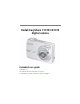
Kodak EasyShare C1013/CD1013 digital camera Extended user guide www.kodak.com For interactive tutorials, www.kodak.com/go/howto For help with your camera, www.kodak.
Eastman Kodak Company Rochester, NY 14650 © Eastman Kodak Company, 2008 All screen images are simulated. Kodak, EasyShare, and Perfect Touch are trademarks of Eastman Kodak Company.
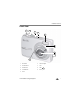
Product features Front view 1 2 3 4 5 6 7 8 9 1 Mode dial 6 Self-timer light 2 Shutter button 7 Lens 3 Flash button 8 USB 4 On/Off button 9 Microphone 5 Flash www.kodak.
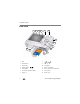
Product features Back view 1 2 3 4 5 6 7 8 9 14 10 13 12 11 optional 1 LCD 8 2 3 4 5 6 7 Review button Menu button LCD/Info button Delete button Zoom button (Telephoto/Wide) Strap post 9 10 11 12 13 14 ii OK button Share button Battery compartment Slot for optional SD or SDHC card Dock connector Tripod socket www.kodak.
Table of contents 1 1 Setting up your camera .........................................................................1 Attaching the strap ....................................................................................... 1 Loading the battery ....................................................................................... 1 Turning on the camera .................................................................................. 2 Setting the language, date/time................................
Table of contents Customizing your camera ............................................................................ 27 Using exposure compensation to adjust picture brightness ........................... 29 Using the framing grid to compose a picture................................................ 30 Sharing your pictures................................................................................... 30 5 Transferring and printing pictures .......................................................
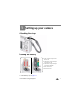
1 Setting up your camera Attaching the strap Loading the battery • Kodak oxy-alkaline digital camera batteries AA • Kodak Ni-MH rechargeable digital camera batteries AA • Kodak Ni-MH rechargeable digital camera battery KAA2HR • alkaline batteries AA • lithium batteries AA To extend battery life, see page 51. www.kodak.
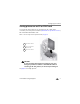
Setting up your camera Turning on the camera Setting the language, date/time 1 2 1 Language: to change. OK to accept. Date/Time: At the prompt, press OK. 2 to change. for previous/next field. OK to accept. NOTE: To change the date/time and language in the future, use the Menu button (page 27). 2 www.kodak.
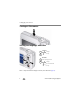
Setting up your camera Storing pictures on an SD or SDHC card Your camera has internal memory. You can purchase an SD or SDHC card to conveniently store more pictures and videos (www.kodak.com/go/c1013accessories). We recommend Kodak SD/SDHC cards. NOTE: To choose a storage location for pictures and videos, see page 27. 1 Turn off the camera. 2 Insert or remove the optional card. 3 Turn on the camera. CAUTION: A card can only be inserted one way; forcing it may cause damage.
2 Taking pictures/videos Taking a picture 1 2 Press the Shutter button halfway to focus and set exposure. When the framing marks turn green, press the Shutter button completely down. Framing marks Reviewing the picture just taken After you take a picture or video, the LCD displays a quickview for approximately 10 seconds. (To exit the quickview sooner, press the Shutter button halfway.) The picture is saved unless you press the Delete button. Delete Play a video.
Taking pictures/videos Using the framing marks to take pictures Framing marks indicate the camera focus area. The camera attempts to focus on foreground subjects, even if the subjects are not centered in the scene. Framing marks 1 Press the Shutter button halfway. When the framing marks turn green, focus is accomplished. 2 If the camera is not focusing on the desired subject (or if the framing marks disappear), release the Shutter button and recompose the scene.
Taking pictures/videos Using optical zoom Use optical zoom to get up to 3X closer to your subject. 1 Use the LCD to frame your subject. 2 Press Telephoto (T) to zoom in. Press Wide Angle (W) to zoom out. The zoom indicator shows zoom status. 3 Take the picture or video. NOTE: For focus distances, see Camera specifications, page 46. Optical zoom range W T ■ Always use the auto focus framing marks (see page 5).
Taking pictures/videos Using the flash Use the flash when you take pictures at night, indoors, or outdoors in heavy shadows. button repeatedly to scroll Press the through flash modes (see Flash modes below). The current flash mode appears in the LCD screen. Flash-to-subject distance Zoom position Flash distance Wide angle 0.6–3.2 m (2–10.5 ft) @ ISO 160 Telephoto 0.6–1.8 m (2–5.9 ft) @ ISO 160 Flash modes Flash fires Auto Flash When the lighting conditions require it.
Taking pictures/videos Using different picture-taking modes Choose the mode that best suits your subjects and surroundings. Use this mode For SCN Scene Point-and-shoot simplicity when taking pictures under special conditions. (See page 8.) Close-up Close range. Use available light instead of flash if possible. The camera automatically sets the focus distance depending on the zoom position. Landscape Far-away scenes. The camera uses infinity auto-focus.
Taking pictures/videos If the mode description turns off before you finish reading it, press OK. 3 Press OK to choose a Scene mode. Use this For SCN mode Portrait Night Portrait Night Landscape Sports Snow Beach Text/ Document Backlight Manner/ Museum Fireworks High ISO Children Flower SelfPortrait Sunset Full-frame portraits of people. Reducing red eye of people in night scenes or low-light conditions. Place the camera on a flat, steady surface or use a tripod. Distant scenery at night.
Taking pictures/videos Using camera Help To better understand each menu option, use camera Help. Highlight a menu choice, then press the button. Turn on/off Help Scroll up/down 10 www.kodak.
Taking pictures/videos Understanding the picture-taking icons Flash Self-timer Date stamp Picture size Pictures/time remaining Storage location Zoom: Wide Telephoto Digital Exposure metering White balance ISO speed Low battery Camera mode Exposure compensation In capture mode—shutter pressed halfway Tag name Auto Exposure/ Auto Focus warning Low battery Exposure compensation www.kodak.
3 Working with pictures/videos Reviewing pictures/videos Press the Review button to view and work with your pictures/videos. Press Review again to exit. 1 Press the Review button. 2 Press to view previous/next picture/video. To save battery power, use an optional Kodak EasyShare dock. (Visit www.kodak.com/go/c1013accessories.) Review NOTE: Pictures taken at a 3:2 picture size have a black bar at the top and bottom. Pictures taken at 16:9 picture size have a black bar at the sides.
Working with pictures/videos Playing videos 1 Press the Review button. 2 Press Playback speed 4X 2X 1X 2X Reverse 4X Forward to find previous/next video. Press to play/pause. Press during playback to play at 2X, 4X. Press to reverse at 2X, 4X. NOTE: To hear audio, transfer the video to your computer (see page 35). Viewing thumbnails (multi-up) 1 Press the Review button. 2 Press W (Wide Angle Zoom) to change from single-picture view to multi-up thumbnails.
Working with pictures/videos Deleting pictures/videos 1 Press the Review button. 2 Press to find previous/next picture/video. 3 Press the Delete button. 4 Follow the screen prompts. Protecting pictures/videos from deletion 1 Press the Review button. 2 Press to find previous/next picture/video. 3 Press the Menu button. 4 Press to highlight Protect, then press OK. The picture/video is protected and cannot be deleted. The Protect icon with the protected picture/video.
Working with pictures/videos Using the menu button in review 1 Press the Review button, then the Menu button. 2 Press to highlight a setting, then press the OK button. 3 Highlight an option, then press the OK button. Using Kodak Perfect Touch technology Kodak Perfect Touch technology helps ensure better, brighter pictures. 1 Press the Review button, then to find previous/next picture. 2 Press the Menu button. Press to highlight Edit Picture, then press OK. 3 Press to highlight Perfect Touch tech.
Working with pictures/videos Cropping pictures You can crop a picture so that only the desired portion of the picture remains. 1 Press the Review button, then picture. Picture Cropped picture to find a 2 Press the Menu button. Press Edit Picture, then press OK. 3 Press to highlight to highlight Crop, then press OK. 4 Press Telephoto (T) to zoom in, or to move the crop box. Press OK. 5 Follow the screen prompts. The picture is cropped and saved as a new one. The original is saved.
Working with pictures/videos Editing videos Making a picture from a video You can choose a single frame from a video, then make a picture suitable for printing. Video Picture 1 Press the Review button, then to find a video. 2 Press the Menu button. Press Edit Video, then press OK. to highlight 3 Press press OK. to highlight Make Picture, then 4 Press OK to select a video frame. 5 Follow the screen prompts to save the picture. A picture is created. (The original video is saved.
Working with pictures/videos Making a video action print From a video, you can make a 4-, 9-, or 16-up picture, suitable for a 4 x 6-inch (10 x 15 cm) print. 1 Press the Review button, then video. Video 4-, 9-, or 16-up picture 2 Press the Menu button. Press Edit Video, then press OK. 3 Press press OK. to find a to highlight to highlight Video Action Print, then 4 Choose an option, then press OK. Auto options: The camera includes the first and last frames, then 2, 7, or 14 equally spaced frames.
Working with pictures/videos Changing the slide show display interval The default interval setting displays each picture for 5 seconds. You can set the display interval from 3–60 seconds. 1 On the Slide Show menu, press to highlight Interval, then press OK. 2 Select a display interval. To scroll through the seconds quickly, press and hold . 3 Press OK. The interval setting remains until you change it. Running a continuous slide show loop When you turn on Loop, the slide show is continuously repeated.
Working with pictures/videos Copy pictures/videos: 1 Press the Review button, then the Menu button. 2 Press to highlight Copy, then press OK. 3 Press to highlight an option. 4 Press OK. NOTE: Pictures/videos are copied, not moved. To remove pictures/videos from the original location after copying, delete them (see page 14). Tags that you applied for print, email, and favorites are not copied. Protection settings are not copied. To apply protection to a picture/video, see page 14.
Working with pictures/videos Selecting multiple pictures/videos Use the multi-select feature when you have two or more pictures/videos to print, transfer, delete, etc. Multi-select is used most effectively in Multi-Up mode, page 13. 1 Press the Review button, then picture/video. Selected pictures to find a 2 Press the OK button to select pictures/videos. A check mark appears on the picture. You can now print, transfer, delete, etc. the selected pictures.
Working with pictures/videos Understanding the review icons Pictures Print tag/number of prints Protected Favorite tag Email tag Tag name Scroll arrows Blur warning Kodak Perfect Touch tech. Picture number Image storage location Review mode Videos Protected Favorite tag Email tag Date/Time Video length Video number Image storage location Review mode Scroll arrows 22 www.kodak.
Working with pictures/videos Understanding blur warning icons A picture blur warning icon is displayed during quickview and review. Green—Picture is sharp enough for an acceptable 4 x 6-inch (10 x 15 cm) print. Yellow—Picture may be sharp enough for an acceptable 4 x 6-inch (10 x 15 cm) print or sharpness is not determined. Red—Picture is not sharp enough for an acceptable 4 x 6-inch (10 x 15 cm) print. White—Printability is still being determined. www.kodak.
4 Doing more with your camera Changing picture-taking settings You can change settings to get the best results from your camera. 1 Press the Menu button. 2 Press to highlight a setting, then press OK. 3 Choose an option, then press OK. Press the Menu button to exit the menu. NOTE: To better understand each menu option, use camera Help. Highlight a menu choice, then press the button. Some settings remain until you change them; others, until you change modes or turn off the camera.
Doing more with your camera Press Menu, , and OK to access settings Picture Size Choose a picture resolution. For recommended print sizes, visit: www.kodak.com/go/ printsizes Options 10.1 MP Pictures at the highest resolution, largest file size 8.9 MP (3:2) Printing on EasyShare printer docks and photo printers 7.6 MP (16:9) HDTV format in high resolution 5.0 MP Medium file size 3.1 MP Medium file size 2.
Doing more with your camera Press Menu, , and OK to access settings Options ISO Speed Choose a lower ISO setting in brightly lit scenes; use a higher ISO for Control the camera’s low-light scenes. Choose Auto (default), 80, 100, 200, 400, 800, 1000. sensitivity to light. NOTE: ISO returns to Auto when the camera is set to SCN mode. Unavailable in Video mode. AF Zone Select a large or concentrated area of focus. Multi-zone—evaluates 3 zones to give an even picture focus. Ideal for general picture taking.
Doing more with your camera Customizing your camera Use Setup to customize your camera settings. 1 In any mode, press the Menu button. 2 Press to highlight Setup, then press OK. 3 Press to highlight a setting, then press OK. 4 Choose an option, then press OK. 5 Press the Menu button to exit. NOTE: Press the LCD/Info button for information about camera settings and options. These settings remain until you change them.
Doing more with your camera Press Menu, to highlight Setup, Options then OK to access settings Set Tag Assign tag names to pictures/videos. Select tag name(s) before you take pictures or videos. Then, new pictures/ videos are assigned that tag name(s). See page 32. Clear All Add Tag Delete Tag Exit Tag Name 1 Tag Name 2 Camera Sounds Choose sound effects. All On Shutter Only All Off Auto Power Off 10 minutes Choose inactivity time until camera turns off.
Doing more with your camera Press Menu, to highlight Setup, Options then OK to access settings About View camera information. Using exposure compensation to adjust picture brightness Before you take a picture, you can adjust exposure compensation to make pictures darker or lighter. ■ Press to decrease exposure compensation. ■ Press to increase exposure compensation. The exposure compensation level is shown on the LCD; the LCD gets brighter or dimmer. www.kodak.
Doing more with your camera Using the framing grid to compose a picture The framing grid divides the LCD into thirds—vertically and horizontally. This is helpful if, for example, you want to balance a picture between water, earth, and sky. To turn on the framing grid in Auto/SCN modes, press the LCD/Info button until the grid appears. Sharing your pictures Press the Share button to tag your pictures and videos. When they are transferred to your computer, you can share them.
Doing more with your camera Printing tagged pictures When you transfer the tagged pictures to your computer, the Kodak EasyShare software print screen opens. For details, click the Help button in EasyShare software. For more information on printing from your computer, printer dock, PictBridge enabled printer, or card, see page 36. NOTE: For the best 4 x 6 in. (10 x 15 cm) prints, set the camera to a 3:2 picture size.
Doing more with your camera Third—transfer and email When you transfer these pictures/videos to your computer, EasyShare software prompts you to send them. For details, see Help in EasyShare software. Tagging pictures/videos with tags that you create Use the Tag feature to create tag names and assign them to pictures/videos. 1 Press the Review button, then find a picture/video. 2 Press the Menu button. 3 Press to highlight Tag, then press OK.
Doing more with your camera Tagging pictures/videos as favorites Tag pictures as favorites 1 Press the Review button. Press to find a picture. 2 Press the Menu button, highlight Favorite, then press OK. The Favorite icon appears in the status area. To remove the tag, press OK again. View favorites on your camera 1 Press the Review button, then the Menu button. 2 Choose View By, then Favorites. www.kodak.
5 Transferring and printing pictures Installing the software CAUTION: Install EasyShare software before connecting the camera to the computer. Failure to do so may cause the software to load incorrectly. 1 Close all software applications that are open on your computer (including anti-virus software). 2 Place the EasyShare software CD into the CD-ROM drive. 3 Load the software: Windows OS—if the install window does not appear, choose Run from the Start menu and type d:\setup.
Transferring and printing pictures Transferring pictures with the USB cable 1 Turn off the camera. 2 Connect the USB cable (U-8). 3 Turn on the camera. Kodak EasyShare software opens on your computer and prompts you through the transfer process. NOTE: Visit www.kodak.com/go/howto for an online tutorial on connecting. Also available for transferring You can also use these Kodak products to transfer your pictures and videos.
Transferring and printing pictures Printing pictures Direct printing with an EasyShare all-in-one printer Your camera is compatible with PictBridge technology, so you can print directly to PictBridge enabled printers. You need a camera with fully charged battery, a PictBridge enabled printer, and a USB cable. Connecting the camera to an EasyShare all-in-one printer 1 Turn off the camera and printer. 2 Connect the appropriate USB cable from the camera to the printer.
Transferring and printing pictures Disconnecting the camera from an EasyShare all-in-one printer 1 Turn off the camera and printer. 2 Disconnect the USB cable from the camera and the printer. Using a printer that is not PictBridge enabled After you transfer pictures from the camera to your computer, you can print them from EasyShare software. For details, see Help in EasyShare software. Ordering prints online Kodak Gallery (www.kodakgallery.
Transferring and printing pictures Dock compatibility for your camera To see which Kodak EasyShare docks are compatible with your camera, visit www.kodak.com/go/dockcompatibility. Purchase camera docks, printer docks, and other accessories at a dealer of Kodak products or visit www.kodak.com/go/c1013accessories. 38 www.kodak.
6 Troubleshooting For step-by-step product support, visit www.kodak.com/go/c1013support and select Interactive Troubleshooting & Repairs. Camera problems If... Try one or more of the following Camera does not turn on. ■ Install new batteries (see page 1). Camera does not turn off. ■ Remove the battery, then reinsert or replace it. If the camera still does Pictures remaining number does not decrease after taking a picture. Short battery life with Kodak Ni-MH rechargeable digital camera batteries.
Troubleshooting If... Try one or more of the following In Review mode, a blue or black screen is displayed instead of a picture. Shutter button does not work. ■ Transfer the picture to the computer (see page 35). ■ Take another picture. If problem continues, try internal memory and/or another memory card. ■ Turn on the camera (see page 2).
Troubleshooting If... Try one or more of the following Memory card full. ■ Insert a new card (see page 3). ■ Transfer pictures to the computer (see page 35). ■ Delete pictures/videos (see page 14). Memory card and ■ Transfer pictures to the computer (see page 35). internal memory ■ Delete pictures/videos (see page 14), or insert a new card full. (see page 3). Camera/computer communications If... Try one or more of the following The computer does ■ Visit www.kodak.com/go/c1013support.
Troubleshooting LCD screen messages If... Try one or more of the following No images to display Memory card requires formatting Memory card cannot be read (Please format memory card or insert another card) Only one USB connection allowed. Disconnect cable or remove camera from dock.
Troubleshooting If... Try one or more of the following Memory card is locked (Insert new memory card) Read-only memory card. Remove write protection to capture or write to card. Memory card is unusable (Insert new memory card) Date and time have been reset No address book on camera (Connect with computer to import address book) High camera temperature. (Camera will be turned off.) Unrecognized file format Camera error #XXXX. See user’s guide.
7 Getting help Helpful links Camera Email, write, or phone customer support Get support for your product (FAQs, troubleshooting information, arrange for repairs, etc.) Purchase camera accessories (camera docks, printer docks, lenses, cards, etc.) Download the latest camera firmware and software See online demonstrations of your camera www.kodak.com/go/contact www.kodak.com/go/c1013support www.kodak.com/go/c1013accessories www.kodak.com/go/c1013downloads www.kodak.
Getting help NOTE: If you have questions concerning this product, you may speak with Kodak customer support.
8 Appendix Camera specifications For more specifications, visit www.kodak.com/go/c1013support. CCD—1/2.33 in. CCD, 4:3 aspect ratio; 10.3 MP (total), 10.3 MP (effective) Picture sizes— C1013/CD1013 10.1 MP: 3664 x 2748 pixels 8.9 MP (3:2): 3664 x 2442 pixels 7.6 MP (16:9): 3664 x 2062 pixels 5.0 MP: 2592 x 1944 pixels 3.1 MP: 2048 x 1536 pixels 2.2 MP (3:2): 1800 x 1200 pixels 2.1 MP (16:9): 1920 x 1080 pixels 1.2 MP: 1280 x 960 pixels Color display—6.1 cm (2.4 in.
Appendix Focus system—TTL-AF; selectable multi-zone AF, center-zone AF. Working range: 0.6 m (2 ft)–infinity @ normal 0.13–0.7 m (5–28 in.) @ close-up/macro, wide 0.22–0.7 m (8.7–28 in.) @ close-up/macro, tele 10 m (32.8 ft)–infinity @ Landscape Exposure metering—Multi-pattern, Center-weight, Center-spot Exposure compensation—+/-2.0 EV with 0.5 EV steps Shutter speed—Auto: 1/2–1/1400 sec. ISO speed—Auto: 64–160, (Blur Reduction, High ISO: 800) Manual: 80, 100, 200, 400, 800, 1000 Electronic flash—Guide no.
Appendix Communication with computer—USB 2.0 HIgh Speed (PIMA 15740 protocol), via USB cable model U-8, EasyShare camera dock or printer dock PictBridge support—Yes Self Timer—2 seconds, 10 seconds, or 2-shot White balance—Auto, Daylight, Tungsten, Fluorescent, Open Shade Auto power off—Selectable 1, 3, 5, 10 minutes Microphone—Yes (for audio recording at Video mode) Color modes—Color, Black & White, Sepia Tripod mount—1/4 inch Operating temperature—32–104°F (0–40°C) Size—91.1 mm (3.6 in.) x 62.2 mm (2.
Appendix Upgrading your software and firmware Download the latest versions of the software included on the Kodak EasyShare software CD and the camera firmware (the software that runs on the camera). Visit www.kodak.com/go/c1013downloads. Storage capacities The LCD displays the approximate number of pictures (or minutes/seconds of video) remaining. For average SD/SDHC card capacities, visit www.kodak.com/go/SDcapacities.
Appendix ■ Use only batteries approved for this product to avoid risk of explosion. ■ Keep batteries out of the reach of children. ■ Do not allow batteries to touch metal objects, including coins. Otherwise, a battery may short circuit, discharge energy, become hot, or leak. ■ Do not disassemble, install backward, or expose batteries to liquid, moisture, fire, or extreme temperature. ■ Remove the battery when the product is stored for an extended period of time.
Appendix Extending battery life ■ See Auto Power Off (see page 28). ■ Limit the following activities that quickly deplete battery power: – Reviewing your pictures on the LCD (see page 12) – Excessive use of the flash ■ Dirt on the battery contacts can affect battery life. Wipe the contacts with a clean, dry cloth before loading batteries in the camera. ■ Battery performance is reduced at temperatures below 41° F (5° C).
Appendix used in making repairs, those parts may be remanufactured, or may contain remanufactured materials. If it is necessary to replace the entire Product, it may be replaced with a remanufactured Product. Remanufactured Products, parts, and materials are warranted for the remaining warranty term of the original Product, or 90 days after the date of repair or replacement, whichever is longer. Limitations This warranty does not cover circumstances beyond Kodak’s control.
Appendix Your rights Some states or jurisdictions do not allow exclusion or limitation of incidental or consequential damages, so the above limitation or exclusion may not apply to you. Some states or jurisdictions do not allow limitations on how long an implied warranty lasts, so the above limitation may not apply to you. This warranty gives you specific rights, and you may have other rights which vary from state to state or by jurisdiction.
Appendix or relocate the receiving antenna; 2) increase the separation between the equipment and the receiver; 3) connect the equipment to an outlet on a circuit different from that to which the receiver is connected; 4) consult the dealer or an experienced radio/TV technician for additional suggestions. Any changes or modifications not expressly approved by the party responsible for compliance could void the user’s authority to operate the equipment.
Appendix China RoHS VCCI Class B ITE Russian GOST-R Eastman Kodak Company Rochester, NY 14650 AIO-40 www.kodak.
1 Index A about picture, video, 13 about this camera, 29 accessories, 35 battery, 51 buying, 44 SD/SDHC card, 3 appendix, 46 auto, 8 flash, 7 focus framing marks, 5 B backlight, 9 battery compartment, ii extending life, 51 loading, 1 types, 47 beach, 9 blur, 23 blur warning, 28 button delete, ii, 4 flash/status, 7 LCD/info, ii menu, ii ok, ii on/off, i review, ii, 12 share, ii shutter, i 56 zoom, ii, 6 C cable, USB, 35 camera sounds, 28 caring for your camera, 48 children, 9 clock, setting, 2 color mode,
Index displaying slide show, 18 disposal, recycling, 48, 54 dock compatibility, 37, 38 connector, ii doing more with your camera, 24 download pictures, 34 E EasyShare software installing, 34 emailing pictures, videos, 31 exposure compensation, 29 F face detection, 25 favorites tagging, 33 filter pictures, videos, 20 fireworks, 9 firmware, upgrading, 49 flash settings, 7 flower, 9 focus framing marks, 5 zone, 26 format, 28 framing grid, 30 G grid, framing, 30 guidelines, battery, 51 www.kodak.
Index batteries, 1 SD/SDHC card, 3 software, 34 M Macintosh computers, installing software on, 34 maintenance, camera, 48 manner/museum, 9 memory inserting card, 3 storage capacities, 49 menu button, ii microphone, i mode dial, i, 8 modes auto, 8 backlight, 9 beach, 9 children, 9 fireworks, 9 flower, 9 high ISO, 9 manner/museum, 9 night landscape, 9 night portrait, 9 portrait, 9 SCN, 8 self-portrait, 9 snow, 9 sports, 9 sunset, 9 text/document, 9 multiple selections, 21 58 N night landscape, 9 night portr
Index PictBridge, 36 tagged pictures, 37 problem-solving, 39 protecting pictures, videos, 14 Q quickview, using, 4 R recycling, disposal, 48, 54 red-eye, flash, 7 regulatory information, 53 repair, 44 review button, ii, 12 reviewing pictures as you take them, 4 deleting, 14 LCD, 12 protecting, 14 slide show, 18 reviewing videos deleting, 14 LCD, 12 protecting, 14 slide show, 18 rotating pictures, 16 running slide show, 18 S scene modes, 8 SCN, 8 SD/SDHC card inserting, 3 printing from, 37 storage capacitie
Index snow, 9 software installing, 34 upgrading, 49 sounds, 28 specifications, camera, 46 sports, 9 status blur, 23 storage capacity, 49 strap post, ii sunset, 9 support, technical, 44, 45 T tag favorites, 33 for email, 31 for print, 31 tags set, 28 telephone support, 45 text/document, 9 time, setting, 2 tips care & maintenance, 48 transferring pictures, videos, 34 trash can, deleting, 4 tripod socket, ii troubleshooting, 39 turning camera on and off, 2 U upgrading software, firmware, 49 60 URLs, Kodak we
Index digital, 6 optical, 6 zoom button, ii www.kodak.