ENGLISH urg_00776.book Page 1 Friday, February 19, 2010 12:18 PM Installing the software Before connecting any cables, install the software that was included with your camera. Follow the on-screen instructions. After installing the software, return to this Getting Started Guide.
urg_00776.book Page 2 Friday, February 19, 2010 12:18 PM ENGLISH Turning on the camera Setting the language, date/time 1 2 1 Language: to change. OK to accept. Date/Time: At the prompt, press OK. 2 to change. for previous/next field. OK 2 to accept. www.kodak.
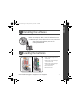
ENGLISH urg_00776.book Page 3 Friday, February 19, 2010 12:18 PM Taking a picture/video Pictures 1 Videos 1 2 2 Framing brackets Press the Shutter button halfway to focus and set exposure. When the framing brackets turn green, press the Shutter button completely down. Press the Shutter button completely down and release. To stop recording, press and release the Shutter button again. www.kodak.
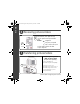
urg_00776.book Page 4 Friday, February 19, 2010 12:18 PM ENGLISH Reviewing pictures/videos Review 1 Press Review. (Press again to exit.) 2 for previous/next picture/video. Play/pause Videos: Play at 2X, 4X speed Play in reverse at 2X, 4X To hear audio, transfer the video to your computer. Transferring pictures/videos USB cable Kodak EasyShare printer dock or camera dock (May be sold separately.) For dock compatibility, visit www.kodak.com/go/dockcompatibility.
Keep learning about your camera! Congratulations! You have: • set up your camera • taken pictures • transferred pictures to your computer Keep learning! Finish reading this book, so you can take and share your best pictures! To better understand each menu option, use camera Help. (Highlight a menu choice, then press the button.) Visit www.kodak.com/go/c713support or www.kodak.
urg_00776.book Page 6 Friday, February 19, 2010 12:18 PM ENGLISH Front view 1 2 3 4 5 6 7 8 9 1 Mode dial 6 Self-timer light 2 Shutter button 7 Lens 3 Flash button 8 USB 4 On/Off button 9 Microphone 5 Flash 6 www.kodak.
ENGLISH urg_00776.book Page 7 Friday, February 19, 2010 12:18 PM Back view 2 3 4 5 6 1 7 8 9 14 10 13 12 11 optional 1 LCD 8 2 Review button 9 3 Menu button 10 Share button OK button 4 LCD/Info button 11 Battery compartment 5 Delete button 12 Slot for optional SD card 6 Zoom button (Telephoto/Wide) 13 Dock connector 7 Strap post 14 Tripod socket www.kodak.
urg_00776.book Page 8 Friday, February 19, 2010 12:18 PM 1 Doing more with your camera Storing pictures on an SD card Your camera has internal memory. You can purchase an SD card to store more pictures and videos (www.kodak.com/go/c713accessories, www.kodak.com/go/c813accessories). We recommend Kodak SD cards. 1 Turn off the camera. 2 Insert or remove the optional card. 3 Turn on the camera. CAUTION: A card can only be inserted one way; forcing it may cause damage.
urg_00776.book Page 9 Friday, February 19, 2010 12:18 PM Doing more with your camera Using the zoom button Use optical zoom to get up to 3X closer to your subject. 1 Use the LCD to frame your subject. 2 Press Telephoto (T) to zoom in. Press Wide Angle (W) to zoom out. The zoom indicator shows zoom status. 3 Take the picture or video. NOTE: To get a focused picture every time, remember: ■Always W use the auto focus framing marks.
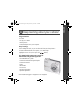
urg_00776.book Page 10 Friday, February 19, 2010 12:18 PM Doing more with your camera Using the flash button Use the flash when you take pictures at night, indoors, or outdoors in heavy shadows. button repeatedly to scroll Press the through flash modes (see Flash modes below). The current flash mode appears in the LCD screen. Flash Distance Wide angle: 0.6–3.6 m (2–11.8 ft) @ ISO 200 Telephoto: 0.6–2.1 m (2–6.9 ft) @ ISO 200 Flash modes Flash fires Auto Flash When the lighting conditions require it.
urg_00776.book Page 11 Friday, February 19, 2010 12:18 PM Doing more with your camera Using different picture-taking modes Choose the mode that best suits your subjects and surroundings. Use this mode SCN For Auto General picture taking—offers an excellent balance of image quality and ease of use. Digital Image Stabilization Minimizing the effects of camera shake and subject movement. Close-up Close range. Use available light instead of flash if possible.
urg_00776.book Page 12 Friday, February 19, 2010 12:18 PM Doing more with your camera Scene modes Choose a Scene mode—for great pictures in practically any situation! 1 Turn the Mode dial to Scene . 2 Press to display Scene mode descriptions. If the mode description turns off before you finish reading it, press OK. 3 Press OK to choose a Scene mode. Use this For SCN mode Portrait Night Portrait Full-frame portraits of people. Reducing red eye of people in night scenes or low-light conditions.
urg_00776.book Page 13 Friday, February 19, 2010 12:18 PM Doing more with your camera Use this For SCN mode Manner/ Museum Fireworks High ISO Children Flower SelfPortrait Sunset Quiet occasions, like a wedding or lecture. Flash and sound are disabled. Bright, colorful light displays. Flash does not fire. Place the camera on a flat, steady surface or use a tripod. People indoors, in low-light scenes. Minimizes red eye. Action pictures of children in bright light.
urg_00776.book Page 14 Friday, February 19, 2010 12:18 PM Doing more with your camera Using camera Help To better understand each menu option, use camera Help. Highlight a menu choice, then press the button. Turn on/off Help Scroll up/down Understanding the picture-taking icons Flash Self-timer Date stamp Picture size Pictures/time remaining Storage location Zoom: Wide Telephoto Digital Exposure metering White balance ISO speed Low battery Camera mode Exposure compensation 14 www.kodak.
urg_00776.book Page 15 Friday, February 19, 2010 12:18 PM 2 Working with pictures/videos Magnifying pictures 1 Press the Review button. 2 Press W/T to magnify 2X–8X. 3 Press 4 Press OK to return to 1X. to view other parts of the picture. Deleting pictures/videos 1 2 Press the Review button. View previous/next. 3 Press the Delete button. 4 Follow the screen prompts. www.kodak.
urg_00776.book Page 16 Friday, February 19, 2010 12:18 PM Working with pictures/videos Using Kodak Perfect Touch technology Kodak Perfect Touch technology helps ensure better, brighter pictures. 1 Press the Review button, then for previous/next picture. 2 Press the Menu button. Press to highlight Edit Picture, then press OK. 3 Press to highlight Perfect Touch tech., then press OK. The enhancement is previewed in a split screen. Press to view other parts of the picture. 4 Press OK.
urg_00776.book Page 17 Friday, February 19, 2010 12:18 PM Working with pictures/videos Cropping pictures You can crop a picture so that only the desired portion of the picture remains. Picture Cropped picture 1 Press the Review button, then picture. to find a 2 Press the Menu button. Press Edit Picture, then press OK. to highlight 3 Press 4 Press Telephoto (T) to zoom in, or to highlight Crop, then press OK. to move the crop box. Press OK. 5 Follow the screen prompts. The picture is cropped.
urg_00776.book Page 18 Friday, February 19, 2010 12:18 PM Working with pictures/videos Editing videos Making a picture from a video You can choose a single frame from a video, then make a picture suitable for printing. Video Picture 1 Press the Review button, then to find a video. 2 Press the Menu button. Press Edit Video, then press OK. to highlight 3 Press OK. to highlight Make Picture, then press 4 Press OK to select a video frame. 5 Follow the screen prompts to save the picture.
urg_00776.book Page 19 Friday, February 19, 2010 12:18 PM Working with pictures/videos Making a video action print From a video, you can make a 4-, 9-, or 16-up picture, suitable for a 4 x 6-inch (10 x 15 cm) print. Video 4-, 9-, or 16-up picture 1 Press the Review button, then to find a video. 2 Press the Menu button. Press Edit Video, then press OK. to highlight 3 Press press OK. to highlight Video Action Print, then 4 Choose an option, then press OK.
urg_00776.book Page 20 Friday, February 19, 2010 12:18 PM Working with pictures/videos Understanding the review icons Pictures Print tag/number of prints Protected Favorite tag Email tag Blur warning Kodak Perfect Touch tech. Picture number Image storage location Album Scroll arrows Review mode Videos Protected Favorite tag Email tag Date/Time Video length Video number Image storage location Review mode Scroll arrows 20 www.kodak.
urg_00776.book Page 21 Friday, February 19, 2010 12:18 PM 3 Solving camera problems Camera problems For step-by-step product support, visit www.kodak.com/go/c713support, www.kodak.com/go/c813support and select Interactive Troubleshooting & Repairs. If Try one or more of the following Camera does not turn on. ■ Install new batteries (see page 1). ■ Charge rechargeable batteries. Camera does not turn off. ■ Remove the battery, then reinsert or replace it. If the camera still does not function, visit www.
urg_00776.book Page 22 Friday, February 19, 2010 12:18 PM 4 Appendix CAUTION: Do not disassemble this product; there are no user-serviceable parts inside. Refer servicing to qualified service personnel. Kodak AC adapters and battery chargers are intended for indoor use only. The use of controls, adjustments, or procedures other than those specified herein may result in exposure to shock and/or electrical or mechanical hazards. If the LCD breaks, do not touch the glass or liquid.
urg_00776.book Page 23 Friday, February 19, 2010 12:18 PM Appendix Upgrading your software and firmware Download the latest versions of the software included on the Kodak EasyShare software CD and the camera firmware (the software that runs on the camera). See www.kodak.com/go/c713downloads, www.kodak.com/go/c813downloads.
urg_00776.book Page 24 Friday, February 19, 2010 12:18 PM Appendix replacement, or refund is Kodak's only obligation. Kodak will not be responsible for any special, consequential or incidental damages resulting from the sale, purchase, or use of this product regardless of the cause.
urg_00776.book Page 25 Friday, February 19, 2010 12:18 PM Appendix MPEG-4 Use of this product in any manner that complies with the MPEG-4 visual standard is prohibited, except for use by a consumer engaging in personal and non-commercial activities. Canadian DOC statement DOC Class B Compliance—This Class B digital apparatus complies with Canadian ICES-003. Observation des normes-Classe B—Cet appareil numérique de la classe B est conforme à la norme NMB-003 du Canada.
urg_00776.book Page 26 Friday, February 19, 2010 12:18 PM Appendix China RoHS Eastman Kodak Company Rochester, New York 14650 © Eastman Kodak Company, 2007 Kodak, EasyShare, and Perfect Touch are trademarks of Eastman Kodak Company. 2F6597_en 26 www.kodak.