Kodak EasyShare C533/C503 zoom digital camera User’s guide www.kodak.com For interactive tutorials, www.kodak.com/go/howto For help with your camera, www.kodak.com/go/c533support or www.kodak.
Eastman Kodak Company Rochester, New York 14650 © Eastman Kodak Company, 2005 All screen images are simulated. Kodak and EasyShare are trademarks of Eastman Kodak Company.
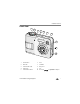
Product features Front view 1 2 3 4 5 6 7 8 9 10 1 Shutter button 6 Flash 2 Mode dial 7 Viewfinder 3 Self-timer/Video light 8 Microphone 4 Flash button 9 Lens 5 Self-timer/Burst button 10 DC-In (3V) www.kodak.
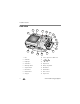
Product features Back view 2 3 4 1 5 6 7 8 9 10 11 12 18 ii 17 13 16 15 14 1 LCD 10 Slot for optional SD or MMC card 2 Viewfinder 11 3 Ready light 12 OK button 4 Share button 13 USB, A/V Out 5 Wide angle button 14 Battery compartment 6 Telephoto button 15 Menu button 7 Delete button 16 Review button 8 LCD/Info button 17 Dock connector 9 Strap post 18 Tripod socket www.kodak.
Table of contents 1 1 Setting up your camera .........................................................................1 Attaching the strap ....................................................................................... 1 Loading the battery ....................................................................................... 1 Turning on the camera .................................................................................. 2 Setting the language, date/time................................
Table of contents 5 Troubleshooting ..................................................................................35 Camera problems........................................................................................ 35 Camera ready light status............................................................................ 37 Camera/computer communications.............................................................. 38 LCD screen messages ..............................................................
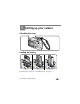
1 Setting up your camera Attaching the strap Loading the battery Ni-MH (rechargeable) CRV3 lithium (non-rechargeable) 2 AA (rechargeable or non-rechargeable) For battery types, see page 46. To extend battery life, see page 50. www.kodak.
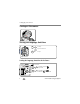
Setting up your camera Turning on the camera Setting the language, date/time 1 to change. for previous/next field. 2 OK to accept. OK (press) Setting the language, date/time in the future 1 2 Press Menu. 2 to highlight Setup Menu then press OK. 3 to highlight Language or Date/Time , then press OK. www.kodak.
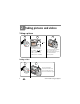
Setting up your camera Storing pictures on an SD or MMC card Your camera has 16 MB of internal memory. You can purchase an SD or MMC card to conveniently store more pictures and videos. NOTE: When using the card for the first time, format it in this camera before taking pictures (see Format on page 25). We recommend Kodak SD or MMC cards. Notched corner SD or MMC card (optional) CAUTION: A card can only be inserted one way; forcing it may cause damage.
2 Taking pictures and videos Taking a picture 1 2 3 LCD/Info Use the LCD or viewfinder. Press LCD/Info for: • LCD on, status icons on • LCD on, status icons off • LCD off (use the viewfinder) Press the Shutter button halfway to focus and set exposure. When the Ready light turns green, press the Shutter button completely down. Taking a video 1 2 Press the Shutter button completely down and release. To stop recording, press and release the Shutter button again. 4 www.kodak.
Taking pictures and videos Reviewing the picture or video just taken After you take a picture or video, the LCD displays a quickview for approximately 5 seconds. Tag a picture/video for email or as a favorite, or tag a picture for print. If you press no buttons, the picture/ video is saved. Delete Play a video. adjust the volume on your Video Out device.) ( To review pictures and videos anytime, see page 8.
Taking pictures and videos In capture mode—shutter pressed halfway Auto Exposure/ Auto Focus warning Low battery Exposure compensation Using the auto-focus framing marks (to take pictures) When using the LCD as a viewfinder, framing marks indicate the camera focus area. The camera attempts to focus on foreground subjects, even if the subjects are not centered in the scene. 1 Press the Shutter button halfway. When the framing marks turn green, focus is accomplished.
Taking pictures and videos 2 If the camera is not focusing on the desired subject (or if the framing marks disappear), release the Shutter button, recompose the scene, and repeat step 1. 3 Press the Shutter button completely down to take the picture. NOTE: Framing marks do not appear in Landscape or Video mode. When you use Focus Zone (see page 22) and set Center Zone, the framing marks are fixed at Center Wide.
Taking pictures and videos Reviewing pictures and videos on your camera Press the Review button to view and work with your pictures and videos. Videos: OK Play/pause. 2 1 for previous/next. Rewind to beginning (during playback). Next picture/video (during playback). Review. (Press again to exit.) To save battery power, use an optional Kodak EasyShare dock or Kodak 3-volt AC adapter. (See www.kodak.com/go/c533accessories or www.kodak.com/go/c503accessories.) NOTE: Pictures taken at the 4.
Taking pictures and videos Understanding review icons Pictures Print tag/number of prints Favorite tag Picture number Image storage location Email tag Protected Review mode Scroll arrows Videos Video number Video length Favorite tag Image storage location Playback time counter Email tag Volume control (for Video Out device) Date/Time Review mode Scroll arrows www.kodak.com/go/support view single picture.
Taking pictures and videos Deleting pictures and videos during review 1 Press Review. 2 for previous/next. 3 Press Delete. 4 Follow the screen prompts. Using the undo delete feature If you accidentally delete a picture, you can use Undo Delete to retrieve it. This feature is only available immediately after you delete a picture. NOTE: You cannot use Undo Delete if your picture is larger than 20 MB. Protecting pictures and videos from deletion 1 Press Review. 2 for previous/next. 3 Press Menu.
3 Transferring and printing pictures Installing the software CAUTION: Install EasyShare software before connecting the camera to the computer. Failure to do so may cause the software to load incorrectly. 1 Close all software applications that are open on your computer (including anti-virus software). 2 Place the EasyShare software CD into the CD-ROM drive. 3 Load the software: Windows OS—if the install window does not appear, choose Run from the Start menu and type d:\setup.
Transferring and printing pictures Transferring pictures with the USB cable 1 Turn off camera. 2 Connect USB cable (U-8). 3 Turn on camera. Kodak EasyShare software opens on your computer and prompts you through the transfer process. NOTE: Visit www.kodak.com/go/howto for an online tutorial on connecting. Also available for transferring You can also use these Kodak products to transfer your pictures and videos.
Transferring and printing pictures Direct printing with a PictBridge enabled printer Your camera is compatible with PictBridge technology, so you can print directly to PictBridge enabled printers. You need: ■ Camera with fully charged batteries ■ PictBridge enabled printer ■ USB cable (may be sold separately) Connecting the camera to a PictBridge enabled printer 1 Turn off the camera and printer. 2 Connect the appropriate USB cable from the camera to the printer.
Transferring and printing pictures Disconnecting the camera from a PictBridge enabled printer 1 Turn off the camera and printer. 2 Disconnect the USB cable from the camera and the printer. Using a printer that is not PictBridge enabled For details on printing pictures from your computer, click the Help button in EasyShare software. Ordering prints online Kodak EasyShare Gallery (www.kodakgallery.com) is one of the many online print services offered in the Kodak EasyShare software.
Transferring and printing pictures Dock compatibility for your camera Kodak EasyShare dock Docking configuration ■ printer dock plus series 3 Custom dock insert ■ printer docks and camera docks series 3 Dock ■ printer dock Custom dock insert ■ printer dock plus ■ printer dock 6000 ■ camera dock 6000 Kodak dock adapter kit D-22 Dock ■ printer dock 4000 Not compatible ■ camera dock II ■ LS420, LS443 camera dock Purchase camera docks, printer docks, and other accessories at a dealer of Kodak pro
4 Doing more with your camera Using optical zoom Use optical zoom to get up to 3X closer to your subject. Optical zoom is effective when the lens is no closer than 24 in. (60 cm) to the subject or 5 in. (12.7 cm) in Close-up mode. You can change optical zoom before (but not during) video recording. 1 Use the viewfinder or LCD to frame your subject. 2 Press Telephoto (T) to zoom in. Press Wide Angle (W) to zoom out. The zoom indicator shows zoom status.
Doing more with your camera Picture-taking modes Choose the mode that best suits your subjects and surroundings. Use this mode Auto For General picture-taking—offers an excellent balance of image quality and ease of use. Landscape Far-away scenes. The camera uses infinity auto-focus. Auto-focus framing marks are not available in Landscape. Close-up Close range. Use available light instead of flash if possible. The camera automatically sets the focus distance depending on the zoom position.
Doing more with your camera Scene modes 1 Turn the Mode dial to Scene . 2 Press to display Scene mode descriptions. NOTE: If the Help text turns off, press the OK button. 3 Press the OK button to choose a Scene mode. Use this SCN mode For Portrait Full-frame portraits of people. Sport Subjects that are in motion. Children Action pictures of children in bright light. Party People indoors. Minimizes red eye. Beach Bright beach scenes. Snow Bright snow scenes. Fireworks Fireworks displays.
Doing more with your camera Using exposure compensation to adjust brightness In Auto, Landscape, or Close-up mode, you can adjust exposure compensation to make your pictures darker or lighter. Press to decrease exposure compensation and to increase exposure compensation. The exposure compensation level is shown on the LCD dimmer or brighter. , and the LCD gets Using the self-timer 1 Place camera on a tripod or flat surface.
Doing more with your camera Using burst Option Description Purpose Camera takes up to 3 pictures (3 per second) while the Shutter button is pressed. Burst Capture an expected event. Example: A person swinging a golf club. First 3 pictures are saved. 1 In most Still modes, press the Burst button repeatedly to choose an option. 2 Press the Shutter button halfway to focus and set exposure. 3 Press the Shutter button completely down and hold it to take pictures.
Doing more with your camera NOTE: Some settings are unavailable in some modes. Setting Options -2.0 to +2.0 (in 0.5 increments) Exposure Compensation Control how much light enters the camera. This setting remains until you turn the Mode dial. Picture Size Choose a picture resolution. This setting remains until you change it. 5.0 MP (default)—for printing up to 20 x 30 in. (51 x 76 cm); pictures are highest resolution and largest file size. 4.4 MP (3:2)—ideal for printing 4 x 6 in.
Doing more with your camera Setting Options ISO Speed Control the camera’s sensitivity to light. This setting remains until you turn off the camera. Auto (default) ISO 80, 100, 200, 400, 800 (800 available only for smallest picture size setting). Choose a lower ISO setting in brightly lit scenes; use a higher ISO for low-light scenes. NOTE: ISO returns to Auto during Long Time Exposure. Unavailable in Video mode. Focus Zone Select a large or concentrated area of focus.
Doing more with your camera Setting Options Set Album Choose Album names. This setting remains until you change it. You can apply different Set Album choices to videos and to pictures. On (when Album name is selected) Off Pre-select album names before you take pictures or videos. Then, all the pictures or videos you take are tagged with those album names. See page 29. Image Storage Choose a storage location for pictures/videos. This setting remains until you change it.
Doing more with your camera Customizing your camera Use Setup to customize your camera settings. 1 In any mode, press the Menu button. 2 Press to highlight Setup , then press the OK button. 3 Press to highlight the setting you wish to change, then press the OK button. 4 Choose an option, then press the OK button. 5 Press the Menu button to exit. NOTE: These settings remain until you change them. Setting Options Return to previous menu. Liveview Change liveview default to on or off.
Doing more with your camera Setting Options Video Out NTSC (default)—used in North America and Japan; most common format. Choose the regional setting that lets you connect the camera to a television or other PAL—used in Europe and China. external device (see page 27). Orientation Sensor Orient pictures so that they are displayed with the correct side up. On (default) Off Date Stamp Imprint the date on pictures.
Doing more with your camera Running a slide show Use the Slide Show to display your pictures/videos on the LCD. To run a slide show on a television or on any external device, see page 27. To save battery power, use an optional Kodak 3V AC adapter. (Visit www.kodak.com/go/c533accessories or www.kodak.com/go/c503accessories.) Starting the slide show 1 Press the Review button, then press the Menu button. 2 Press to highlight Slide Show , then press the OK button.
Doing more with your camera 2 Press to highlight On, then press the OK button. The slide show repeats until you press the OK button or until battery power is exhausted. The Loop feature remains until you change it. Displaying pictures and videos on a television You can display pictures/videos on a television, computer monitor, or any device equipped with a video input. (Image quality on a television screen may not be as good as on a computer monitor or when printed.
Doing more with your camera Viewing picture/video information 1 Press Review. 2 Press LCD/Info. To exit Review, press the Review button. Copying pictures and videos You can copy pictures/videos from a card to internal memory or from internal memory to a card. Before you copy, make sure that: ■ A card is inserted in the camera. ■ The camera’s picture storage location is set to the location from which you are copying. (See Image Storage on page 23.
Doing more with your camera Pre-tagging for album names Use the Set Album (Still or Video) feature to pre-select album names before you take pictures or videos. Then, all the pictures or videos you take are tagged with those album names. First—on your computer Use the EasyShare software that was packaged with your camera to create album names on your computer. The next time you connect the camera to the computer, copy up to 32 albums to the album name list. See EasyShare software Help for details.
Doing more with your camera Tagging pictures/videos for albums Use the Album feature in Review mode to tag the pictures/videos in your camera with album names. First—on your computer Use EasyShare software to create albums on your computer, then copy up to 32 album names to the camera’s internal memory. See EasyShare software Help for details. Second—on your camera 1 Press the Review button, then locate the picture or video. 2 Press the Menu button. 3 Press to highlight Album , then press the OK button.
Doing more with your camera ■ Just after you take a picture/video, during quickview. ■ After pressing the Review button. Tagging pictures for printing 1 Press the Share button. Press 2 Press to highlight Print to locate a picture. , then press the OK button.* 3 Press to select the number of copies (0-99). Zero removes the tag for that picture. Optional: You can apply a print quantity to other pictures. Press to locate a picture. Press to change the print quantity.
Doing more with your camera Tagging pictures and videos for emailing First—on your computer Use Kodak EasyShare software to create an email address book on your computer. Then copy up to 32 email addresses to the camera’s internal memory. For details, click the Help button in EasyShare software. Second—tag pictures/videos on your camera 1 Press the Share button. Press to locate a picture/video. 2 Press to highlight Email , then press the OK button. The Email icon appears in the status area.
Doing more with your camera NOTE: When you transfer pictures from your camera to your computer, all pictures (including favorites) are stored on your computer at full size. Favorite pictures - smaller copies of your originals - are loaded back to your camera, so you can share and enjoy more. to locate a picture. 1. Tag pictures as 1 Press the Share button. Press favorites 2 Press to highlight Favorite , then press the OK button. 2.
Doing more with your camera NOTE: Pictures taken at the 4.4 MP (3:2) quality setting are displayed at a 3:2 aspect ratio with black bars at the top of the screen. Removing all favorites from your camera 1 Turn the Mode dial to Favorites . 2 Press the Menu button. 3 Highlight Remove Favorites , then press the OK button. All pictures stored in the Favorites section of internal memory are removed. Favorites are restored the next time you transfer pictures to the computer.
5 Troubleshooting For step-by-step product support, visit www.kodak.com/go/c533support or www.kodak.com/go/c503support and select Interactive Troubleshooting & Repairs. Camera problems If... Try one or more the following Camera does not turn on. ■ Install new batteries (page 1). Camera does not turn off. ■ Remove the battery, then reinsert or replace it. ■ Charge rechargeable batteries. Pictures remaining ■ The camera is operating normally. Continue taking pictures.
Troubleshooting If... Try one or more the following In Review mode, a ■ Transfer the picture to the computer (page 12), then format the card in the camera (page 25). blue or black screen is displayed Caution: Formatting a card deletes all pictures and videos, including protected files. instead of a picture. Shutter button does not work. ■ Turn on the camera (page 2). ■ Wait until the ready light stops blinking red before attempting to take another picture.
Troubleshooting If... Try one or more the following Camera does not recognize SD/MMC card. ■ Purchase a certified SD/MMC card. ■ Reformat the card (page 25). Caution: Formatting a card deletes all pictures and videos, including protected files. ■ Insert a card into the slot, then push to seat (page 3). Camera freezes up ■ Turn the camera off, then back on. Make sure the camera is turned off before inserting or removing a card. when a card is inserted or removed. Memory card full.
Troubleshooting If... Try one or more of the following Ready light glows ■ Transfer pictures to the computer (page 12), delete pictures from the camera (page 10), switch image storage locations (page 23), or insert steady red. a card with available memory (page 3). ■ Wait. Resume picture taking when the light turns green. ■ Change the image storage location to internal memory (page 23), or use a different card. Ready light glows ■ Camera is operating normally. steady green.
Troubleshooting LCD screen messages If... Try one or more of the following No pictures or videos to display ■ Change image storage location setting (page 23). Memory card requires formatting ■ Insert a new card (page 3) or format the card (page 25). Caution: Formatting a card deletes all pictures and videos, including protected files. Memory card cannot be read (Please format memory card or insert another card) Only one USB connection allowed. ■ Turn camera off, then back on.
Troubleshooting If... Try one or more of the following Memory card is ■ Insert a new card (page 3), move the switch on the card to unlock the card, or change the image storage location to internal memory locked (Insert new (page 23). memory card) Read only memory card. Remove write protection to capture or write to card. ■ Insert a new card (page 3) or format the card (page 25).
Troubleshooting If... Try one or more of the following Can only mark picture or video with 32 album names. Only the first 32 album names will be saved ■ Delete one or more album names associated with the image Unrecognized file format ■ Transfer the picture to the computer (page 12), or delete it (page 10). (page 29). Camera error ■ Turn camera off, then back on. #XXXX. See user’s guide. www.kodak.
6 Getting help Helpful links Camera Email, write, or phone customer support www.kodak.com/go/contact Get support for your product (FAQs, www.kodak.com/go/c533support or troubleshooting information, arrange for repairs, www.kodak.com/go/c503support etc.) Purchase camera accessories (camera docks, printer docks, lenses, cards, etc.) www.kodak.com/go/c533accessories or www.kodak.com/go/c503accessories Download the latest camera firmware and software www.kodak.com/go/c533downloads or www.kodak.
Getting help Telephone customer support If you have questions concerning this product, contact your customer support representative and have this information available: ■ Operating system ■ Exact error message you received ■ Processor speed (MHz) ■ Version of Kodak EasyShare software CD ■ Computer model ■ Camera serial number ■ Amount of memory (MB) Australia 1800 147 701 Netherlands 020 346 9372 Austria 0179 567 357 New Zealand 0800 440 786 Belgium 02 713 14 45 Norway 23 16 21 33 Brazil
7 Appendix Camera specifications For more specifications, visit www.kodak.com/go/c533support or www.kodak.com/go/c503support. Kodak EasyShare C533/C503 zoom digital camera CCD (charge-coupled device) CCD 1/2.5 in. CCD, 4:3 aspect ratio Output image size 5.0 MP: 2576 x 1932 pixels 4.4 MP (3:2): 2576 x 1716 pixels 3.1 MP: 2048 x 1536 pixels 2.1 MP: 1656 x 1242 pixels 1.1 MP: 1200 x 900 pixels Displays Color display 4.6 cm (1.
Appendix Kodak EasyShare C533/C503 zoom digital camera Digital zoom 5.0X continuous with 0.6X increments Not supported for movie capture Exposure Exposure metering TTL-AE; Center-weighted Exposure compensation +/-2.0 EV with 0.5 EV step Shutter speed Mechanical shutter with CCD electrical Auto: 4 - 1/1400 sec.
Appendix Kodak EasyShare C533/C503 zoom digital camera Internal storage capacity 16 MB internal memory/10 MB available for image storage (1 MB equals one million bytes) Review Quickview Yes Video output NTSC or PAL selectable Power 2 Kodak oxy-alkaline digital camera batteries AA ZR6 (non-rechargeable); 2-AA lithium digital camera batteries; 2-AA alkaline batteries; 2 Kodak Ni-MH rechargeable digital camera batteries AA; 1 Kodak lithium digital camera battery CRV3 (non-rechargeable); 1 Kodak Ni-MH rec
Appendix Storage capacities Actual storage capacity varies depending on subject composition, card brand, and other factors. You may be able to store more or fewer pictures and videos. Favorites take up additional space in internal memory. Picture storage capacity Number of pictures 5.0 MP 4.4 MP (3:2) 3.1 MP 2.1 MP 1.
Appendix Video storage capacity Minutes/seconds of video VGA (640 x 480) QVGA (320 x 240) Internal memory 14 sec. 34 sec. 16 MB SD/MMC 20 sec. 50 sec. 32 MB SD/MMC 39 sec. 1 min. 39 sec. 64 MB SD/MMC 1 min. 18 sec. 3 min. 18 sec. 128 MB SD/MMC 2 min. 36 sec. 6 min. 24 sec. 256 MB SD/MMC 5 min. 55 sec. 14 min. 29 sec. 512 MB SD/MMC 11 min. 49 sec. 28 min. 57 sec. 1 GB SD/MMC 23 min. 39 sec. 57 min. 57 sec.
Appendix Using this product ■ The use of an accessory attachment that is not recommended by Kodak, such as an AC adapter, may cause fire, electric shock, or injury. ■ Use only a USB-certified computer. Contact your computer manufacturer if you have questions. ■ If using this product in an airplane, observe all instructions of the airline. Battery safety and handling CAUTION: When removing the battery, allow it to cool; it may be hot.
Appendix Battery life Use these Kodak batteries. (Battery types are also molded into the battery door.) CRV3 lithium battery 450 - 650 AA (2) lithium batteries 350 - 550 Ni-MH rechargeable digital camera battery (per charge) 250 - 350 AA (2) Ni-MH rechargeable batteries (per charge) 250 - 350 AA (2) oxy-alkaline non-rechargeable batteries 100 - 200 AA (2) alkaline 70 - 100 non-rechargeable batteries 400 0 700 Battery life per CIPA testing method (Approx.
Appendix ■ Battery performance is reduced at temperatures below 41° F (5° C). When using your camera in cold weather, carry spare batteries and keep them warm. Do not discard cold batteries that do not work; when they return to room temperature, they may be usable. Upgrading your software and firmware Download the latest versions of the software included on the Kodak EasyShare software CD and the camera firmware (the software that runs on the camera). See www.kodak.com/go/c533downloads or www.kodak.
Appendix batteries) to be free from malfunctions and defects in both materials and workmanship for one year from the date of purchase. Retain the original dated sales receipt. Proof of the date of purchase will be required with any request for warranty repair. Limited warranty coverage This limited warranty will be honored only within the geographical location that Kodak digital cameras and accessories were purchased.
Appendix Kodak makes no other express or implied warranty for this product. In the event that the exclusion of any implied warranty is ineffective under the law, the duration of the implied warranty will be one year from the purchase date. The option of replacement is Kodak’s only obligation. Kodak will not be responsible for any special, consequential or incidental damages resulting from the sale, purchase, or use of this product, regardless of the cause.
Appendix Regulatory compliance FCC compliance and advisory Kodak EasyShare C533/C503 zoom digital camera This equipment has been tested and found to comply with the limits for a Class B digital device, pursuant to Part 15 of the FCC Rules. These limits are designed to provide reasonable protection against harmful interference in a residential installation.
Appendix Canadian DOC statement DOC Class B Compliance—This Class B digital apparatus complies with Canadian ICES-003. Observation des normes-Class B—Cet appareil numérique de la classe B est conforme à la norme NMB-003 du Canada. Waste Electrical and Electronic Equipment labeling In the European Union, do not discard this product as unsorted municipal waste. Contact your local authorities or go to www.kodak.com/go/recycle for recycling program information.
1 Index A A/V out, 27 AA battery, loading, 1 about picture, video, 28 about this camera, 25 accessories, 12 battery, 50 buying, 42 printer dock, 12 SD/MMC card, 3 album set, 23 tagging pictures, 29 appendix, 44 Australian C-Tick regulation, 54 auto, 17 flash, 7 focus framing marks, 6 B backlight, 18 batteries expected life, 50 extending life, 50 loading, 1 types, 46, 50 battery safety, 49 battery compartment, ii battery life, 50 beach, 18 burst button, i 56 burst, using, 20 button burst, i, 20 delete, ii,
Index color mode, 22 compatibility, dock, 15 copy pictures card to memory, 28 memory to card, 28 to computer, 11 cropping pictures, 27 CRV3 battery loading, 1 customizing camera settings, 24 D date setting, 2 date stamp, 25 DC-in, i delete button, ii deleting during quickview, 5 pictures, videos, 10 protecting pictures, videos, 10 digital zoom, using, 16 displaying slide show, 26 disposal, recycling, 51, 55 dock connector, ii printer, 12 dock compatibility, 15 doing more with your camera, 16 download pictu
Index picture-taking, 5 reviewing pictures, 9 icons, mode dial, 17 image storage, 23 info button, ii information about pictures, videos, 28 installing batteries, 1 SD/MMC card, 3 software, 11 internal memory storage capacity, 47 interval, slide show, 26 K Kodak EasyShare software upgrading, 51 Kodak web sites, 42 Korean Class B ITE, 55 L LCD, ii LCD/Info button, ii lens cleaning lens, 51 light ready, 37 liveview, 24 loading batteries, 1 SD/MMC card, 3 software, 11 long time exposure, 22 58 loop, slide sho
Index orientation sensor, 25 protecting pictures, videos, 10 P party, 18 PictBridge enabled printer, 13 picture magnify, 8 picture size, 21 pictures copying, 28 cropping, 27 deleting, 10 emailing tagged, 32 printing, 14 protecting, 10 reviewing, 8 storage capacity, 47 tagging, 29 taking, modes, 17 transfer, 11 picture-taking settings, 20 power camera, 2 power light, i printer dock, 12 printing from a card, 14 from computer, 14 optimizing printer, 42 order online, 14 PictBridge technology, 13 tagged pictu
Index self-timer with pictures, 19 setting about, 25 album, 23 camera sounds, 24 color mode, 22 date and time, 2 date stamp, 25 exposure compensation, 21 flash, 7 focus zone, 22 image storage, 23 liveview, 24 long time exposure, 22 orientation sensor, 25 picture size, 21 picture taking mode, 17 return, 24 self-timer, 19 setup menu, 23 video date display, 25 video out, 25 video size, 23 white balance, 21 settings picture taking, 20 setup menu, 23 setup mode, using, 24 Share button, ii sharing pictures, vide
Index trash can, deleting, 5 tripod socket, ii troubleshooting, 35 camera, 35 camera/computer communications, 38 error messages, 39 ready light status, 37 turning camera on and off, 2 U undelete, 10 undo, 10 upgrading software, firmware, 51 URLs, Kodak web sites, 42 USB cable, 12 USB, A/V out, ii viewing picture after taking, 5, 8 W warranty, 51 WEEE, 55 white balance, 21 wide angle button, ii Windows OS-based computers installing software, 11 wrist strap, 1 wrist strap post, ii Z zoom digital, 16 optical