Kodak EasyShare C530/C315/CD50 digital camera User’s guide www.kodak.com For interactive tutorials, www.kodak.com/go/howto For help with your camera, www.kodak.
Eastman Kodak Company Rochester, New York 14650 © Eastman Kodak Company, 2005 All screen images are simulated. Kodak, EasyShare, and Retinar are trademarks of Eastman Kodak Company.
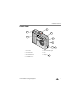
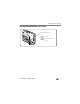
Product features Front view 3 2 4 1 5 6 7 1 Flash unit 5 Self Timer/Video light 2 Shutter button 6 Lens 3 Mode dial/Power 7 USB port 4 Viewfinder lens www.kodak.
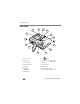
Product features Back view 5 6 7 8 4 9 10 3 11 2 12 1 13 15 14 1 Dock connector 9 Flash button 2 Tripod socket 10 4-way controller 3 Review button 11 OK button 4 Camera/LCD screen 12 Wrist strap post 5 Viewfinder 13 Share button 6 Ready light 14 Battery compartment 7 Menu button 15 Slot for optional SD/MMC card 8 Delete button ii www.kodak.
Table of contents 1 1 Setting up your camera .........................................................................1 Attaching the wrist strap ............................................................................... 1 Loading the batteries .................................................................................... 1 Turning on the camera .................................................................................. 2 Setting the language and date/time, other times...................
Table of contents Pre-tagging for album names ...................................................................... 30 Sharing your pictures................................................................................... 33 5 Troubleshooting ..................................................................................38 Camera problems........................................................................................ 38 Camera/computer communications..........................................
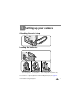
1 Setting up your camera Attaching the wrist strap Loading the batteries CRV3 lithium (non-rechargeable) Ni-MH KAA2HR (rechargeable) 2-AA lithium, Ni-MH, or (non-rechargeable oxy-alkaline AA) For information on replacing batteries and extending battery life, see page 54. www.kodak.
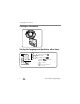
Setting up your camera Turning on the camera Setting the language and date/time, other times 1 2 3 Press Menu. to highlight Setup Menu then press OK. to highlight Language , then press OK. or Date/Time If setting the date/time: to change. OK 2 for previous/next field. to accept. www.kodak.
Setting up your camera Setting the date/time, first time At the prompt, press OK. to change. for previous/next field. OK www.kodak.com/go/support to accept.
Setting up your camera Storing pictures on an SD/MMC card Your camera has 16 MB of internal memory. You can purchase an SD/MMC card to conveniently store more pictures and videos. NOTE: We recommend Kodak SD/MMC cards. When using the card for the first time, format it in this camera before taking pictures (see page 29). Notched corner SD/MMC card (optional) CAUTION: A card can only be inserted one way; forcing it may cause damage.
2 Taking pictures and videos Taking a picture 1 3 Press the Shutter button to take the picture. Turn on camera. 4 When the Ready light 2 blinks green, the picture is being saved; you can still take pictures. Frame your subject in the viewfinder or LCD screen. Ready light Taking a video 1 3 Turn on camera. Press the Shutter button down and release, or press and hold for more than 2 seconds. 2 To stop recording, press the Shutter button again.
Taking pictures and videos Reviewing the picture or video just taken After you take a picture or video, the LCD screen displays a Quickview for approximately 5 seconds. While the picture or video and are displayed: If you press no buttons, the picture/video is saved. Delete OK to play/pause a video Tag a picture/video for email or as a favorite, or tag a picture for print. To view pictures and videos anytime, see page 8.
Taking pictures and videos Using the LCD screen as a viewfinder IMPORTANT: The Liveview feature depletes battery power; use it sparingly. 1 Turn the Mode dial to . 2 Press the OK button to turn on the LCD screen. 3 Frame your subject in the LCD screen. 4 Press the Shutter button to take the picture. 5 To turn off the LCD screen, press the OK button. OK button To make the LCD screen turn on whenever the camera is on, see Liveview, page 28.
Taking pictures and videos Using the flash Use the flash when you take pictures at night, indoors, or outdoors in heavy shadows. Flash is effective between 3.3 - 7.9 ft (1.0 - 2.4 m). You can only change the flash setting in Auto mode. Press the button repeatedly to scroll through flash options (see Flash modes table on page 24). The active flash icon is displayed in the LCD screen status area (see page 6). To change the flash settings, see page 24.
Taking pictures and videos What the review icons mean Pictures Print tag/number of prints Favorite tag Email tag Scroll arrows Protect Picture/video number Image storage location Review mode Videos Video length Video number Image storage location On-screen instructions Review mode Scroll arrows www.kodak.
Taking pictures and videos Magnifying a picture during review OK magnify at 2X. Press again for 4X. view other parts of the picture. OK return to 1X. Viewing multi-up (thumbnails) during review view multi-up thumbnails. view previous/next row of thumbnails. view previous/next thumbnail. OK view single picture. 10 www.kodak.
Taking pictures and videos Cropping a picture during review 1 Press Menu. (To exit, press Menu again.) 2 Press to highlight Crop 3 , then press OK. Highlight Zoom, press OK, then follow the on-screen instructions. to size the crop box. Press OK. 4 Highlight Pan, press OK, then follow the on-screen instructions. to move the crop box. Press OK. 5 Press Save to keep the cropped image (the original picture is kept). To return to the Review menu without saving your changes, press Exit.
Taking pictures and videos Protecting pictures and videos from deletion 1 Press Review. 2 3 4 Note: To cancel Protect, press OK again. for previous/next. Press Menu. Press to highlight Protect then press OK. , The picture or video is protected and cannot be deleted. The Protect icon with the protected picture or video. appears Press the Menu button to exit. CAUTION: Formatting internal memory or an SD/MMC card deletes all (including protected) pictures, videos.
Taking pictures and videos Deleting pictures and videos 1 2 Press Review. (To exit, press Review again.) for previous/next. 3 Press Delete. 4 Follow the screen prompts. PICTURE or VIDEO—deletes the displayed picture or video. EXIT—exits the Delete screen. ALL—deletes all pictures and videos from your current storage location. NOTE: To delete protected pictures and videos, remove protection before deleting. www.kodak.
3 Transferring and printing pictures Installing the software CAUTION: Install Kodak EasyShare software before connecting the camera or optional dock to the computer. Failure to do so may cause the software to load incorrectly. 1 Close all software applications that are open on your computer (including anti-virus software). 2 Place the Kodak EasyShare software CD into the CD-ROM drive. 3 Load the software: Windows OS—if the install window does not appear, choose Run from the Start menu and type d:\setup.
Transferring and printing pictures Transferring pictures with the USB cable 1 Turn off the camera. 2 Plug the labeled end of the USB cable into the labeled USB port on your computer. See your computer user’s guide for details. 3 Plug the other end of the USB cable into the labeled USB port on the camera. 4 Turn on the camera. Kodak EasyShare software opens on your computer. The software prompts you through the transfer process. NOTE: Visit www.kodak.com/go/howto for an online tutorial on connecting.
Transferring and printing pictures Printing pictures Printing with a Kodak EasyShare printer dock Dock your camera to the Kodak EasyShare printer dock and print directly—with or without a computer. Purchase this and other accessories at a dealer of Kodak products or visit www.kodak.com/go/c530accessories. Direct printing with a PictBridge enabled printer Your camera is compatible with PictBridge technology, so you can print directly to PictBridge enabled printers.
Transferring and printing pictures Printing from a PictBridge enabled printer 1 Turn on the printer. Turn on the camera. The PictBridge logo is displayed, followed by the current picture and menu. (If no pictures are found, a message is displayed.) If the menu interface turns off, press any button to redisplay it. 2 Press to choose a printing option, then press the OK button. Current Picture Press to choose a picture. Choose the number of copies.
Transferring and printing pictures Disconnecting the camera from a PictBridge enabled printer 1 Turn off the camera and printer. 2 Disconnect the USB cable from the camera and the printer. Using a printer that is not PictBridge enabled For details on printing pictures from your computer, click the Help button in the Kodak EasyShare software. Ordering prints online Kodak EasyShare Gallery (www.kodakgallery.com) is one of the many online print services offered in the Kodak EasyShare software.
Transferring and printing pictures Dock compatibility for your camera Kodak EasyShare dock Docking configuration ■ printer dock plus series 3 Custom dock insert ■ series 3 printer docks and camera docks Dock Others, including: Custom dock insert ■ printer dock ■ printer dock plus ■ printer dock 6000 Kodak dock adapter kit D-22 ■ camera dock 6000 Dock ■ printer dock 4000 Not compatible ■ camera dock II ■ LS420, LS443 camera dock Purchase camera docks, printer docks, and other accessories at
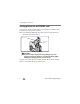
4 Doing more with your camera Using the self-timer 1 Place camera on a tripod or flat surface. 2 In Auto mode, press the Menu button. 3 Choose Self Timer . 10-second delay (so you have time to get into the scene) 2-second delay (for a steady, auto-shutter release on a tripod) 4 5 Compose the scene. Press the Shutter button. NOTE: The self timer cancels after you take the picture, record the video, or turn off the camera.
Doing more with your camera Running a slide show Use the Slide Show to display your pictures and videos on the LCD screen. To run a slide show on a television or on any external device, see page 22. Starting the slide show 1 Press the Review button, then press the Menu button. 2 Press to highlight Slide Show , then press the OK button. 3 Press to highlight Begin Show, then press the OK button. Each picture and video is displayed once, in the order in which you took them.
Doing more with your camera Running a continuous slide show loop When you turn on Loop, the slide show is continuously repeated. 1 On the Slide Show menu, press to highlight Loop, then press the OK button. 2 Press to highlight On, then press the OK button. The slide show repeats until you press the OK button or until battery power is exhausted. This setting remains until you change it.
Doing more with your camera Copying pictures and videos You can copy pictures and videos from a card to internal memory or from internal memory to a card. Before you copy, make sure that: ■ A card is inserted in the camera. ■ The camera’s picture storage location is set to the location from which you are copying. See Image Storage, page 26. Copy pictures or videos: 1 Press the Review button, then press the Menu button. 2 Press to highlight Copy 3 Press to highlight an option.
Doing more with your camera Choosing a flash setting Flash button Press the button repeatedly to scroll through flash options. (see Flash modes table). Press OK. The current flash mode is shown in the LCD status area. NOTE: ■ Off and Fill flash options revert to Auto when the camera is turned off. ■ When the picture is taken with Auto or Fill flash selected, the camera flashes twice: once to set the exposure and once to take the picture.
Doing more with your camera Changing picture-taking settings You can change settings to get the best results from your camera: 1 In any mode, press the Menu button. 2 Press to highlight the setting you wish to change, then press the OK button. 3 Choose an option, then press the OK button. 4 Press the Menu button to exit. Setting Icon Options Self Timer Put yourself in the picture or video. 10, 2 seconds, Off. See page 20. Exposure Compensation (Auto mode) Choose how much light enters the camera.
Doing more with your camera Setting Icon Options Picture Size (Auto mode) Set picture resolution. This setting remains until you change it. 5.0 MP (default)—for printing up to 20 x 30 in. (51 x 76 cm); pictures are highest resolution and largest file size. 4.4 MP (3:2)—ideal for printing 4 x 6 in. (10 x 15 cm) prints without cropping. Also for printing up to 20 x 30 in. (51 x 76 cm); some cropping may result due to the 3:2 aspect ratio. 4.0 MP—for printing up to 20 x 30 in.
Doing more with your camera Setting Icon Options Set Album Choose Album names. On or Off. Pre-select album names before you take pictures or videos. Then, all the pictures or videos you take are tagged with those album names. See page 30. Video Length (Video mode) Choose the video length. This setting remains until you change it. Continuous (default)—as long as there is room on the card or internal memory, or until the Shutter button is pressed.
Doing more with your camera 5 Press the Menu button to exit. Setting Icon Options Return Return to previous menu. Liveview Change LCD screen setting so that it is always on or always off (see page 7). This setting remains until you change it. On or Off. Auto Power Off Select when you would like the camera to turn off. 3 minutes (default) 1, 3, 5, or 10 minutes Date & Time Set the date and time. This setting remains until you change it. See page 2.
Doing more with your camera Setting Icon Options Language Display the LCD screen text in different languages. This setting remains until you change it. See page 2. Format Format camera memory. Memory Card—deletes everything on the card; formats the card. Cancel—exits without making a change. Internal Memory—deletes everything in internal memory including email addresses, album names, and Favorites: formats the internal memory.
Doing more with your camera Changing optional review settings In Review mode, press the Menu button to access optional review settings. Magnify (pictures) (page 10) Copy (page 23) Album (page 30) Protect (page 12) Crop (page 11) Image Storage (page 26) Slide Show (page 21) Picture/Video Information (page 29) Multi-up (page 10) Setup Menu (page 27) Pre-tagging for album names Use the Set Album (Still or Video) feature to pre-select album names before you take pictures or videos.
Doing more with your camera Second—on your camera 1 In any mode, press the Menu button. 2 Press to highlight Set Album , then press the OK button. 3 Press to highlight an album name, then press the OK button. Repeat to mark pictures or videos for albums. Selected albums are noted with a check mark. 4 To remove a selection, highlight an album name and press the OK button. To remove all album selections, select Clear All. 5 Highlight Exit, then press the OK button. Your selections are saved.
Doing more with your camera Tagging pictures/videos for albums Use the Album feature in Review mode to tag the pictures and videos in your camera with album names. First—on your computer Use Kodak EasyShare software to create album names on your computer, then copy up to 32 album names to the camera’s internal memory. See Kodak EasyShare software Help for details. Second—on your camera 1 Press the Review button. 2 Press to locate a picture, then press the Menu button.
Doing more with your camera Sharing your pictures Press the Share button to tag your pictures and videos. When they are transferred to your computer, you can share using: Pictures Videos Print (page 16) ✔ Email (page 34) ✔ ✔ Favorites (page 35), for easy organization on your computer and for sharing on your camera ✔ ✔ NOTE: Tags remain until removed. If a tagged picture or video is copied, the tag is not copied. Tagging pictures for printing 1 Press the Share button.
Doing more with your camera 6 Press the Share button to exit. * To tag all pictures in the image storage location, highlight Print All , press the OK button, then select the number of copies as described above. Print All is not available in Quickview. **To remove the print tagging for all pictures in the image storage location, highlight Cancel Prts , then press the OK button. You cannot cancel prints in Quickview.
Doing more with your camera 4 To remove a selection, highlight a checked address and press the OK button. To remove all email selections, highlight Clear All. 5 Highlight Exit, then press the OK button. Your selections are saved. The Email icon 6 Press the Share button to exit. appears in the status area. Third—transfer and email When you transfer the tagged pictures/videos to your computer, the Email screen opens and lets you send them to the addresses you specified.
Doing more with your camera 3. Transfer pictures to your computer 1 To enjoy full functionality, install and use the EasyShare software that was packaged with this camera. (See page 14.) 2 Connect the camera to the computer using the USB cable (see page 15) or an EasyShare dock. The first time you transfer pictures, the software helps you make choices about your favorite pictures. Then, your pictures are transferred to the computer.
Doing more with your camera Removing all favorites from your camera 1 Turn the Mode dial to Favorites . 2 Press the Menu button. 3 Highlight , then press the OK button. All pictures stored in the Favorites section of internal memory are removed. Favorites are restored the next time you transfer pictures to the computer. 4 Press the Menu button to exit the menu. Preventing favorites from transferring to the camera 1 Open the Kodak EasyShare software. Click the My Collection tab.
5 Troubleshooting For step-by-step product support, visit www.kodak.com/go/c530support and select Interactive Troubleshooting & Repairs. Camera problems If... Try one or more the following Camera does not turn on ■ Install new batteries (page 1). Camera does not turn off ■ Remove the battery, then reinsert or replace it. If the cameras still does ■ Charge rechargeable batteries. not function, visit www.kodak.com/go/c530support and select Interactive Troubleshooting & Repairs.
Troubleshooting If... Try one or more the following In Review mode, a ■ Transfer the picture to the computer (page 15). blue or black screen is displayed instead of a picture. Shutter button does not work. ■ Turn on the camera (page 2). ■ Wait until the ready light stops blinking red before attempting to take another picture.
Troubleshooting If... Try one or more the following Camera does not recognize SD/MMC card. ■ Purchase a certified SD/MMC card. ■ Reformat the card (page 29). Caution: Formatting a card deletes all pictures and videos, including protected files. ■ Insert a card into the slot, then push to seat (page 4). Camera freezes up ■ Turn the camera off, then back on. Make sure the camera is turned off before inserting or removing a card. when a card is inserted or removed. Memory card full.
Troubleshooting Camera/computer communications If... Try one or more of the following The computer does ■ Visit www.kodak.com/go/camerasupport. not communicate ■ Turn on the camera (page 2). with the camera. ■ Install new batteries (page 1) or charge rechargeable batteries. ■ See the Power Management section of the laptop user’s guide to disable this feature. ■ Connect cable to camera and computer port (page 15). ■ Install the software (page 14). ■ Disconnect the USB cable. Close all open applications.
Troubleshooting If... Try one or more of the following Memory card requires formatting ■ Insert a new card (page 4) or format the card (page 29). Caution: Formatting a card deletes all pictures and videos, including protected files. Memory card cannot be read (Please format memory card or insert another card) ■ Unplug the USB cable from the camera. Only one USB connection allowed. Disconnect cable or rem. (remove) camera from dock.
Troubleshooting If... Try one or more of the following Memory card is ■ Insert a new card (page 4), move the switch on the card to unlock the card, or change the image storage location to internal memory locked (Insert new (page 26). memory card) Read-only memory card. Remove write protection to capture or write to card. ■ Insert a new card (page 4) or format the card (page 29).
Troubleshooting If... Try one or more of the following Can only mark ■ Delete one or more album names associated with the image (page 32). image with 32 album names. Only the first 32 album names will be saved High camera temperature. (Camera will be turned off.) ■ Leave the camera off until it’s cool to the touch, then turn it back on. If the message reappears, visit www.kodak.com/go/c530support and select Interactive Troubleshooting & Repairs.
Troubleshooting If... Try one or more of the following Ready light glows ■ Transfer pictures to the computer (page 15), delete pictures from the camera (page 13), switch image storage locations (page 26), or insert steady red. a card with available memory (page 4). ■ Wait. Resume picture taking when the light turns green. ■ Change the image storage location to internal memory (page 26), or use a different card. Ready light glows ■ Camera is operating normally. steady green. www.kodak.
6 Getting help Helpful Web links Help with your camera www.kodak.com/go/c530support Help with Windows operating system and working with digital pictures www.kodak.com/go/pcbasics Download the latest camera software and firmware www.kodak.com/go/c530downloads Optimize your printer for truer, more vibrant colors www.kodak.com/go/onetouch Get support for cameras, software, accessories, www.kodak.com/go/support more Purchase camera accessories www.kodak.com/go/c530support Register your camera www.
Getting help Telephone customer support If you have questions concerning the operation of the software or camera, have your device connected to your computer, and have this information available: ■ Operating system ■ Exact error message you received ■ Processor speed (MHz) ■ Version of Kodak EasyShare software CD ■ Computer model ■ Camera serial number ■ Amount of memory (MB) Australia 1800 147 701 Netherlands 020 346 9372 Austria 0179 567 357 New Zealand 0800 440 786 Belgium 02 713 14 45
7 Appendix Camera specifications For more specifications, visit www.kodak.com/go/c530support. Kodak EasyShare C530/C315/CD50 digital camera CCD (charge-coupled device) CCD 1/2.5 in. CCD, 4:3 aspect ratio Output image size 5.0 MP: 2576 x 1932 pixels 4.4 MP (3:2): 2576 x 1712 pixels 4.0 MP: 2304 x 1728 pixels 3.1 MP: 2048 x 1536 pixels 2.1 MP: 1664 x 1248 pixels 1.1 MP: 1216 x 912 pixels Displays Color display 1.5 in. (3.
Appendix Kodak EasyShare C530/C315/CD50 digital camera Exposure compensation +/-2.0 EV with 0.5 EV step Shutter speed Mechanical with CCD electrical Auto: 1/2 - 1/1618 sec. ISO speed Auto: 100 to 200 Flash Electronic flash Guide no. 9 (@ ISO 100) Auto flash with pre-flash Working range: 1.0 - 2.4 m @ ISO 140 Flash modes Auto, Fill, Red-eye, Off Capture Capture modes Auto, Video Video capture QVGA (320 x 240) @ 20 fps Image file format Still: EXIF 2.
Appendix Kodak EasyShare C530/C315/CD50 digital camera Power 2 Kodak oxy-alkaline digital camera batteries AA ZR6 (non-rechargeable); 2-AA lithium digital camera batteries; 2 Kodak Ni-MH rechargeable digital camera batteries AA; 1 Kodak lithium digital camera battery CRV3 (non-rechargeable); 1 Kodak Ni-MH rechargeable digital camera battery KAA2HR Communication with computer USB 2.
Appendix Picture storage capacity Number of pictures 5.0 MP 4.4 MP (3:2) 4.0 MP 3.1 MP 2.1 MP 1.
Appendix Power-saving features If no action for The camera To turn it back on 1 minute Screen turns off. Press any button. 3 minutes or select Enters auto power off. 1, 5, or 10 minutes Turn the Mode dial off and on again. Important safety instructions Using this product ■ Read and follow these instructions before using Kodak products. Always follow basic safety procedures. ■ Use only a USB-certified computer. Contact your computer manufacturer if you have questions.
Appendix Battery safety and handling CAUTION: When removing batteries, allow them to cool first; batteries may be hot. ■ Read and follow all warnings and instructions supplied by the battery manufacturer. ■ Use only batteries that are approved for this product. ■ Keep batteries out of the reach of children. ■ Do not allow batteries to touch metal objects, including coins. Otherwise, a battery may short circuit, discharge energy, become hot, or leak.
Appendix Battery information Battery life for Kodak C-series digital cameras Use the following batteries. Actual battery life may vary based on usage. 550–700 CRV3 lithium battery 500–600 (2) lithium batteries AA Ni-MH rechargeable digital camera battery KAA2HR (per charge) (2) Ni-MH rechargeable batteries AA (per charge) (2) oxy-alkaline non-rechargeable batteries AA 300–400 200–300 125–225 0 700 Battery Life (Approx.
Appendix ■ Battery performance is reduced at temperatures below 41°F (5°C). When using your camera in cold weather, carry spare batteries and keep them warm. Do not discard cold batteries that do not work; when they return to room temperature, they may be usable. Visit www.kodak.com/go/c530accessories for: Kodak EasyShare camera dock—powers your camera, transfers pictures to your computer, and charges the available Kodak Ni-MH rechargeable digital camera battery KAA2HR.
Appendix Warranty Limited warranty Kodak warrants Kodak EasyShare digital cameras and accessories (excluding batteries) to be free from malfunctions and defects in both materials and workmanship for one year from the date of purchase. Retain the original dated sales receipt. Proof of the date of purchase will be required with any request for warranty repair.
Appendix This warranty does not apply when failure is due to shipping damage, accident, alteration, modification, unauthorized service, misuse, abuse, use with incompatible accessories or attachments, failure to follow Kodak’s operation, maintenance or repacking instructions, failure to use items supplied by Kodak (such as adapters and cables), or claims made after the duration of this warranty. Kodak makes no other express or implied warranty for this product.
Appendix Regulatory compliance FCC compliance and advisory Kodak EasyShare C530/C315/CD50 digital camera This equipment has been tested and found to comply with the limits for a Class B digital device, pursuant to Part 15 of the FCC Rules. These limits are designed to provide reasonable protection against harmful interference in a residential installation.
Appendix Observation des normes-Class B—Cet appareil numérique de la classe B est conforme à la norme NMB-003 du Canada. Waste Electrical and Electronic Equipment labeling In the European Union, do not discard this product as unsorted municipal waste. Contact your local authorities or go to www.kodak.com/go/recycle for recycling program information.
1 Index Numerics 4-way buttons, ii A AA battery, installing, 1 about, 29 accessories, 15 battery, 54 buying, 46 camera dock, 55 printer dock, 16, 55 SD/MMC card, 4 albums, tagging pictures for, 30, 32 alkaline batteries, warning, 1 Australian C-Tick regulation, 59 auto flash, 8 power off, 28 power-down, 52 B batteries expected life, 54 extending life, 54 loading, 1 types, 1, 50, 54 battery compartment, ii safety, 53 button delete, 6 flash, ii 60 flash/status, 8 menu, ii OK, ii review, ii, 8 Share, ii zoom
Index CRV3 battery loading, 1 customer support, 47 customizing camera settings, 27 D date displaying on video, 28 imprinting on pictures, 28 setting, 2, 3 stamp, 28 deleting during quickview, 6 formatting precaution, 29 from internal memory, 13 from SD/MMC card, 13 protecting pictures, videos, 12 digital zoom, 7 displaying slide show, 21 disposal, recycling, 55, 59 dock camera, 55 connector, ii printer, 16, 55 downloading pictures, 14 E EasyShare software, 14 emailing pictures, videos, 34 error messages, 4
Index software, 14 internal memory formatting, 29 setting image storage location, 26 storage capacity, 50 K Kodak digital camera batteries, 1 Kodak EasyShare software getting help, 46 installing, 14 upgrading, 55 Kodak web sites, 46 Korean Class B ITE, 59 L language, 29 LCD screen, ii LCD screen, using as a viewfinder, 7 lens, i cleaning lens, 55 light ready, 44 Liveview, 28 turning default on/off, 28 loading batteries, 1 SD/MMC card, 4 software, 14 M Mac OS, installing software on, 14 magnifying pictures,
Index tagging, 30, 32 transfer via USB cable, 15 viewing multi-up, 10 power, i auto off, 52 camera, 2 printer dock, 16, 55 printing from a card, 18 from computer, 18 optimizing printer, 46 order online, 18 PictBridge technology, 16 tagged pictures, 18 with EasyShare printer dock, 16 protecting pictures, videos, 12 Q quickview using, 6 R ready light, ii, 44 recycling, disposal, 55, 59 red-eye, flash, 8 regulatory information, 58, 59 Class B ITE, 59 removing favorites, 37 return, 28 review button, ii reviewi
Index date stamp, 28 exposure compensation, 25 flash, 8 image storage location, 26 language, 29 Liveview, 28 picture quality, 26 self timer, 20 video length, 27 video out, 28 setup mode, using, 27 Share button, ii shutoff, auto, 52 shutter problems, 39 self timer delay, 20 sleep mode, 52 slide show continuous loop, 22 problems, 39 running, 21 software getting help, 46 installing, 14 upgrading, 55 specifications, camera, 48 status camera ready light, 44 storage capacity, 50 support, technical, 47 T tagging
Index videos checking settings, 9 copying, 23 deleting, 13 display date on, 28 emailing tagged, 34 protecting, 12 reviewing, 8 setting recording time, 27 storage capacities, 50 transfer to computer, 14 viewing, 8 viewfinder, i, ii using the screen as a, 7 viewing camera information, 29 picture after taking, 6, 8 W warranty, 56 WEEE Waste Electrical and Electronic Equipment, 59 Windows OS-based computers installing software, 14 Z zoom, using digital, 7 www.kodak.