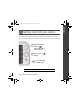
ENGLISH urg_01053.book Page 1 Thursday, June 18, 2009 8:10 AM Loading the batteries Purchase cost-effective rechargeable batteries and battery charger www.kodak.com/go/c190support www.kodak.
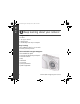
urg_01053.book Page 2 Thursday, June 18, 2009 8:10 AM ENGLISH Using an (accessory) SD Card Your camera has internal memory. You can purchase an SD or SDHC Card to store more pictures and videos. (Maximum supported card size is 32 GB.) CAUTION: A card can only be inserted one way; forcing it may cause damage. Inserting or removing a card when the camera is on may damage the pictures, the card, or the camera. 1 Turn off the camera. 2 Insert or remove the optional card. 3 Turn on the camera.
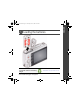
ENGLISH urg_01053.book Page 3 Thursday, June 18, 2009 8:10 AM Turning on the camera Setting the language and date/time Language: to change. OK to accept. OK Date/Time: At the prompt, press OK. change current field. previous/next field. OK to accept. See the Extended user guide www.kodak.com/go/c190support www.kodak.
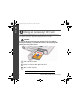
urg_01053.book Page 4 Thursday, June 18, 2009 8:10 AM ENGLISH Taking a picture 1 Turn the mode dial to Smart Capture 2 Press the Shutter button halfway to focus and set exposure. When the framing marks turn green, press the Shutter button completely down. Framing marks See the Extended user guide www.kodak.com/go/c190support 4 www.kodak.
ENGLISH urg_01053.book Page 5 Thursday, June 18, 2009 8:10 AM Reviewing pictures/videos Press the Review button for previous/next Press picture/video. Press the Shutter button halfway down to return to capture mode. See the Extended user guide www.kodak.com/go/c190support www.kodak.
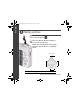
urg_01053.book Page 6 Thursday, June 18, 2009 8:10 AM ENGLISH Transferring pictures/videos 1 Turn off the camera. 2 Connect KODAK USB Cable, Model U-8. 3 Turn on the camera. See the Extended user guide www.kodak.com/go/c190support Purchase accessories 6 www.kodak.com/go/c190accessories www.kodak.
ENGLISH urg_01053.book Page 7 Thursday, June 18, 2009 8:10 AM Getting help from your camera Your camera offers a built-in Help system. It describes every setting for every menu choice. If you learn nothing else about your camera, learn how to use on-camera Help. 1 Press the Menu button then highlight a menu choice. 2 Press the Info button. Scroll through a Help topic. See the Extended user guide www.kodak.com/go/c190support www.kodak.
urg_01053.book Page 8 Thursday, June 18, 2009 8:10 AM ENGLISH Keep learning about your camera! Congratulations! You have: • set up your camera • taken pictures • transferred pictures to your computer Keep learning! Finish reading this book, so you can take and share your best pictures! Visit www.kodak.com/go/c190support: • the extended user guide • interactive troubleshooting and repairs • interactive tutorials • FAQs • downloads • accessories • printing information • product registration 8 www.kodak.
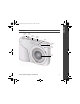
ENGLISH urg_01053.book Page 9 Thursday, June 18, 2009 8:10 AM Front view Shutter button Mode dial Flash button Power button Flash Self-timer light Microphone Lens/ cover www.kodak.
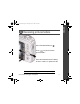
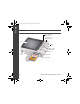
urg_01053.book Page 10 Thursday, June 18, 2009 8:10 AM ENGLISH Back view Delete, Menu, Info, Review buttons Zoom (Telephoto/ Wide Angle) buttons LCD USB port OK button Share button Tripod socket SD/SDHC card slot Battery compartment 10 www.kodak.
urg_01053.book Page 11 Thursday, June 18, 2009 8:10 AM 1 Doing more with your camera Turn the Mode dial to the mode that best suits your subjects and surroundings. Use this mode Smart Capture Video For General picture taking—it offers excellent image quality and ease of use. Capturing video with sound. NOTE: Sound cannot be played on the camera. Sound is heard after the video is transferred to your computer. Blur Reducing blur caused by camera shake or subject motion.
urg_01053.book Page 12 Thursday, June 18, 2009 8:10 AM Doing more with your camera Using the flash Press the flash button repeatedly to scroll through flash modes. The current flash mode is shown on the LCD. Flash modes Auto Flash fires When the lighting conditions require it. Fill (Flash On) Every time you take a picture, regardless of the lighting conditions. Use when the subject is in shadow or is “backlit” (when the light is behind the subject).
urg_01053.book Page 13 Thursday, June 18, 2009 8:10 AM Doing more with your camera Using the menu button to change settings You can change settings to get the best from your camera. NOTE: Some modes offer limited settings. 1 Press the Menu button. 2 Press to highlight the Capture/Video or Setup tab. 3 Press to highlight a setting, then press OK. 4 Highlight an option, then press OK. IMPORTANT: Your camera offers a built-in Help system. To get the most from your camera, see page 7.
urg_01053.book Page 14 Thursday, June 18, 2009 8:10 AM 2 Working with pictures/videos Deleting pictures/videos 1 Press the Review 2 Press button. for previous/next picture/video. 3 Press the Delete button, then follow the prompts. Understanding the review icons Video duration Print tag/number of prints Protected Email mark Picture/Video number Select picture Shortcuts* Add text tag View thumbnails Play video 14 Upload mark Battery level Favorite mark Text tag name Date stamp www.kodak.
urg_01053.book Page 15 Thursday, June 18, 2009 8:10 AM 3 Share your stories! Pictures start here! 1 3 2 Load software. Take pictures. Transfer pictures to your computer. Pictures become stories here! At home Online KODAK All-in-One Printers At a retailer KODAK Picture Kiosk www.kodak.com/go/tips www.kodak.
urg_01053.book Page 16 Thursday, June 18, 2009 8:10 AM 4 Solving camera problems Status Solution Camera does not turn on, off Camera buttons and controls do not function In Review, a blue or black screen is displayed instead of a picture Memory card is almost or entirely full ■ Make sure the battery is charged and installed correctly (see page 1). ■ Transfer all pictures to the computer (see page 6). ■ Take another picture. ■ Transfer the pictures to the computer (see page 6).
urg_01053.book Page 17 Thursday, June 18, 2009 8:10 AM 5 Appendix FCC compliance and advisory This equipment has been tested and found to comply with the limits for a Class B digital device, pursuant to Part 15 of the FCC Rules. These limits are designed to provide reasonable protection against harmful interference in a residential installation.
urg_01053.book Page 18 Thursday, June 18, 2009 8:10 AM Appendix Korean Class B ITE China RoHS Eastman Kodak Company Rochester, New York 14650 © Kodak, 2009 Kodak and EasyShare are trademarks of Eastman Kodak Company. 18 www.kodak.