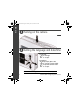
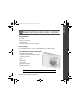
ENGLISH urg_00993.book Page 1 Monday, June 15, 2009 8:55 AM Installing the software Before connecting any cables, install the software that was included with your camera. Follow the on-screen instructions. After installing the software, return to this user guide. Loading the batteries See the Extended user guide www.kodak.com/go/c140support www.kodak.
urg_00993.book Page 2 Monday, June 15, 2009 8:55 AM ENGLISH Turning on the camera Setting the language and date/time Language: to change. OK to accept. Date/Time: At the prompt, press OK. to change current field. for previous/next field. OK to accept. See the Extended user guide 2 www.kodak.com/go/c140support www.kodak.
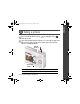
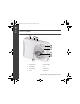
ENGLISH urg_00993.book Page 3 Monday, June 15, 2009 8:55 AM Taking a picture 1 Press the Mode button, then then press OK. to highlight Auto , 2 Press the Shutter button halfway to focus and set exposure. When the framing marks turn green, press the Shutter button completely down. Mode button Framing marks Learn about Auto and other modes See page 10 See the Extended user guide www.kodak.com/go/c140support www.kodak.
urg_00993.book Page 4 Monday, June 15, 2009 8:55 AM ENGLISH Reviewing pictures/videos Press the Review button to enter/exit Review. View previous/next picture/video. OK Play a video. Review See the Extended user guide 4 www.kodak.com/go/c140support www.kodak.
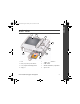
ENGLISH urg_00993.book Page 5 Monday, June 15, 2009 8:55 AM Transferring pictures/videos 1 Turn off the camera. 2 Connect the KODAK USB Cable, Model U-8 (may be included). 3 Turn on the camera. See the Extended user guide www.kodak.com/go/c140support Purchase accessories www.kodak.com/go/c140accessories www.kodak.
urg_00993.book Page 6 Monday, June 15, 2009 8:55 AM ENGLISH Getting help from your camera You want the most from your camera. You want to understand: ■ What it can do for you ■ And how to take the best possible pictures and videos Great news! Your camera offers a built-in Help system. It describes every setting for every menu choice. If you learn nothing else about your camera, learn how to use on-camera Help. Because the more you know your camera, the more confident you become.
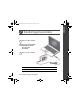
Keep learning about your camera! Congratulations! You have: • set up your camera • taken pictures • transferred pictures to your computer Keep learning! Finish reading this book, so you can take and share your best pictures! Visit www.kodak.com/go/c140support: • the extended user guide • interactive troubleshooting and repairs • interactive tutorials • FAQs • downloads • accessories • printing information • product registration See the Extended user guide www.kodak.com/go/c140support www.kodak.
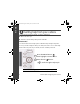
urg_00993.book Page 8 Monday, June 15, 2009 8:55 AM ENGLISH Front View 1 2 3 4 5 6 7 8 8 1 Shutter button 5 Self-timer light 2 Mode button 6 Lens 3 Power button 7 USB/AV Out 4 Flash 8 Microphone www.kodak.
ENGLISH urg_00993.book Page 9 Monday, June 15, 2009 8:55 AM Back View 1 2 3 4 5 8 6 7 1 LCD 5 2 Delete, Info, Menu, Review buttons 6 Share button 3 Zoom (Telephoto/Wide Angle) button 7 SD/SDHC Card/Battery compartment 4 Strap post 8 Tripod socket www.kodak.
urg_00993.book Page 10 Monday, June 15, 2009 8:55 AM 1 Doing more with your camera Press the Mode button, then to highlight a mode, then OK. Use this mode For General picture taking—it offers excellent image quality and ease of use. ■ Faces are detected. ■ The scene is analyzed for other content and for lighting. Auto You can choose the best picture size and aspect ratio for your needs—just button and choose Picture Size.
urg_00993.book Page 11 Monday, June 15, 2009 8:55 AM Doing more with your camera Taking a video 1 Press the Mode button, then , then press OK. to highlight Video 2 Press the Shutter button completely down, then release it. To stop recording, press and release the Shutter button again. To review and work with videos, see page 4. NOTE: Sound cannot be played on the camera. Sound is heard after the video is transferred to your computer.
urg_00993.book Page 12 Monday, June 15, 2009 8:55 AM Doing more with your camera SCN mode For Sunset Subjects at dusk. Backlight Subjects that are in shadow (when light is behind the subject). Candle Light Subjects illuminated by candle light. Children Action pictures of children in bright light. Manner/ Museum Quiet occasions, like a wedding or lecture. Flash and sound are disabled. Place the camera on a steady surface or tripod. Text Documents. Place the camera on a steady surface or tripod.
urg_00993.book Page 13 Monday, June 15, 2009 8:55 AM Doing more with your camera Using the optical zoom 1 To zoom in picture-taking mode, press Telephoto (T). To zoom out, press Wide Angle (W). 2 Take the picture. Using digital zoom ■ In video mode, press the Telephoto (T) button. In picture-taking mode, press the Telephoto (T) button until the slider on the LCD is at the maximum optical zoom range. Release Telephoto (T), then press it again.
urg_00993.book Page 14 Monday, June 15, 2009 8:55 AM Doing more with your camera Using the flash 1 Press the Info LCD. 2 Press Press button to show shortcuts on the to highlight the Flash icon on the LCD. to choose a Flash mode. NOTE: You can also press to choose a Flash mode when shortcuts are not visible. Flash modes Flash fires Auto When the lighting conditions require it. Fill (Flash On) Every time you take a picture, regardless of the lighting conditions.
urg_00993.book Page 15 Monday, June 15, 2009 8:55 AM Doing more with your camera Using shortcuts Shortcuts give quick access to the most popular functions. 1 Press the Info button to show shortcuts on the LCD. 2 Press to access functions like Flash, Exposure Compensation, Self-timer, and Auto focus. (You’ll see different functions in different modes.) 3 Press to choose a setting. To hide the shortcuts again, press . Shortcuts Press to show/hide shortcuts. www.kodak.
urg_00993.book Page 16 Monday, June 15, 2009 8:55 AM Doing more with your camera Using the menu button to change settings IMPORTANT: Your camera offers a built-in Help system. To get the most from your camera, see page 6. You can change settings to get the best results from your camera. 1 Press the Menu 2 Press button. to highlight a tab: ■ Capture/Video for the most common picture/video-taking settings ■ Setup for other camera settings 3 Press to highlight a setting, then press OK.
urg_00993.book Page 17 Monday, June 15, 2009 8:55 AM Doing more with your camera Understanding the picture-taking icons Self timer Exposure compensation Flash mode Capture mode Pictures/time remaining Zoom slider Tag name Battery level Date stamp www.kodak.
urg_00993.book Page 18 Monday, June 15, 2009 8:55 AM 2 Working with pictures/videos Deleting pictures/videos 1 Press the Review 2 Press button. for previous/next picture/video. 3 Press the Delete button. 4 Follow the screen prompts. Understanding the review icons Video duration Print tag/number of prints Protected Email tag Picture/Video number Select picture Shortcuts Add text tag View multi-up Play video Upload tag Battery level Favorite tag Date stamp Text tag name 18 www.kodak.
urg_00993.book Page 19 Monday, June 15, 2009 8:55 AM 3 Share your stories! A thousand ways to tell a story... and each begins with a picture. How do you tell yours? Prints • 4 x 6 pictures • Enlargements, posters • Collages • Photo books Photo gifts • Cards • Calendars • Mugs • Ties • Shirts www.kodak.com/go/c140support Digitally • EASYSHARE Digital Picture Frame • HDTV devices • Email ...
urg_00993.book Page 20 Monday, June 15, 2009 8:55 AM Share your stories! Pictures start here! 1 3 2 Load KODAK EASYSHARE Software. Take pictures. Transfer pictures to your computer. Pictures become stories here! At home KODAK All-in-One Printers Online At a local photo retailer KODAK Picture Kiosk www.kodak.com/go/tips 20 www.kodak.
urg_00993.book Page 21 Monday, June 15, 2009 8:55 AM 4 Solving camera problems Status Camera does not turn on/off Camera buttons and controls do not function In Review, a blue or black screen is displayed instead of a picture Pictures remaining number does not decrease after taking a picture Flash does not fire Solution ■ Make sure the batteries are charged and installed correctly (see page 1). ■ Transfer all pictures to the computer (see page 5). ■ Take another picture. ■ Continue taking pictures.
urg_00993.book Page 22 Monday, June 15, 2009 8:55 AM 5 Appendix CAUTION: Do not disassemble this product; there are no user-serviceable parts inside. Refer servicing to qualified service personnel. KODAK AC Adapters and Battery Chargers are intended for indoor use only. The use of controls, adjustments, or procedures other than those specified herein may result in exposure to shock and/or electrical or mechanical hazards. If the LCD breaks, do not touch the glass or liquid.
urg_00993.book Page 23 Monday, June 15, 2009 8:55 AM Appendix Limited Warranty Kodak warrants Kodak consumer electronic products and accessories (“products”), excluding batteries, to be free from malfunctions and defects in both materials and workmanship for the warranty period specified on your KODAK Product packaging. Retain the original dated sales receipt. Proof of the date of purchase will be required with any request for warranty repair.
urg_00993.book Page 24 Monday, June 15, 2009 8:55 AM Appendix Outside the United States and Canada In countries other than the United States and Canada, the terms and conditions of this warranty may be different. Unless a specific Kodak warranty is communicated to the purchaser in writing by a Kodak company, no warranty or liability exists beyond any minimum requirements imposed by law, even though defect, damage, or loss may be by negligence or other act.
urg_00993.book Page 25 Monday, June 15, 2009 8:55 AM Appendix Australian C-Tick N137 Korean Class B ITE China RoHS www.kodak.
urg_00993.book Page 26 Monday, June 15, 2009 8:55 AM Appendix Eastman Kodak Company Rochester, New York 14650 © Kodak, 2009 Kodak and EasyShare are trademarks of Eastman Kodak Company. 4H5264_en 26 www.kodak.