Kodak EasyShare photo printer 500 User’s Guide www.kodak.com For interactive tutorials, www.kodak.
Eastman Kodak Company Rochester, New York 14650 © Eastman Kodak Company, 2005 All screen images are simulated. The Bluetooth word mark and logos are owned by the Bluetooth SIG, Inc. and any use of such marks is under license. Wi-Fi® is a registered trademark of the Wi-Fi Alliance. Eastman Kodak Company is an authorized licensee of the CompactFlash trademark. Kodak, EasyShare, and XtraLife are trademarks of Eastman Kodak Company.
Product features Front/top/side view 1 19 18 2 3 4 5 17 6 16 7 8 9 15 14 13 12 11 10 1 LCD 10 Paper tray door 2 Power button/light 11 CF card slot 3 Color Cartridge light 12 Bluetooth button/light 4 Red-eye Reduction button/light 13 Cancel button 5 Transfer button/light 14 Paper light 6 Print button/light Left/Right Up/Down control 15 USB device connector 16 Menu button 7 8 SDIO card slot SD/MMC/Memory Stick/xD card slot 17 Rotate button 18 Slide show button 9 Paper tray
Product features Back/top/side view 1 7 ii 6 4 5 3 2 1 Power connector (DC-in) 4 Slot for paper path 2 USB connector (to computer) 5 Cartridge release 3 Cooling vents 6 Color cartridge (installed as shown) 7 Cartridge door www.kodak.
Table of contents 1 1 Getting started ......................................................................................1 Finding a location for your photo printer........................................................ 1 Connecting the power................................................................................... 2 Handling and storing the color cartridge ........................................................ 2 Installing and removing the color cartridge ..................................
Table of contents 4 Using the photo printer with a computer ............................................17 Installing the software................................................................................. 17 Connecting to a computer ........................................................................... 19 Transferring pictures from a card slot........................................................... 21 Transferring pictures from a USB device ...................................................
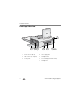
1 Getting started Finding a location for your photo printer ■ Place the photo printer on a flat, clean, dust-free surface, in a dry location, and out of direct sunlight. 5 in. (12.7 cm) ■ Allow at least 5 in. (12.7 cm) clearance from the back of the photo printer for paper travel. ■ For proper ventilation, make sure the top and back of the photo printer are not blocked. ■ When connecting power or USB cables, keep the cables clear of the paper path to the front and rear of the photo printer.
Getting started Connecting the power RISK OF ELECTRIC SHOCK: Use only the AC power adapter included with your photo printer. Other adapters or cords can damage your photo printer or computer. 1 Connect the AC power cord to the AC power adapter, then to the back of the photo printer. NOTE: The AC power cord included with your photo printer may not require assembly, and may be different from the one shown. 2 Connect the AC power cord into a power outlet.
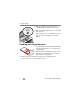
Getting started Installing and removing the color cartridge 1 Open the cartridge door on the side of the photo printer. 2 Check to make sure there is no slack in the color cartridge ribbon. To remove slack, push in on the cartridge spool, then rotate the spool clockwise. IMPORTANT: Be careful not to rotate the spool more than necessary. Doing so could reduce the number of prints you are able to make. 3 Slide the color cartridge in, label side up, with the arrow pointing toward the photo printer.
Getting started ■ When the cartridge is almost empty, the Color Cartridge light glows amber for several seconds. ■ When the cartridge is depleted, the Color Cartridge light glows red. After installing a new color cartridge, press the Print button to clear the cartridge error and resume printing. Handling and storing the paper ■ 4 ■ To avoid fingerprints, handle the paper by the edges or by the perforated tabs. Do not touch the glossy side of the paper.
Getting started Loading paper 1 Remove the paper tray from the photo printer if installed (see page 6). 2 Slide the paper tray cover back until it “clicks” into place, about 1.25 in. (3 cm), then lift up on the end of the paper tray cover. 3 Carefully “fan” the paper to keep the sheets from sticking together. IMPORTANT: Do not load more than 25 sheets of paper. Use the upper limit line inside the paper tray as a guide to prevent overloading. Do not load paper that is missing perforated tabs.
Getting started Installing the paper tray 1 Open the paper tray door on the photo printer. 2 Slide the paper tray cover back until it “clicks” into place, about 1.25 in. (3 cm). 3 Slide the paper tray in the printer tray slot until the tray locks into place. IMPORTANT: To ensure the paper tray fits squarely on the photo printer, make sure to keep the paper tray cover all the way open while installing. ■ Pull the paper tray out to remove it.
2 Printing without a computer Printing from a card or USB flash drive You can print pictures directly from your card or USB flash drive. Middle Slot: • SD/MMC (Secure Digital/MultiMedia Card/Reduced Size-MMC) • MS (Memory Stick, Memory Stick Duo, Memory Stick Pro, Magic Gate) • xD (xD-Picture Card) Left Slot: CF (CompactFlash Type I, II) 1 Insert a card or plug in a USB flash drive as shown. The current picture appears on the LCD. 2 Create a print order: ■ Press to locate a picture on the LCD.
Printing without a computer While the printer is printing When printing, the paper cycles four times. The first three passes apply layers of yellow, magenta, and cyan colors to the print. The fourth pass applies the Kodak XtraLifeTM coating that protects and preserves the image Removing the perforated tabs from the paper 1 Fold the tabs up, then down. 2 Remove each tab and discard. NOTE: Remove perforated tabs only after printing. Paper missing perforated tabs will not feed properly.
Printing without a computer Printing tagged (DPOF) pictures If your device or card contains pictures that are tagged for printing (DPOF—digital print order format), the photo printer gives you the option to print tagged pictures first. NOTE: If your camera can take pictures in 3:2 aspect ratio, use this setting. 3:2 ensures that your pictures are proportional to the photo printer paper. See your camera user’s guide for details. ■ ■ To print tagged pictures—press the Print button.
3 Doing more with your printer Use these features to improve and to share your pictures: ■ Reduce red-eye, page 10 ■ Picture size, page 12 ■ Wireless settings, page 15 ■ Rotate, page 10 ■ Color mode, page 14 ■ Language, page 15 ■ Slide show, page 11 ■ Donor level, page 15 ■ Default settings, page 16 ■ Crop, page 11 ■ Tagged prints, page 15 ■ About, page 16 Reducing red-eye in your pictures The EasyShare photo printer 500 automatically detects red-eye in your subjects and lets you correct your
Doing more with your printer Running a slide show Use the Slide Show feature to display your pictures on the photo printer LCD. 1 Insert a card in the card slot (or connect a USB device to your photo printer). 2 Press the Slide Show button. The slide show begins in 10 seconds. 3 If you want to change slide show settings, press to highlight a feature. Then press the Print button. ■ Interval—Choose how long a picture is displayed. ■ Loop—Choose if the slide show plays once, or repeats.
Doing more with your printer Changing the printed picture size 1 Set print options on the device you wish to print from. Refer to the appropriate section in this manual or see your device user’s guide. 2 Press the Menu button. 3 Press to highlight Picture Size, then press the Print button. 4 Press to highlight a picture size, then press the Print button. Picture Size setting Number and size of prints per sheet 1 up (full photo) One 4 x 6 in. (10.2 x 15.2 cm) picture 2 up (card size) Up to two 2.
Doing more with your printer NOTE: When printing from a PictBridge compatible device, picture size and number of copies are determined by the device’s multi-up and copies settings. Change these settings on your device before printing. If the picture size option selected on your device does not match any of the picture size options on the photo printer, the closest available picture size option on the photo printer is automatically selected.
Doing more with your printer Printing duplicate pictures on the same sheet 1 Insert a card in the card slot (or connect a USB device to your photo printer). 2 Choose a picture size: ■ Press the Menu button. ■ Press to highlight Picture Size (page 12), then press the Print button. ■ Press to choose a picture size, then press the Print button. 3 Create a print order: ■ Press to locate a picture on the LCD. ■ Press to choose the number of prints for each picture.
Doing more with your printer Checking the donor level 1 Press the Menu button. 2 Press to highlight Donor Level, then press the Print button. The estimated prints remaining and cartridge size are displayed. Printing tagged prints NOTE: This menu choice is available only if pictures have been tagged on your device or card. 1 Press the Menu button. 2 Press to highlight Tagged Prints, then press the Print button. 3 If tagged prints are available, follow the prompts to print them.
Doing more with your printer Changing default settings 1 Press the Menu button. 2 Press to highlight Default Settings, then press the Print button. 3 Press to highlight a choice, then press the Print button. ■ Picture Size ■ Color Mode ■ Red-eye Reduction Reset Defaults The current default for each setting is denoted. 4 To change a default setting, follow the prompts. To reset all settings to the factory defaults, choose Reset Defaults. ■ Viewing the About screen 1 Press the Menu button.
4 Using the photo printer with a computer Installing the software IMPORTANT: Install EasyShare software before connecting the printer to the computer. 1 Close all software applications that are open on your computer (including anti-virus software). 2 Place the Kodak EasyShare software CD into the CD-ROM drive. 3 Load the software: Windows OS—if the install window does not appear, choose Run from the Start menu and type d:\setup.exe where d is the drive letter that contains the CD.
Using the photo printer with a computer IMPORTANT: When prompted, take a few minutes to electronically register your photo printer and software. You must be connected to your Internet service provider to register electronically. To register later, visit www.kodak.com/go/register. 5 Restart the computer if prompted. If you turned off anti-virus software, turn it back on. See the anti-virus software manual for details.
Using the photo printer with a computer Mac OS X: 1 Double-click the operating drive for your system. 2 Select Library, then select Printers. 3 Open the Kodak folder, then open the photo printer folder. 4 Double-click the photo printer uninstaller program. 5 Follow the on-screen instructions. Connecting to a computer IMPORTANT: Make sure your camera or other device is NOT connected when you connect the photo printer to the computer.
Using the photo printer with a computer 4 Mac OS X— Add the printer to your computer (Mac OS 10.2.8 - 10.3.9) a Open the Finder window, then click the Applications button. (Or open the Applications folder on your operating drive.) b Open the Utilities folder, then double-click Printer Setup Utility. c Click Add. d From the menu, select Kodak printer. e Select the printer, then click Add. The printer is added to your computer. Add the printer to your computer (Mac OS 10.
Using the photo printer with a computer Transferring pictures from a card slot 1 Make sure Kodak EasyShare software is installed (see page 17) and the photo printer is connected to your computer (see page 19). 2 Insert a card (see page 7.) The current picture is displayed on the LCD. 3 Press the Transfer button on the photo printer. Kodak EasyShare software opens on your computer. 4 Use Kodak EasyShare software to transfer pictures from the card to your computer.
Using the photo printer with a computer Transferring pictures from a USB device 1 Make sure Kodak EasyShare software is installed (see page 17) and the photo printer is connected to your computer (see page 19). 2 Plug the USB connector from the USB device into the USB connector located on the side of the photo printer. NOTE: If the USB device is already plugged in but no longer recognized, disconnect then reconnect it to re-establish the connection. 3 Press the Transfer button on the photo printer.
Using the photo printer with a computer Printing from a computer We recommend using Kodak EasyShare software (included) for printing. This software lets you take advantage of a wide range of features, including editing and printing options, picture organization, and much more. IMPORTANT: Wait until printing is complete before removing paper or the paper tray. Failure to do so can cause paper misfeeds or jams.
Using the photo printer with a computer Printing from other applications 1 Make sure the printer driver is installed (see page 17), and the photo printer is connected to your computer (see page 19). 2 Open the pictures you wish to print in the application from which you want to print. 3 Access printer settings by selecting Print or Page Setup from the File menu (depending on your application and operating system). 4 Make sure the photo printer is selected as the current printer.
Using the photo printer with a computer To change the color mode: Windows 2000/XP OS: 1 From the Start menu, select Settings, then select Printers. NOTE: Depending on your Start Menu configuration, you may need to select Printers and Faxes from the Control Panel. 2 Right-click the Kodak EasyShare photo printer 500 icon, then select Printing Preferences. 3 Click the Color Correction tab. 4 Select a color correction option, then click OK.
Using the photo printer with a computer Canceling printing Windows OS: 1 Double-click the printer icon in the system tray. 2 Click the print job you want to cancel. 3 Select Document, then select Cancel. Mac OS X: 1 In Print Center, double-click the printer icon. 2 Click the job you want to cancel, then select Delete. 26 www.kodak.
5 Using the wireless features of your photo printer Printing from a Bluetooth® wireless technology enabled device The on-board Bluetooth radio uses Bluetooth 1.1 technology, allowing you to print from compatible Bluetooth technology enabled devices, including many personal digital assistants (PDAs) and wireless mobile telephones. Use your wireless device to review pictures, choose printing options, and print.
Using the wireless features of your photo printer To print from your Bluetooth technology enabled device: 1 Set wireless technology on your device to On, then select pictures to print. Available Bluetooth wireless technology devices are displayed on your device. 2 Select your printer on your device. NOTE: If your device requires you to set authentication, enter pin number 1111 (default). 3 Select Send or Beam on your device. The selected images are sent to the photo printer for printing.
Using the wireless features of your photo printer Printing and transferring over a Wi-Fi wireless network Insert a Kodak Wi-Fi® card (sold separately) into the card slot. Then, print and transfer pictures using your photo printer on an existing Wi-Fi wireless (Infrastructure) network, or print pictures directly to your photo printer over a Wi-Fi wireless device-to-device (Ad-Hoc) network. Example of a wireless Infrastructure network: Example of an Ad-Hoc network: www.kodak.
Using the wireless features of your photo printer Adding your printer to a Wi-Fi wireless network 1 If a USB device is connected to the photo printer, disconnect it. IMPORTANT: Insert card only as shown. Do not force the card into the card slot. 2 Push the Kodak Wi-Fi card into the card slot to seat the connector. The card slot light blinks as the photo printer scans for available networks. Once connected, the card slot light glows steady.
Using the wireless features of your photo printer Add the printer as a wireless printer to your computer: a From the Start menu, select Programs (or All Programs). b Open the Kodak folder, then open the EasyShare printer folder. c Select Kodak wireless printer computer setup assistant. d Click Next. e Select the printer, then click Next. The wireless printer is added to your computer (represented as a wireless “copy” of your printer in the Windows OS list of printers).
Using the wireless features of your photo printer Print pictures over your Wi-Fi wireless network 1 Add the photo printer to your Wi-Fi wireless network (see page 23). IMPORTANT: Add the printer to the same network as the computer or device you want to print from. If printing from EasyShare software, make sure Enable WIreless Connections is selected in Preferences. (For details, click the Help button in EasyShare software.) 2 On your computer (or your Wi-Fi enabled device), select and print pictures.
6 Care and maintenance General care IMPORTANT: Always disconnect the power before cleaning. Do not use harsh or abrasive cleaners or organic solvents on the photo printer or any of its parts. ■ To clean, wipe the outside of the photo printer and LCD with a clean, dry cloth. ■ Support the photo printer and tray by placing it on a flat, level surface. Do not block the cooling vents. ■ Avoid blocking the back of the photo printer and paper tray exit.
Care and maintenance Cleaning the paper feed roller To prevent misfeeds and to make sure your pictures look their best, we recommend that you keep the paper feed roller clean. Inspect the roller weekly for debris particles, and clean if necessary. IMPORTANT: Unplug the power before cleaning the paper feed roller. 1 Unplug the AC power cord from the power outlet. 2 Remove the paper tray from the photo printer, and leave the paper tray door open. 3 Lightly moisten a lint-free cloth with water.
Care and maintenance Traveling with your photo printer IMPORTANT: When traveling, keep the photo printer, accessories, and supplies away from direct sunlight and out of high-temperature environments (such as a vehicle parked in the sun). Consider purchasing the AC power cord for the region to which you are traveling. 1 Turn off the photo printer. Disconnect all cables. 2 Remove the paper tray from the photo printer; close the paper tray cover and the paper tray door on the photo printer.
7 Troubleshooting When you have questions about your photo printer, start here. Additional technical information is available in the ReadMe file located on the Kodak EasyShare software CD. For updates to Troubleshooting information, visit www.kodak.com/go/printerdocks. Printing problems If... Try the following Paper does not IMPORTANT: Use only Kodak color cartridge & photo paper kits for your photo printer. Do not use inkjet paper. feed (Paper light may ■ The paper tray may be empty.
Troubleshooting If... Try the following Multiple sheets 1 Remove the paper tray (page 6). of paper are 2 Remove the paper supply from the paper tray. Carefully “fan” the paper pulled through to keep the sheets from sticking together. printer 3 Reload the paper tray. Do not exceed the fill line. 4 Re-install the paper tray, then press to resume printing. IMPORTANT: Use only Kodak color cartridge & photo paper kits for your photo printer. Do not use inkjet paper.
Troubleshooting If... Try the following Printing stops IMPORTANT: Use only Kodak color cartridge & photo paper kits for your photo printer. Do not use inkjet paper. during mid-print (paper stops ■ Check the paper: feeding, and 1 Remove the paper tray (page 6). Paper light may blink) 2 Check the paper slot on the back of the photo printer. 3 Remove loose paper from the photo printer. If paper is jammed, see page 37.
Troubleshooting If... Try the following Print is too light IMPORTANT: Use only Kodak color cartridge & photo paper kits for your photo printer. Do not use inkjet paper. ■ Make sure the paper is loaded with the Kodak logo facing down. Reload if necessary (page 5). ■ Try re-taking the picture with the flash off. See your camera user’s guide for details. ■ Adjust the exposure compensation on your camera, and try re-taking the picture. See your camera user’s guide for details.
Troubleshooting If... Try the following Nothing happens when you try to print ■ Check the power connections (page 2). ■ Remove the paper tray, check that paper is properly loaded, and re-install (page 6). ■ If the Paper light glows steady red, load paper (page 5). ■ Make sure the color cartridge is properly installed (page 3). If the Color Cartridge light is on, install a new cartridge. ■ If printing from a USB device, make sure the device is turned on (if applicable).
Troubleshooting If... Try the following Printing is slow NOTE: When printing a large number of prints, printing may slow down to prevent the print head from overheating. Turning on the red-eye reduction feature may result in longer printing times. ■ Make sure the photo printer is not placed in direct sunlight or is not operating in a high-temperature environment. ■ Make sure the cooling vents are not blocked or dirty (page 1). ■ Close unnecessary software applications.
Troubleshooting If... Try the following Nothing happens when you try to print from a Bluetooth technology enabled device ■ The internal Bluetooth radio is off. Press the Bluetooth button, then try again. ■ Move within range of the Bluetooth radio signal (30 ft, or 10 m). ■ The device does not find the printer. On the device, turn wireless technology on, then repeat the discovery process. ■ The device does not use an OPP or FTP profile. Transfer/communication problems If...
Troubleshooting Wireless network connection Problem Cause and/or solution Photo printer cannot ■ A Kodak Wi-Fi card is not inserted or is not fully inserted. Reinsert the Wi-Fi card (page 29). connect to the network ■ Check the power connections. ■ Make sure the wireless router and network are running before the photo printer begins scanning for a network. ■ Out of range of the Wi-Fi signal. Make sure the photo printer is located within the operating range of the Wi-Fi wireless network.
Troubleshooting Print button/light Light status Cause Action/solution Light is off There are no pictures in the camera or on the card. None required. To enable Print: 1 Take pictures. The compatible device is not connected. 2 Connect the camera or compatible USB device (page 8). The camera or USB device is None required. transferring pictures to the When transfer is complete, press computer, or has established an the blinking Transfer button, . active connection to the computer.
Troubleshooting Color Cartridge light Light status Cause Action/solution Light slowly blinks amber for several seconds The color cartridge is nearly depleted. None required. Light blinks red There is a color cartridge jam. Clear the jam (page 37), then press . Light glows steady red The color cartridge is depleted. Install a new color cartridge (page 3), then press . The color cartridge is not installed or is not fully seated. Remove and re-install the color cartridge (page 3), then press .
Troubleshooting Paper light Light status Cause Action/solution Light glows steady red The paper tray is empty. Load paper (page 5), then press The paper tray is not installed or is improperly installed. Remove the paper tray, check that paper is properly loaded, and re-install (page 6). Press to resume printing. . Paper did not feed; removable tabs may Check the paper supply. Reload be missing or sheets may be stuck with new paper if necessary, then together (page 36). press .
Troubleshooting Transfer button/light Light status Cause Light blinks green Pictures are being transferred None required. to the computer. After transferring pictures, the Transfer light continues to blink green until either the Transfer button is pressed again or the connection is no longer available. Action/solution Light is off There are no pictures in the camera or on the card. None required.
Troubleshooting USB device connector light Light status Cause Light is off There is no device connected to None required. the USB device connector on the printer. The connection between the printer and device is loose. Action/solution Check the USB connections from the device to the printer. A device other than a compatible Disconnect the device. Connect a Kodak Kodak card reader or PictBridge 8-in-1 card reader, or a PictBridge compatible camera or device is compatible camera or device. connected.
Troubleshooting Red-eye Reduction button/light Light status Cause Action/solution Light glows steady Red-eye reduction has been applied to pictures for None required. green the current print job. To turn red-eye reduction on or off, Light is off Red-eye reduction has not been selected. press the Red-eye Reduction button. Bluetooth button/light Light status Cause Action/solution Light glows steady The Bluetooth radio is on; the printer is blue ready to receive Bluetooth signals.
Troubleshooting Other 50 Get support for Kodak printers, cameras, software, accessories, more www.kodak.com/go/support Get information on Kodak EasyShare photo printers www.kodak.com/go/printerdocks Get information on Kodak inkjet products www.kodak.com/go/inkjet Optimize your printer for truer, more vibrant colors www.kodak.com/go/onetouch Register your photo printer www.kodak.com/go/register www.kodak.
Troubleshooting Telephone customer support If you have questions concerning the operation of the software or printer, you may speak with a customer support representative.
8 Appendix Photo printer specifications For more specifications, visit www.kodak.com/go/printerdocks.
Appendix Photo printer specifications Paper size with perforated tabs 4 x 7.25 in. (10.2 x 18.4 cm) Picture resolution 300 ppi, continuous tone LCD 3.5 in. (8.9 cm); TBD dpi Compatible input devices Memory card slots: CompactFlash Type I, Secure Digital/MultiMedia Card/Reduced Size-MMC, Memory Stick (Memory Stick Duo, Memory Stick Pro, Magic Gate), xD-Picture Card. USB port: USB flash drive (USB key), Pictbridge compatible camera, Bluetooth device supporting OBEX OPP.
Appendix Important safety instructions Using this product ■ Read and follow these instructions before using Kodak products. Always follow basic safety procedures. ■ Use only a USB-certified computer. Contact your computer manufacturer if you have questions. ■ The use of an accessory attachment that is not recommended by Kodak, such as an AC adapter, may cause fire, electric shock, or injury. CAUTION: Do not disassemble this product; there are no user-serviceable parts inside.
Appendix Additional care and maintenance ■ Do not allow chemicals, such as suntan lotion, to come into contact with the painted surface of the photo printer. ■ If the photo printer has been subjected to inclement weather or you suspect water has gotten inside the photo printer, turn off the photo printer and remove the paper tray and color cartridge. Allow all components to air-dry for at least 24 hours before using the photo printer again.
Appendix Limited warranty coverage This limited warranty will be honored only within the geographical location that Kodak EasyShare digital cameras and accessories were purchased. Kodak will REPAIR or REPLACE Kodak EasyShare digital cameras and accessories if they fail to function properly during the warranty period, subject to any conditions and/or limitations stated herein. Such repair service will include all labor as well as any necessary adjustments and/or replacement parts.
Appendix The option of replacement is Kodak’s only obligation. Kodak will not be responsible for any special, consequential or incidental damages resulting from the sale, purchase, or use of this product, regardless of the cause.
Appendix This equipment has been tested and found to comply with the limits for a Class B digital device, pursuant to Part 15 of the FCC Rules. These limits are designed to provide reasonable protection against harmful interference in a residential installation. This equipment generates, uses, and can radiate radio frequency energy and, if not installed or used in accordance with the instructions, may cause harmful interference to radio communications.
Appendix SAR statement (when using with Wi-Fi card) The available scientific evidence does not show that any health problems are associated with using low power wireless devices. There is no proof, however, that these low power wireless devices are absolutely safe. Low power wireless devices emit low levels of radio frequency energy (RF) in the microwave range while being used.
Appendix Waste Electrical and Electronic Equipment labeling In the European Union, do not discard the product as unsorted municipal waste. Contact your local authorities or go to www.kodak.com/go/recycle for recycling program information. Korea Class B ITE VCCI Class B ITE English translation: This is a Class B product based on the standard of the Voluntary Control Council for Interference from Information Technology Equipment (VCCI).
Index A AC power adapter & cord, connecting, 2 accessories & supplies, ordering, 49 B Bluetooth button, i, 27, 46, 49 button Bluetooth, i, 27 cancel, i, 7 crop, i menu, i power, i print, i, 7 red-eye reduction, i rotate, i slideshow, i transfer, i, 21, 29 C cable AC power adapter & cord, 2 USB, 8, 19, 22 Canadian DOC statement, 59 cancel button, i, 7 card slot, i card reader printing, 7 slot, 7 transferring pictures, 21 troubleshooting, 48 care & maintenance www.kodak.
Index D DC-in, power connector, ii, 2 disposal and recycling of printer, 55 door cartridge, ii, 3 paper tray, i, 6 F FCC and Industry Canada, 59 compliance and advisory, 57 firmware, upgrading, 49, 54 H help software, 49 telephone support, 51 troubleshooting, 36 Web links, 49 I installing paper tray, 6 software, 17 K Kodak EasyShare software help, 49 installing, 17 printing with, 23 uninstalling, 18 Kodak Web sites, 49 Kodak Wi-Fi card. See wireless 62 L layout.
Index handling, storing, 4, 8 light, i, 45 loading, 5 removing perforated tabs, 8 slot, ii paper tray, i door, i installing, removing, 6 PictBridge compatible device, printing from, 8 picture size and number of copies, 12 changing default, 12 printing different pictures on same sheet, 13 printing different sizes/layouts, 12 printing duplicate pictures on same sheet, 14 pictures automatic color correction of, 24 printing different pictures on same sheet, 13 printing duplicate pictures on same sheet, 14 prin
Index Class B ITE, 60 FCC and Industry Canada, 59 FCC compliance and advisory, 57 SAR statement, 59 VCCI Class B ITE, 60 Waste Electrical and Electronic Equipment labeling, 60 wireless channels, 53 rotate button, i S safety, 54 SAR statement, 59 SD/MMC/Memory Stick/xD card slot, i SDIO card slot, i service and support, 51 setup color cartridge, 3 loading paper, 5 location for photo printer, 1 paper tray, 6 slideshow button, i slot card, i paper path, ii software help, 49 installing, 17 Kodak EasyShare, pri
Index W warranty, 55 Waste Electrical and Electronic Equipment labeling, 60 Wi-Fi See wireless Windows OS installing software on, 17 uninstalling software, 18 wireless network, troubleshooting, 43 printing and transferring via Wi-Fi, 29 Wi-Fi card, 29 www.kodak.