
Owner manual

1-2 A-61628 December 2011
System requirements The Kodak Scan Station 500/520EX - Scanner Administration which is
installed on a separate PC, requires one of the following operating
systems:
• Windows XP Service Pack 2 and 3
• Windows Vista, Service Pack 2
• Windows 7
All require Microsoft .Net 2.0 Framework and Microsoft Installer v3.0,
which will automatically be installed if not detected.
What’s in the box Before you begin open the box and check the contents:
• Kodak Scan Station 500
• Power cord bundle
• Portable USB flash drive
• Welcome Folio which includes:
- Installation CDs:
Scanner Administration and Supporting Documentation
User Configuration Organizer and Supporting Documentation
- Registration sheets
- Printed User’s Guide, English
- Printed Administrator’s Guide, English
- Maintenance Reference Guide
- User Reference Guide
- Installation Guide
- Country Contact sheet
- Miscellaneous flyers
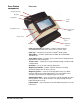
Setting up the Scan
Station
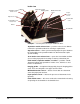
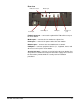
Carefully unpack the Scan Station 500 and place it on a clean, dry and
level surface. Refer to the “Rear view” illustration later in this chapter for
port locations.
1. Select the appropriate AC power cord and plug one end of the
power cord into the power port of the Scan Station and the other end
into the wall outlet.
2. Plug one end of the 10/100 Base T network cable (customer
provided) into the Ethernet port of the Scan Station and plug the
other end of the network cable into the network drop’s wall outlet.
3. When the Scan Station is properly connected, press the power
button and wait a few moments for the Scan Station to start up and
display the application.
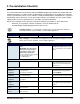
4. Proceed to Chapter 2, Pre-installation Checklist to review and
gather the necessary configuration information before installing the
Kodak Scan Station 500/520EX - Scanner Administration and
creating your administrative configuration file.