Safety • Place the Kodak Scan Station 500 on a level work surface capable of supporting 13.6 kgs (30 lbs). • When placing the Scan Station, make sure that the electrical power outlet is located within 1.52 metres (5 feet) of the Scan Station and is easily accessible. • When relocating the Scan Station, it is recommended that two people lift the Scan Station and use safe lifting techniques. • Do not install the Scan Station in a location subject to dust, humidity or steam.
EMC statements United States: This equipment has been tested and found to comply with the limits for a Class A digital device pursuant to Part 15 of the FCC rules. These limits are designed to provide reasonable protection against harmful interference when the equipment is operated in a commercial environment. This equipment generates, uses, and can radiate radio frequency energy and, if not installed and used in accordance with the instruction manual, may cause harmful interference to radio communications.
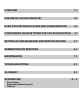
OVERVIEW 1-1 PRE-INSTALLATION CHECKLIST 2-1 SCAN STATION INSTALLATION AND CONFIGURATION 3-1 CONFIGURING SCAN SETTINGS FOR THE SCAN STATION 4-1 SETTING UP AND MANAGING DESTINATION GROUPS 5-1 ADMINISTRATION SPECIFICS 6-1 MAINTENANCE 7-1 TROUBLESHOOTING 8-1 GLOSSARY 9-1 APPENDICIES Specifications Supported Network Protocols Warranty A–C
1 Overview Contents Chapter summary ........................................................................... 1-1 System requirements ...................................................................... 1-2 What’s in the box ............................................................................ 1-2 Setting up the Scan Station............................................................. 1-2 Scan Station components ...............................................................
System requirements The Kodak Scan Station 500/520EX - Scanner Administration which is installed on a separate PC, requires one of the following operating systems: • Windows XP Service Pack 2 and 3 • Windows Vista, Service Pack 2 • Windows 7 All require Microsoft .Net 2.0 Framework and Microsoft Installer v3.0, which will automatically be installed if not detected.
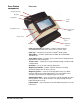
Scan Station components Front view Input tray extender Input tray Side guides Power button Scan Station cover Stop/Logout button Touch screen Output tray panel Go button Output tray extender Input tray extender (not shown) — pull this extender out to accommodate document sizes over 8 1/2 x 11 inches (A4). Input tray — holds up to 75 sheets of 75 g/m2 (20 lb.) paper. Side guides — slide the guides back and forth to accommodate document size.
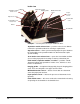
Inside view USB port Separation module release lever Separation module Imaging guides Multifeed detection sensor Gap release lever Paper present sensor Feed module cover Scan Station cover release lever Rollers Feed module USB port — use this port to insert your USB flash drive. Separation module release lever — push the release lever down to remove the separation module for cleaning or replacement.
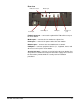
Rear view Flatbed connector Power port Modem port Ethernet port USB ports Security lock port Flatbed connector — connects the optional A3 Flatbed Accessory to the Scan Station. Modem port — connects the fax modem to a phone line. Power port — connects the power cord to the Scan Station. Ethernet port — connects the Scan Station to the network. USB ports — connects peripheral devices (i.e., keyboard, mouse and other accessories) to the Scan Station.
2 Pre-installation Checklist It is recommended that you fill out this worksheet before configuring the Kodak Scan Station 500. This network information is needed to create an administrative configuration file to complete the installation. Locate any information you are unsure of before creating the administrative configuration file. If you have trouble filling out this worksheet, see the person who manages your network.
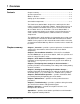
Device Settings (continued) — found under the Settings button in the Configuration Organizer or Scan Station when using the KSS500 - Scanner Admin application. Parameter Name Description/Sample Your Setting Notes • Alternate WINS Server Alphanumeric IP address of Windows Internet Name Server #2 Device/ Administrator Password Optional numeric password to restrict access to the Scan Station. Entered via the virtual keyboard at each access. May be alpha or numeric characters up to 30 characters long.
Email Server Settings — found under the Settings button in the Configuration Organizer or Scan Station when using the KSS500 - Scanner Admin application. Parameter Name Description/Sample Your Setting Notes SMTP Settings • Server Address Fully qualified domain name or IPv4 address of the SMTP server (e.g., smtp-server. company.com or 192.0.0.1). Use IPv4 to eliminate any DNS issues when troubleshooting. • Credentials User name, password and network domain. Required to access the SMTP server.
LDAP Settings (continued) Return Email Address This is the address that bounced emails are returned to (e.g., bounce@company.com). This address will also appear as the default “From” address when sending email. Select a person who will receive notification that an email address could not be reached. Maximum Attachment Size 1-99 MB Default: 99 MB Email operations that create files larger than this will fail. This should match the limitations defined by your email server.
3 Scan Station Installation and Configuration Contents A-61628 December 2011 Setup Wizard .................................................................................. 3-2 Installing the Kodak Scan Station 500/520EX - Scanner Administration application ............................................................ 3-6 Menus ............................................................................................. 3-8 Toolbar ...........................................................................
Setup Wizard When the Scan Station 500 is turned on for the first time, the setup wizard automatically starts which provides a step-by-step procedure allowing you to select configuration options (i.e., time, date, etc.) when connecting to the network. Other configuration options are also required for Scan Station setup (i.e., email and fax configurations, etc.); however, these options are setup using the KSS500 - Scanner Administration application.
2. Select any of the options you want to configure: • Device Name: allows you to enter the device name. • Date: allows you to set the date on the Scan Station. • Time Zone: allows you to select the desired time zone. • Time: allows you to set the time on the Scan Station. • Device/Administrator Password: allows you to set a password that provides access to the Scan Station. • Network Settings: allows you to configure the Scan Station’s network address.
If you selected Time Zone, the following screen will be displayed. 6. Select the desired time zone and click Next. If you selected Time, the following screen will be displayed. 7. Enter the desired time and click Next. If you selected Device/ Administrator Password, the following screen will be displayed.
8. Enter the desired password and click Next. The following screen will be displayed. 9. Select Obtain an IP Address automatically to use DHCP to obtain an IP address to connect to the network or Assign an IP Address to enable you to enter the desired IP address and click Next. The following screen will be displayed. 10. Enter the required IP Address, Subnet Mask, Default Gateway, Preferred DNS Server information and click Done. A screen summarizing your settings will be displayed. 11.
Installing the Kodak Scan Station 500/ 520EX - Scanner Administration application You must install the KSS500 - Scanner Administration application (KSS500 - Scanner Admin) on a separate computer. The KSS500 Scanner Admin application allows you to properly setup, configure and manage Scan Station 500 devices over a network in an efficient and productive manner. This application communicates with Kodak Scan Station 500 devices over the network; thereby minimizing individual access to multiple Scan Stations.
9. After installing the application, the Kodak Scan Station 500/520EX Scanner Admin main screen will be displayed. NOTE: The KSS500 - Scanner Admin main screen contains the specific data to identify and connect to Scan Stations on a network. Scanner Name — displays the name assigned to the Scan Station. IP Address — displays the IP address that is associated with the Scan Station.
Menus The KSS500 - Scanner Admin application provides the following menus: File, Edit, Scanner and Help. File menu — the File menu provides these options: Save — displays the Save as dialog box which allows you to select a file name and directory to save the Scan Station identification data in an xml file format. Open — displays the Open dialog box which allows you to open a previously saved Scan Station identification xml file format.
Refresh — displays the current state of the Scan Station: • Idle — currently active on the network. • Scanning — Scan Station is scanning. • Processing images — the Scan Station is processing images (i.e., converting images to PDF). • Sending e-mail — the Scan Station is sending an e-mail. • Saving — images are being saved to a USB drive, network folder, FTP site, or a SharePoint or Evernote site. • Printing — the Scan Station is printing images.
Scanner menu — the Scanner menu provides Device, Configuration and Power Options. Device — provides the following options: • Retrieve Logs: allows you to save the log files retrieved from the selected Scan Station. • Clear Logs: when selected the following message will be displayed, Are you sure you want to clear the log files of the selected scanner? If you click Yes, the log files will be cleared.
Toolbar The Toolbar provides quick access to commonly used functions. The toolbar is always displayed. You cannot add, delete or move toolbar buttons. Icon Description Displays the Save as dialog box which allows you to select a file name and directory to save the Scan Station identification data xml file format. Displays the Add Scanner dialog box, which allows you to setup Scan Stations that will be managed remotely.
Network configuration options Before you can start adding Scan Stations you must know the IP address or the Scan Station’s device name; preferably both. Whether you are administrating a Scan Station that is located next to you or across the country on the same network, you must have this information before administering a Scan Station using the KSS500 Scanner Admin application. To get the name of your Scan Station: 1. Be sure the Scan Station is on and the application is running. 2.
4. Enter the device’s password. NOTES: • This field can be left blank. Leave this field blank if the password has not been changed. • This field will be grayed out and not needed if the password has not been changed. 5. Enter the name of the group (or location). For example, the Scan Station may be located in the main branch of a corporation. 6. Enter any additional information that is important to you in the Comment field.
Discovering devices The Discover Devices option allows you to scan a range of IP addresses to find and automatically register any Scan Station that has an IP address that falls within the defined range of addresses. NOTE: The Discover Devices option only works on Scan Stations that have not had their password changed from the factory default. 1. Select Edit>Discover Devices. The Discover Devices dialog box will be displayed. 2.
Modifying a Scan Station 1. Select Edit>Modify Scanner. The Modify Scanner dialog box will be displayed. 2. Make any required changes. NOTE: If you select Static IP Address, the Static IP Address window will be displayed allowing you to change IP address settings. 3. Click Update. NOTE: When changing from a Static IP address to DHCP IP address, you may have to click the Update Status icon screen to see the IP Address change.
Deleting a Scan Station 1. Select Edit>Delete Scanner. The Delete Scanner dialog box will be displayed. 2. Click Yes. Changing a password 1. Select Edit>Change Password. The Change Password dialog box will be displayed. 2. Enter the current Scan Station password in the Current password field. 3. Enter the new password in the New Password field. 4. Re-enter the new password in the Confirm new password field. 5. Click OK.
Administrative and user configuration files Within the KSS500 - Scanner Admin application is the Configuration Organizer which allows you to create administrative and user configuration files. The Configuration Organizer is used to create either administrative or user configuration files that are used to configure the Scan Station 500. The Configuration Organizer file is named KSS500.XML and can only be read by the Scan Station and Configuration Organizer. It can also be password protected.
Configuring your Scan Station This section provides the steps needed to configure your Scan Station. Before you begin, you need to know some basic information about your network configuration as well as network addresses (e.g., your Email server and any shared folders you may want to access from your Scan Station). Refer to the Pre-Installation Checklist in Chapter 2 as you are configuring your Scan Station. NOTE: Use the scroll arrows on the side and top of each screen to display all options. 1.
Language setting The language you select will be used to configure the Scan Station’s user interface. 1. Select the Language icon. 2. Select the desired language. Device settings Clicking the Device icon displays a list of settings which will be used to configure the Scan Station to work on your office network. • The Scan Station is configured with a unique device name at the factory. It is highly recommended that you do not change the default name: “OEMXXXXXX”.
1. Select IP Address to configure the device’s network address. Select one of the following: • If your network uses dynamic IP addresses, click Automatic (DHCP), click Done and proceed to the next section, “E-mail settings”. • If your network uses static IP addresses, click Static (IPv4) and continue. • Make any required changes to the following Static IP Address options. When finished making an entry in these fields, click Done to accept the values and close the screen.
2. If desired, select Device/Administrator Password to passwordprotect the Scan Station. You will be asked to re-enter the password. When finished, click Done. NOTES: • If you assign a device password, all users will be prompted to enter this password every time they use the Scan Station. This does not take the place of your Scan Station’s administrative configuration file password. • If Force User Login is enabled, this password will be used as the administrator account password. 3.
When selected, the Remote Configuration Settings screen will be displayed. - Enter a network folder where the Scan Station will find updated configuration settings. - Select which day(s) of the week this operation will be performed. - Select the time of day you want your Scan Station to check for updates. 5. Click Done. NOTE: When updating a configuration using this method, the following fields will not be updated: Device Name, IP Address and Device Password. 6.
The Setup Wizard screen will be displayed. 8. Click Run the wizard at next boot-up. NOTE: See the section entitled, “Setup Wizard” earlier in this chapter for more information.
E-mail settings For the Scan Station to send documents to email recipients, you must define how the Scan Station will access your email server. SMTP, LDAP, Return Email Address and Maximum Attachment Size settings are configured from the E-mail screen. • Select the E-mail icon. SMTP settings 1. Select SMTP Settings. 2. Select SMTP Server Address. 3. Enter an IP address or a fully qualified domain name (e.g., mailserver.mycompany.com). 4. Click Done.
5. Select Credentials to define the email server credentials. NOTE: If you are using an unauthenticated SMTP server, you do not need to make any selections in the Credentials fields. 6. Enter a Username, Password and an optional Domain name on the Credentials screen for the email server account that the Scan Station will log into. Even though these credentials may be the same as the Default Credentials, they must still be defined here. 7. Click Done. 8. Most email servers communicate on Port 25.
11. The default for SSL is to not use SSL. If your email server requires Secure Socket Layer (SSL), check Use SSL. 12. Select Use StartTLS if you want to enable a secure SMTP connection. NOTE: Make sure your mail server is configured to use STARTTLS. If it is not, the Scan Station will fail to send an E-mail. 13. When your SMTP connection is configured, select Test Connection to test whether your settings are correct.
LDAP settings Connecting to an LDAP server allows the Scan Station and the Configuration Organizer to connect to a network address directory. This connection can be used to import one or more email addresses into an email address group. It can also be used to look up addresses on the Scan Station to temporarily add an email address to an email group list. 1. From the E-mail screen, select LDAP Settings. 2. Select the LDAP Server Address. 3. Enter an IP address or a fully qualified domain name (e.g.
9. The Base DN (Distinguished Name), Search Field Tag, Email Address Tag, and Full Name Field Tag are strings that define the search criteria for the LDAP server. See your network administrator for the specific format of these strings. When you have the correct format, enter the Base DN, Search Field Tag, Email Address Tag and Full Name Field Tag. 10. Select Search Results To Return to set the maximum number of records to display when performing a search. Select a number from 1 to 1000.
11. Select Security Options to set the Security Type and/or Certificate. • Click Security Type to setup a secure connection to your active directory server. Selections are: None, SSL or TLS. • Click Certificate. The displayed dialog box will allow you to select a certificate file or enter the full path to the desired certificate file. NOTE: Some certificates require a password. If your certificate requires a password, enter the password. 12. Click Done. 13.
Return e-mail address Setting the Return E-mail Address allows you to receive notification if an email sent by the Scan Station could not be delivered. This address is also used as the default “From” email address when sending documents via email. IMPORTANT: Be careful about setting this option as every undeliverable email notification will be sent to this address and the same address will appear as the Sender address for every email sent from the Scan Station.
Maximum attachment size This option allows you to set the maximum size of an email attachment that can be sent successfully. This value should match the limitations defined by your email server. 1. Select Maximum Attachment Size. The following screen will be displayed. 2. Use the up and down arrows to select the desired size (0 to 99 MB in 1 MB increments) then click the button to the left of the selected number. When you have made your selection, the E-mail screen will be redisplayed.
Fax settings Following are procedures for configuring your fax settings. NOTES: • LDAP may be used to search for fax numbers that are stored on a corporate address book. LDAP is not required to use the fax option. • LDAP credentials for E-mail LDAP must be set up to properly use LDAP for faxing. For more information refer to the section entitled, “LDAP settings” earlier in this chapter. 1. Click the Fax icon. 2. Select LDAP Fax Field Tag. 3.
10. Select Modem Country Code to display a list of countries and the associated codes that configure the modem for use in the selected country. 11. Select the desired country/code. 12. Select Incoming Fax Settings to configure your Scan Station to receive faxes. These settings can be used to define where incoming faxes will be delivered. You can select a network folder and/or a network printer for fax delivery.
13. Select Incoming Fax Folder to enter a fully qualified path name to a network folder where incoming faxes will be delivered, then click Done. 14. If you want to select a network printer for incoming fax delivery, click Incoming Fax Printer to display the list of installed printers. NOTES: • If no printers are installed, None will be displayed on the Select Printer for Incoming Fax screen. • Do not delete a printer destination that is assigned to incoming faxes.
NOTES: • The Incoming Fax option can only be checked if the administrator’s Email ID is configured (see the section entitled, “Return Email Address” earlier in this chapter). If the Return Email Address is not configured, the following message will be displayed: If the email address you entered is incorrect or invalid, you will not receive notification of fax errors. • If the destination(s) (e.g.
20. Select Fax Notification if you want “success” and “failure” notifications to be sent to an email address, printer or both, every time a fax is sent. The following screen will be displayed. 21. Click Email Address and/or Printer to enter an email address/or select a printer, where you want the fax notification to be sent. 22. If you want to track and monitor fax activity, you can select Fax Console. Selecting this option will display the Microsoft Fax Service dialog box.
23. Click Retries to enter the number of times the Scan Station will attempt to send a fax, then click Done. 24. Click Retry Delay to enter the number of minutes the Scan Station will wait between attempting to send a fax. If the fax service is not able to send a fax to the recipient, an email will be sent to the sender’s email address (if available). Otherwise, the message will be sent to the administrator’s email address.
Transaction Log settings The Scan Station can log all transactions to a separate transaction file. This file is in XML format and can be downloaded or exported from the Scan Station. This is useful in environments that are security-minded or where transactions are used for billing. By default, all transactions are logged (checked). You can disable logging on any or all of the transaction types listed on the Transaction Log Settings screen by unchecking the appropriate box. 1.
Time settings 1. Click the Time icon. 2. Select Time Zone to select your appropriate time zone. 3. Select Daylight Savings and select Automatically Adjust or No Adjustment. 4. Select Clock and select either a 12 Hour or 24 Hour time format. 5. Select Separator and select the separator symbol. 6. Click Format and select the hours, minutes, and seconds format.
Date settings If the Date icon is not displayed, use the arrows on the toolbar to scroll to the icon. 1. Click the Date icon. 2. Click Separator and select the desired separator symbol. 3. Click Format and select the desired day, month, year format. NOTE: The actual time and date of the Scan Station can only be set manually by using a USB flash drive that contains an administrative configuration file. Currently, you cannot set the time and date of the Scan Station remotely.
Configuration options The Configuration Options screen provides a variety of options. • Select the Configuration options icon and check any of the following options. Allow custom E-mail Addresses — allows a user to enter an email address that is not currently in the address book. By selecting Allow custom E-mail Addresses (this is the default), users can enter new email addresses in an ad-hoc manner.
Allow Saving to USB Drive — allows you to disable scanning to a USB drive. This may be useful in more secure environments where tighter control is required. Force User Login — when enabled, this option requires the user to login before a scan session. At login, the user will have to enter user name, password and domain. When Force User Login is checked, you must configure LDAP settings. See the section entitled, “LDAP settings” earlier in this chapter.
FAST Scanning — allows a user to scan instantly without waiting for the 10-second delay, the Settings Review screen and the Destination Review screen to be displayed. A message will only be displayed if the scan session was unsuccessful. Allow Voice Annotation — when enabled, allows a user to record a voice annotation. By default, this option is enabled. Enable Restricted Mode — when enabled, will only allow users to have access to the Tasks function. These Tasks cannot be changed by the user.
Password protecting the configuration file Users who have access to the KSS500 - Scanner Admin application can create an administrative configuration file and without knowing it, replace the Scan Station settings with their own. If using a USB drive to install administrative configuration files instead of the KSS500 Scanner Admin application, it is suggested that you password-protect the administrative configuration file to prevent overwriting Scan Station settings. 1. Select User>Configuration Password.
Saving your administrative configuration file After making changes to the configuration, save your configuration settings. Configuration settings can be saved to three locations. • USB Drive • Local backup • Folder 1. Click the Save icon. The Save Configuration To dialog box will be displayed. By default the Local backup option is selected. If you choose to create a local backup, a copy of the settings will be saved in the same directory as the KSS500 - Scanner Admin application.
Uploading configuration settings After saving the administrative configuration file, the file needs to be uploaded to the Scan Station. The configuration file can be uploaded by using the KSS500 - Scanner Admin application or by saving the file to a USB drive and inserting it in the USB port of the Scan Station. Loading configuration settings using the KSS500 - Scanner Admin application 1.
Setting the Scan Station clock The time on the Scan Station can only be set when the Scan Station is in local administrator mode and by using a USB drive that contains an administration configuration file. NOTE: Currently, you cannot set the time of the Scan Station remotely using the KSS500 - Scanner Admin application. 1. Insert a USB drive with an administrative configuration file into the Scan Station. 2. If prompted to update the Scan Station settings, select No.
4 Configuring Scan Settings for the Scan Station Contents A-61628 December 2011 Configuring default Scan settings ................................................... 4-2 Settings Shortcut option.................................................................. 4-3 Changing default settings ........................................................ 4-4 Creating a new Settings Shortcut ............................................ 4-5 Renaming a Settings Shortcut ..............................................
Configuring default Scan settings The Scan Station can be configured with default values for Scan Settings (e.g., Scan As, File Type, etc.) These default values are used when scanning documents unless they are changed by the user before scanning. 1. Double-click the KSS500 - Scanner Admin application shortcut. 2. Select File>Configuration Organizer. 3. Select Settings. NOTE: Use the Right and Left arrows to scroll through the list of icons and scan settings. 4.
Settings Shortcuts option Settings Shortcuts — six Settings Shortcuts are provided at installation. These Settings Shortcuts can be used as a template to create other shortcuts. • • • • • • Defaults Black and White Document Black and White Document (OCR Quality) Color Document Color Document (OCR Quality) Color Photograph Settings Shortcuts are a way for you to create personalized groups of scan settings to make scanning easier. If you have scan settings that you will use frequently (i.e.
Changing default settings You can change the user default settings to common scan settings that meet your needs. 1. From the main Configuration Organizer screen, click Settings. 2. Select the Setting Shortcuts icon. 3. Select User Defaults. 4. Scroll through the scan settings icons to make the desired changes to your default shortcut.
Creating a new Settings Shortcut 1. In the Configuration Organizer window, access the Settings screen and select the Settings Shortcut icon. 2. Select Edit>Add Item. The Add New Settings Shortcut dialog box will be displayed. 3. Enter the name of the new shortcut in the Description field. 4. Select a shortcut that most closely represents the scan settings that you want for your shortcut from the Create From drop-down list.
Renaming a Settings Shortcut 1. Access the Settings screen and select the Settings Shortcut that you want to rename. 2. Select Edit>Rename Item. The Rename Settings Shortcut dialog box will be displayed. 3. Enter a new name in the Description field and click OK. Tasks option Tasks allow you to group together scan settings (i.e., resolution, file type, one-sided/two-sided, etc.) with one or more destinations. Creating tasks Before creating a task, you must have destination groups created.
The Choose Destinations screen will be displayed listing the destinations that have been setup in your configuration file. 3. Select the destination(s) that you want to add to your task. For example, you may want to send invoices to personnel in the Billing department, then save a copy of what you send to your personal file on the network. In this case, you would click Billing department and Network. Clicking on an item in the list will display the contents of the selected group. 4.
The Choose Settings screen will be displayed with default settings. 5. Click on any of the settings in the list you want to change. For example if the invoices you want to send to the Billing Department should be one-sided, black and white, PDF files, you would make those selections. 6. Click Done. The keyboard will be displayed allowing you to name your task. 7. Enter the task name and click Done.
Renaming tasks By default, when you add a task, the group is named Task. To change the name of the task: 1. Select the task that you want to rename. 2. Select Edit>Rename Item. The keyboard will be displayed allowing you to rename your task. 3. Click Done. Deleting tasks When you delete a task, all items within the task will be deleted. Remember, you can only have one task, but many items within a task group. 1. Select the task you want to delete. 2. Select Edit>Delete Group.
File Name Settings option File Name Settings allows you to define values that determine the locations and file name used when creating scanned documents. You can define a folder name where scanned documents will be placed when scanning to a network folder, FTP location or USB flash drive destination. You can also define the file name prefix that will be applied to every scanned document created.
In either case, if the path to the final destination does not exist, then the Scan Station attempts to create the full path to the destination. This is true for network destinations as well as USB flash drive destinations. As in the previous example, if the sub-folders docs and/or worddocs did not exist, they would be created prior to copying the scanned document providing the Scan Station account has appropriate user rights.
• Device Name as Prefix — if checked, scanned documents will be created with a file name that begins with the name of the Scan Station. • Omit Separators — when checked, no underscore character will be placed between the constructed file names or paths unless the underscore is part of the file name prefix or folder name.
Scan As option When selecting a Scan As setting, your selection may have an impact on other scan settings. The table below describes how each Scan As selection will impact other selections.
• If you select Black and White, the Black and White screen will be displayed. Select either Best (iThresholding) or Normal (ATP). 4-14 - Best (iThresholding) — the Scan Station dynamically evaluates each document to determine the optimal threshold value to produce the highest quality image. This allows scanning of mixed document sets with varying quality (such as faint text, shaded backgrounds, or color backgrounds) to be scanned using a single setting thus reducing the need for document sorting.
File Type option 1. Select the File Type icon. 2. Select the File Type that will most frequently be used by your organization. • PDF - Searchable (Image + Text) — creates a single- or multipage document that contains both text and image data. This type of document uses OCR technology to read the scanned page and extracts text information from the image data. When you select this option, a screen is displayed with the following options for creating PDF files.
• PDF - Image Only — creates a single- or multi-page document that contains only scanned data as a bitmap image. PDF files created with this option are not text searchable. When you select this option, a screen is displayed with the following options for creating PDF files. - Quality: allows you to select a Good, Better or Best quality option. When saving a file as PDF, predefined scanner resolution settings will be used when selecting Good (150 dpi), Better (200 dpi), and Best (300 dpi).
Input Document Is option The Input Document Is screen provides three options: Two Sided — the Scan Station will scan the front and back in a single pass. One-Sided - Face Down — select if your organization typically scans one-sided documents. If you select this option, the documents must be put in the input tray face down (the side you want to scan facing the input tray). One-Sided - Face Up — select if your organization typically scans onesided documents.
Resolution option Select a default Resolution from 75 to 600 dpi. 200 dpi is the default. Higher resolutions produce better quality images, but larger file sizes. Document Type option If your documents typically have a mixture of text and graphics, keep this option as the default. Otherwise, select the Document Type that is most frequently scanned by your organization.
Black and White Adjustment option If you selected Black and White as your Scan As selection, the Black and White Adjustments screen will be available. 1. Select the Black and White Adjustment icon. • If you selected Best (iThresholding) on the Scan As screen, only the Contrast value can be changed. • If you selected Normal (ATP), both Contrast and Threshold can be changed. 2. Use the Up and Down arrows to adjust the value, then click the button to the left of the number to save the new value.
Copies for Printing option This option is for the user during their scan session. Any changes to this option during configuration will be ignored. The default is 1. Advanced option 1. Select the Advanced icon. The Advanced screen provides these options: • Blank Image Detection — used to detect blank pages (e.g., the back side of a document), so these pages can be discarded. Use this option when scanning black and white documents to either TIFF or PDF.
• Cropping — allows you to select either Automatic or Aggressive cropping. - Automatic: automatically detects the border of an image and straightens it if necessary. - Aggressive: automatically detects the border of an image, straightens it if necessary, and eliminates any residual black border on any image edges. In order to achieve this, there is a possibility that a small amount of image data from the edge of the document may be lost.
Saving your administrative configuration file After making changes to the configuration, save your configuration settings. Configuration settings can be saved to three locations: • USB Drive • Local backup • Folder 1. Click the Save icon. The Save Configuration To dialog box will be displayed. By default the Local backup option is selected. If you choose to create a local backup, a copy of the settings will be saved in the same directory as the KSS500 - Scanner Admin application. 2.
Updating configuration settings After saving the administrative configuration file, the file needs to be uploaded to the Scan Station. The configuration file can be uploaded by using the KSS500 - Scanner Admin application remote configuration or by saving the file to a USB drive and inserting it in the USB port of the Scan Station. Loading configuration settings using the KSS500 Scanner Admin application 1.
Verifying your Scan Station setup Verify that your Scan Station installation was successful and is operational. NOTE: If Save to Flash Drive is disabled, select another destination to scan to and go to Step 3. 1. Insert a blank USB drive in the Scan Station’s USB port. When the Scan Station recognizes the USB flash drive, an icon is displayed showing the USB flash drive with the user profile. 2. Click Save to Flash Drive. 3. Place a document into the input tray and press the Go button.
Downloading configuration files It is possible to download a configuration file that is already installed on a Scan Station to the KSS500 - Scanner Admin application to be modified and/or uploaded to a Scan Station. 1. Double-click on the KSS500 - Scanner Admin shortcut icon. 2. Browse to and open the previously saved Scan Station administration file. 3. Select the Scan Station where you want to download the configuration file. 4. Select Scanner>Configuration>File Download.
5 Setting up and Managing Destination Groups Contents Toolbar descriptions ........................................................................ 5-2 Creating groups and adding items .................................................. 5-3 Renaming an email group .......................................................... 5-4 Deleting an email group.............................................................. 5-4 Moving groups and items within groups .....................................
Toolbar descriptions The Configuration Organizer’s toolbar provides quick access to commonly used functions. The toolbar is always displayed. You cannot add, delete or move toolbar buttons. Icon Description Saves the configuration file to the USB flash drive or hard drive. Adds a new item in the current group. Searches for an item Renames the selected item. Deletes the selected item. Moves the selected item up one position. Moves the selected item down one position.
Creating groups and adding items 1. Open the KSS500 - Scanner Admin application. 2. Select File>Configuration Organizer. 3. Select Edit>Add Group>E-Mail. An Email icon is added to the toolbar on the Configuration Organizer window. 4. Select the email group you want to add an address(es) to and select Edit>Add Item. 5. Enter a name in the Description field and email address in the Address field, then click OK.
Renaming an email group By default, when you add an email group, the group is named E-mail. From the Configuration Organizer: 1. Select Edit>Rename Group. The Rename Group dialog box will be displayed. 2. Make the desired change in the Description field and click OK. The new group name will be displayed on the Configuration Organizer screen. Deleting an email group When you delete an email group, all email addresses within the email group will also be deleted. 1.
Moving groups and items within groups The order in which the groups are displayed in the Configuration Organizer is the same order they will be displayed on the Scan Station. If you want a specific group to be displayed as the first selection or in a special order, you can reorder the groups the way you want them displayed. 1. Click the group you want to move. 2. Select Layout>Move Group Left or Layout>Move Group Right. The group will be moved one position to the left or right.
Importing an email address book CSV files are data files that represent database information. Each row contains data values that are separated by a comma. Each comma found on a line of text represents a column of data from the original database. The example below shows typical data exported from Microsoft’s Outlook Express. NOTE: The first row may contain the data column header information and not actual data. First Row First Name,Last Name,E-mail Address Smith,John,johnsmith@rochester.rr.
4. Many email client applications automatically export the column headings as the first row of data. If you do not want to export the column headings as the first row, check Skip first row of data. NOTE: Some email applications also export the data with additional quote characters surrounding the data. The quote characters will be removed while importing data. 5. Enter the column numbers where the First Name, Last Name and Email Address appear in the CSV file.
Adding several email addresses to a single item in an email group Typically email groups contain a list of entries that consist of one e-mail address per entry. However, you can create a list within a single entry within the email group. The following describes the typical case of one email address per item and an example of multiple addresses per entry. Example 1 The Description field contains an email recipient’s name, and the Address field contains a single email address.
Adding a USB drive folder group If you want to add a folder to a USB drive group that already exists, skip to step 2: 1. From the Configuration Organizer select Edit>Add Group>USB Drive Folder. A USB Drive icon is added to the toolbar on the Configuration Organizer window. 2. To add a folder to a USB drive group, click the USB drive group you want to add the folder to and select Edit>Add Item. The Add dialog box will be displayed. 3.
Renaming a USB drive group By default, when you add a flash drive group, the group is named USB Drive. 1. Select the USB drive group that you want to rename. 2. Select Edit>Rename Group. The Rename Group dialog box will be displayed. 3. Make the desired change in the Description field and click OK. The change will be displayed on the main Configuration Organizer window. Deleting a USB drive group When you delete a USB drive group, all folders within that group will also be deleted. 1.
Adding a network folder If you want to add an item to a network folder that already exists, skip to step 2. 1. From the Configuration Organizer select Edit>Add Group>Network Folder. A Network folder icon is added to the toolbar on the Configuration Organizer window. 2. Select the Network group you want to add a folder to, and select Edit>Add Item. The Add dialog box will be displayed. 3. Enter the name and fully qualified folder path in the Description and Folder fields and click OK.
Renaming a network group By default, when you add a network group, the group is named Network. 1. Select the network group that you want to rename. 2. Select Edit>Rename Group. The Rename Group dialog box will be displayed. 3. Make the desired change in the Description field and click OK. The change will be displayed on the main Configuration Organizer window. Deleting a network group When you delete a network group, all folders within that group will also be deleted. 1.
Adding an FTP group To add an FTP group to your configuration: 1. From the Configuration Organizer select Edit>Add Group>FTP. An FTP icon is added to the toolbar on the Configuration Organizer window. 2. Select the FTP group you want to add to and select Edit>Add Item. The Add: Ftp Folder dialog box will be displayed. 3. Make an entry in the Description, Folder, Username and Password fields.
4. Select the desired Protocol option: FTP, FTPS or SFTP. • If you select FTP the following options are available: - If the FTP site communicates on a port other than Port 21, change the value using the up and down arrows. - You may optionally select Passive if required by the FTP server. Passive is most commonly used if the FTP site is outside the firewall.
- A Private Key File is an encrypted key that is used to access the SFTP server. There are several different types of Private Key files. Use the Browse button to select the Private Key file stored on your computer or network. Consult the SFTP administrator for the appropriate Private Key file to use. NOTE: Private Key files encrypted with DSA 2048, 4096 bits and Putty SSH1 RSA are not supported. - If you entered a Private Key File, you must enter a Passphrase.
2. Enter the Proxy Address in the form of a fully qualified domain name (e.g., FTP.acme.com) or as an IP address. 3. Enter the Username and Password required to access the proxy server. 4. If the proxy server is configured to communicate on a port other than Port 21, change or enter the value using the up and down arrows or keyboard. SFTP SFTP supports two proxy types: HTTP and SOCKS. Proxy Type: HTTP 1. Select the Proxy Type.
Proxy Type: SOCKS 1. Select the Proxy Type. If you selected SOCKS as your Proxy Type, the following dialog box will be displayed. 2. Enter the Proxy Address in the form of a fully qualified domain name (e.g., FTP.acme.com) or as an IP address. 3. Enter the Username and Password required to access the proxy server. 4. If the proxy server is configured to communicate on a port other than Port 21, change or enter the value using the up and down arrows or keyboard. 5.
Adding a fax group and fax numbers If you want to add a fax number to a fax group that already exists, skip to step 2. 1. From the Configuration Organize select Edit>Add Group>Fax. A Fax icon is added to the toolbar on the Configuration Organizer window. 2. Select the fax group you want to add a fax number(s) to and select Edit>Add Item. The Add dialog box will be displayed. 3. Enter the description and fax number and click OK.
The fax number will be added to the selected fax group and the number will be listed on the Configuration Organizer window. 4. Repeat steps 2 and 3 for each fax number you want to add to a fax group. Renaming a fax group By default, when you add a fax group, the group is named Fax. 1. Select the fax group you want to rename. 2. Select Edit>Rename Group. The Rename Group dialog box will be displayed. 3. Make the desired change in the Description field and click OK.
Adding a SharePoint group If you want to add SharePoint as a destination group, do the following. 1. Select Edit>Add Group>SharePoint. 2. Select Edit>Add Item. The SharePoint Settings dialog box will be displayed. 3. Make an entry in the Description field that identifies the destination. 4. Enter the address of the SharePoint server in the Address field. The Address field must contain a complete path to the SharePoint site. 5. Make an entry in the Username and Password fields. 6.
7. If the SharePoint site you want the user to access is secure, you will need to enter the certificate file and password by clicking Certificate. The SharePoint Certificate dialog box will be displayed. • Enter the name of the Certificate file in the Certificate field. The following file extensions are allowed: .cer, .crt, .der, .pfx, .p12, .p76, .and p7c. • Enter the certificate password that the user should enter to open and decrypt the certificate file. • Click OK.
The supported index fields are: • Single line of text • Multiple lines of text • Choice • Number • Currency • Date and Time • Lookup • Yes/No • Person or Group • Hyperlink or Picture 10. Click OK to close the Index Fields dialog box. 11. Click OK again to close the SharePoint Settings dialog box. Specifying Proxy settings If your company requires the use of a proxy server before communicating with the SharePoint site, you must define these proxy settings by clicking on the Proxy button. 1.
Adding an Evernote group If you want to add Evernote as a destination group, do the following. 1. Select Edit>Add Group>Evernote. 2. Select Edit>Add Item. The Evernote Settings dialog box will be displayed. 3. Make an entry in the Description field that identifies the destination. 4. Make an entry in the Username and Password fields that identifies the credential name/password for access to the Evernote server. 5. In the Notebook field, enter the path to the notebook where the documents will be scanned.
NOTES: • You cannot change the address of the Evernote server. • If you do not want the Evernote destination to be placed in alphabetical order, uncheck Add to list alphabetically. 6. If your company requires the use of proxy servers, click the Proxy button and go to the next section; otherwise click OK. 7. If you want to further organize your scanned documents, you can click Advanced to make additional settings. The Evenote Advanced Settings dialog box will be displayed.
Specifying Proxy settings If your company requires the use of a proxy server before communicating with the Evernote site, you must define these proxy settings by clicking on the Proxy button. 1. Enter the Proxy Address in the form of a fully qualified domain name (e.g.,proxy.mycompany.com) or as an IP address. 2. Enter the Username and Password required to access the proxy server. 3.
Configuring FTP destinations FTP destinations require a different configuration than the other destinations. The Configuration Organizer allows you to configure both FTP and proxy server settings. Depending on your network configuration you may or may not have to communicate with FTP sites through a proxy server. For each FTP destination you can specify individual username and password settings.
Specifying Proxy settings If your company requires the use of a proxy server before communicating with an FTP site, you must define these proxy settings by clicking on the Proxy button. 1. Select the Proxy Type. • If USER after login is selected, continue with Step 2. 2. Enter the Proxy Address in the form of a fully qualified domain name (e.g.,proxy.mycompany.com) or as an IP address. 3. Enter the Username and Password required to access the proxy server. 4.
Configuring printers The Scan Station uses the Microsoft “Point and Print” technology for installing print drivers and connecting to network printers. Typically, network printers are attached to print servers which manage the scheduling of print jobs for one or more network printers. These print servers manage print queues for each connected printer and can also deliver and install print drivers to other network PCs or devices.
Connecting to a printer shared by another computer on the network workgroup 1. Select Edit>Add Group>Printer. 2. Select Edit>Add Item. The Add: Printer dialog box will be displayed. 3. Enter any text that describes the printer in the Description field. 4. Enter the fully qualified path to the shared computer and the share name assigned to the printer (e.g., \\mypc\sharedprinter or \\192.168.1.101\sharedprinter).
Connecting to a network printer that is directly connected to the network This option requires the printer to be shared by a PC (at least temporarily) on the network, while the printer drivers are downloaded and installed on the Scan Station. Before setting up a printer that is directly connected to the network, the printer must first be “shared” from a computer on the network. The shared printer must also be configured to provide a Windows XP driver for the printer.
4. On the Ports tab, write down the exact text that appears on the selected Port value. NOTE: As shown below, this would be “IP_192.168.2.137”. 5. Return to the Configuration Organizer and select or create a printer group and select Edit>Add Item. 6. Enter any text that describes the printer in the Description field. 7. Enter the IP address of the network printer (e.g., \\192.168.2.137) or //192.168.2.137/ where is the printer name. 8.
9. Click Advanced. The Advanced dialog box allows you to enter the information required to access the printer driver on the shared PC. This information will be used to install the printer driver on the Scan Station. 10. Enter the fully qualified address of the PC sharing the printer (see Step 1) including the share name (e.g. \\workgrouppc\BrotherH). 11. With the information in Steps 1 and 2, enter the driver name and the port name in their respective fields. 12.
6 Administration Specifics Contents A-61628 December 2011 Scan Station Security......................................................................6-2 Password protecting the Scan Station .....................................6-3 Password protecting the administrative configuration file ........6-3 Network configuration details.......................................................... 6-4 Best practices ..........................................................................
Scan Station Security Security is an important part of every day business. It is important that network devices do not allow intrusions from outside sources. The Scan Station 500 is configured to prevent external attacks from the Internet and from direct access by users. The following security steps will block access to the Scan Station’s operating system. • The Scan Station uses a firewall and blocks nearly all incoming network traffic. It can also respond to an Echo (also known as a ping).
Password protecting the Scan Station You can require a user to log into the Scan Station before scanning. If you want to assign a Device password, see the section entitled, “Device settings” in Chapter 3. This security feature is intended for use in companies or departments that have sensitive material that they want to prevent being scanned and distributed. Once the password is assigned, access will be blocked to all users who do not know the password.
Network configuration details Because the Scan Station is a network device, a basic knowledge of networking principals and terminology is helpful. You should be familiar with the concept of creating user accounts (on domains), sharing folders, setting access privileges, the Universal Naming Convention (UNC), using IP addresses, fully qualified domain names (FQDNs) and creating user groups. NOTE: Some of the concepts covered in this section assume knowledge of Microsoft NT Domains and permissions.
NETBIOS usage — in network environments that use routers it is common practice to block NETBIOS traffic on your router. You may need to know the IP address of the server where you want to scan documents. By substituting the IP address of the server instead of the NETBIOS computer name, you can bypass the network traffic restrictions that may cause network scanning to fail. For example, the previously defined network address: \\acmeserver\scanfolder should be replaced with something similar to: \\192.168.2.
Method 1 The administrative configuration file and optional update package is uploaded using the KSS500 - Scanner Admin application. The Scan Station will automatically recognize the new configuration file or update package and perform an update automatically. The KSS500 - Scanner Admin application can be used to upload new configuration files and new firmware updates to the Scan Station. Uploading files 1. Select the Scan Station(s) you want to send a new configuration file to.
Uploading firmware 1. Select the Scan Station(s) you want to send new firmware to. NOTE: To select more than one Scan Station, use the Ctrl or Shift key. and click the mouse button. The selected Scan Stations will be highlighted. 2. Select Scanner>Configuration>Firmware Upload. The Open dialog box will be displayed. 3. Select the file that you want to upload and click Open. NOTES: • Only a KSS500UPDATE.EXE file can be uploaded to the Scan Station.
Method 2 The Scan Station software can be configured to monitor a network folder where configuration files and firmware updates are installed. To set this up: 1. From the Configuration Organizer Settings screen, select the Device icon and click Remote Configuration Settings. From this screen, you can select and define the following values: • Path to the folder where updates can be found. • Which day of the week (Every Day, Every Monday, Every Tuesday, etc.).
On the defined day of the week and time, the Scan Station checks for the specified folder on the network, and if found, examines the contents of the folder looking for an administrative KSS500.XML file and an optional KSS500UPDATE.EXE file. If the KSS500.XML file and/or the KSS500UPDATE.EXE file is found, the modification date and time will be compared to the last time a configuration was executed on the Scan Station. If the KSS500.XML file and/or the KSS500UPDATE.
Retrieving and clearing files Retrieving the Scan Station log file The Retrieve Logs option allows you to save the log file retrieved from the selected Scan Station. The log file extension is .log. The log file contains information about the Scan Station (i.e., error logs, document jam, etc.). 1. Select the Scan Station that you want to save a log file for. NOTE: To select more than one Scan Station, use the Ctrl or Shift key and click the mouse button. The selected Scan Stations will be highlighted. 2.
Retrieving the Scan Station transaction log file The Retrieve Transaction Logs option allows you to save the transaction log file retrieved from the selected Scan Station. The transaction log file extension is .xml. The transaction log file contains actual Scan Station transactions (i.e., destinations, time of transaction, recipient, sender, status of the transaction, number of pages scanned). Two methods are available for saving log files: Method 1. Using the KSS500 - Scanner Admin application.
Clearing a transaction log file To clear a transaction log file: 1. Select the Scan Station(s) that you want to clear the transaction logs. NOTE: To select more than one Scan Station, use the Ctrl or Shift key and click the mouse button. The selected Scan Stations will be highlighted. 2. Select Scanner>Device>Clear Transaction Logs. The following message will be displayed, Are you sure you want to clear the transaction log files of the selected Scanner? 3. Click Yes.
3. Select the port of the NTP server. 4. Enter the amount of time (in milliseconds) after which the Scan Station will stop attempting to synchronizing its internal clock (500 milliseconds = 1/2 second). 5. Select Version 3 or 4. 6. Click Update. Turning off one or more Scan Stations Occasionally it may be necessary to turn off a Scan Station(s) for a particular reason (i.e., scheduled downtime on the network, a scheduled power outage or because a particular Scan Station may require maintenance).
7 Maintenance Contents Opening the Scan Station cover ..................................................... 7-1 Cleaning procedures....................................................................... 7-2 Cleaning the rollers ................................................................... 7-2 Cleaning the separation module................................................. 7-3 Cleaning the feed module .......................................................... 7-4 Vacuuming the Scan Station ............
Cleaning procedures Your Scan Station needs to be cleaned periodically. If your documents do not feed easily, if several documents feed at the same time or if streaks appear on your images, it is time to clean your Scan Station. The section entitled, “Supplies and consumables” at the end of this chapter provides a listing of the supplies required to clean your Scan Station. IMPORTANT: Use only non-flammable cleaners such as those provided through Kodak Parts Services. Do not use household cleaners.
Cleaning the separation module The separation module should be removed from the Scan Station for best cleaning results. 1. Push the separation module up to snap out and lift it out of position. 2. Manually rotate and wipe the separation module tires with a roller cleaning pad. 3. Inspect the separation module. If the separation module tires show signs of wear or damage, replace the tires or the separation module. See “Replacement procedures” for more information.
4. Insert the separation module by aligning the tabs with the slots and snapping it into position. Cleaning the feed module NOTE: Be careful not to damage the paper present sensor when removing or cleaning around the feed module. 1. Pull against the raised edge of the feed module cover and lift it up and out of position.
2. Rotate the feed module forward and push it to the left to lift it out of position. 3. Manually rotate and wipe the feed module tires with a roller cleaning pad. 4. Inspect the feed module. If the feed module tires show signs of wear or damage, replace the tires or the feed module. See the “Replacement procedures” for more information. 5. Using a vacuum or cleaning pad, remove dust and debris from the feed module area.
6. Reinstall the feed module by aligning the pins and pushing it toward the left to fit it into position. Be sure the gears are aligned and it snaps into place. Roll the feed module back into place. 7. Reinstall the feed module cover by aligning the tabs with the slots and pushing it back into position until it snaps into place. Vacuuming the Scan Station Before cleaning the imaging area, it is suggested that you vacuum the inside of the Scan Station to remove any dust and debris.
Running a transport cleaning sheet 1. Remove the wrapping from the Transport Cleaning Sheet. 2. Adjust the side guides to fit the cleaning sheet. 3. Place a transport cleaning sheet in the input tray (adhesive side facing you) in portrait orientation. 4. Select any destination (e.g., your email address) and press the Go button. 5. After the transport cleaning sheet is scanned, turn it over (adhesive side facing the input tray) and scan it again. 6.
Replacement procedures Kodak Scan Stations use replaceable tires that can feed a wide range of document types, sizes and thicknesses. Tire life and performance will vary based on the customer’s document set, the frequency of cleaning the paper path and tires, and following the recommended schedule for changing tires. Nominal tire life is approximately 125,000 pages. Usage figures are not guaranteed.
2. Holding onto the separation module, rotate the release lever back so you can access the separation roller. CAUTION: Use caution as the release lever is spring-loaded and will snap back if you do not hold it in place. 3. Remove the separation roller from the separation module housing. 4. Remove each tire by sliding the tire off the core. 5. Install each new tire by gently pulling it over the core. IMPORTANT: Do not overstretch the tire, it may tear. 6.
Replacing the preseparation pad 1. Remove the separation module from the Scan Station by following the steps previously described in “Replacing the separation module and tires”. 2. Hold the separation module in both hands and locate the two tabs which protrude slightly from the back of the separation module. 3. Push down on the tabs until the pre-separation pad protrudes slightly from the front of the separation module. 4. Grasp the pre-separation pad and pull it out of the separation module. 5.
Replacing the feed module and tires NOTE: The paper present sensor is located to the right of the feed module. Be careful not to damage the paper present sensor when removing or cleaning around the feed module. 1. Push against the raised edge of the feed module cover and lift it up and out of position.
2. Rotate the feed module forward and push it to the left to lift it out of position. • If you are replacing the feed module, insert the new feed module by aligning the pins and pushing it toward the left to fit it into position. Be sure the gears are aligned and it snaps into place, then go to Step 8. • If you are replacing the tires, continue with Step 3. 3. Remove one core assembly by lifting up and out of position. 4. Remove each tire by sliding the tire off the core. 5.
6. Replace the core assembly in the feed module. You may need to slide the shaft to the right or left so the core fits properly within the feed module housing. 7. Repeat the replacement procedure outlined above for the other core assembly. 8. Reinstall the feed module by aligning the pins and pushing it toward the left to fit it into position. 9. Reinstall the feed module cover by aligning the tabs in the slots and pushing the feed module cover down until it snaps into place.
Adjusting the preseparation roller tension If you are experiencing multi-feeds or document jams, it may be necessary to adjust the pre-separation roller tension. 1. Remove the separation module by following the steps described previously in “Replacing the separation module and tires”. 2. Locate the spring on the separation module. 3. Lift the spring from the holder and move it to the left or right as desired to adjust the tension. 4.
Replacing the USB connector The USB connector may need periodic replacement due to extended use which may be detectable due to repeated flash drive errors. Before changing the USB connector, be sure the USB flash drive itself is not defective. Tools needed: Small Phillips Head screwdriver. 1. Turn off the power to the Scan Station. 2. Unplug the power cord from the wall receptacle. 3. Be sure the output tray panel is open, then open the Scan Station cover. 4.
Supplies and consumables Contact your Scan Station supplier to order supplies. Description CAT No. Kodak Feed Rollers (quantity: 12) 148 4864 Kodak Separation Module 173 6115 Kodak Feed Module 826 9607 Kodak Digital Science Roller Cleaning Pads (quantity: 24) 853 5981 Kodak Digital Science Transport Cleaning Sheets (quantity: 50) 169 0783 Staticide Wipes (quantity: 6 boxes of 24) 896 5519 Optics Cleaner Pad 868 3724 NOTE: Items and catalog numbers are subject to change.
8 Troubleshooting Contents Problem solving .............................................................................. 8-1 Indicator lights................................................................................. 8-5 Saving error log files ....................................................................... 8-6 Contacting Service..........................................................................
Problem Possible Solution No images are being displayed If you are scanning one-sided documents, be sure the side you want to scan is facing the input tray (not facing you). For more information, see the section entitled, “Getting your documents ready” in Chapter 2 of the User’s Guide. Roller marks appear on the document after scanning Clean the rollers. See the procedures in Chapter 7, Maintenance.
Network Authentication Issues Possible Solution Workgroup authentication If having trouble writing to a locally shared folder in a workgroup, check the permissions attached to the folder from the PC on the network that is sharing the folder. Make sure the folder’s Permissions allow access to the Scan Station. Email Authentication Verify that the authentication method defined in the Scan Station settings match the authentication method of your SMTP server.
Your network Domain name To find the domain name your Scan Station will use, follow these steps: 1. From a PC logged onto the same network/domain that the Scan Station will use, right click on My Computer and select Properties. 2. From the Properties window select the Computer Name tab. If you are on a domain, the Domain name is listed in the Domain field (see above). 3. Copy the Domain name so you can enter it into the Domain field of the Default Credentials in the Configuration Organizer. 4.
Scan to Network Share Issues Unable to scan to network folder Possible Solution Using another Windows XP, Windows Vista or Windows 7 on your network, ping the NETBIOS computer name of the Share destination. For example, if your destination is \\Servername\Sharename, ping Servername. • If you get a reply to your ping, NETBIOS name resolution is working and the problem may be with the share name or permissions to the share. • If you do not get a ping, NETBIOS name resolution is not working.
Saving error log files You may be asked by Kodak Service personnel to send the log files as an email attachment for further diagnostics. If you are asked to provide these log files, there are two ways to save error log files: Method 1: See the section entitled “Saving the Scan Station log file” in Chapter 6. Method 2: proceed as follows: 1. Create an administrative configuration file on a new USB drive. 2.
9 Glossary Authentication credentials — a username, password and optional network domain name that grants the Scan Station access to network resources. Challenge Response (CRAM-MD5) — an encryption algorithm used for authenticating access to an email server. Configuration file — an encrypted .xml file containing all the settings for the device. Basically, a configuration file tells the Scan Station who it is, how to scan and where to send the digital files.
NT Domain Server — a Microsoft Windows based server that defines a network domain. A network domain defines a grouping of computers and computer resources such as; printers, mail servers and file servers. NTLM — an authentication algorithm for accessing an email server. Ping — typically a command line program that allows a user or administrator to see if a specific device is active and responsive on the network. For example, ping 127.0.0.
Appendix A Specifications This appendix provides Scan Station specifications.
Recommended PC configuration Pentium IV, 2.8 GHz or higher, 1 GB RAM, USB 2.0 running Windows XP, Windows Vista or Windows 7 Recommended portable USB drive specs USB 2.
Appendix B Supported Network Protocols The Scan Station 500 plugs directly into an Ethernet-based IP network, using a standard RJ45 connection, working independently within the following environments: • Microsoft Windows Server 2003 and Server 2008 (TCP/IP, MS sharing, SMTP, FTP, Printing) • NetWare 3.x and 4.
Appendix C Warranty - US and Canada only Congratulations on the purchase of a Kodak Scan Station 500 or Kodak Scan Station 520EX. Kodak Scan Stations are designed to provide end users with the highest performance and reliability. All Kodak Scan Stations are covered by the following Limited Warranty.
Installation Warning and Disclaimer KODAK WILL NOT BE RESPONSIBLE FOR ANY CONSEQUENTIAL OR INCIDENTAL DAMAGES RESULTING FROM THE SALE, INSTALLATION, USE, SERVICING OR IMPROPER FUNCTIONING OF THIS PRODUCT, REGARDLESS OF THE CAUSE. SUCH DAMAGES FOR WHICH KODAK WILL NOT BE RESPONSIBLE, INCLUDE, BUT ARE NOT LIMITED TO, LOSS OF REVENUE OR PROFIT, LOSS OF DATA, DOWNTIME COSTS, LOSS OF USE OF THE PRODUCT, COST OF ANY SUBSTITUTE PRODUCT, FACILITIES OR SERVICES OR CLAIMS OF CUSTOMERS FOR SUCH DAMAGES.
Warranty Service descriptions Eastman Kodak Company (Kodak) offers a range of service programs to support its Limited Warranty and to assist with the use and care of the Kodak Scan Station (“Service Methods”). A Kodak Scan Station represents an important investment. Kodak Scan Stations provide the productivity needed to stay competitive. The sudden loss of this productivity, even temporarily, could seriously affect the ability to meet commitments.
Depot service If the Kodak Scan Station is not eligible for Advance Exchange or On-Site Service, an eligible purchaser may utilize our Depot Repair Service. The eligible purchaser will be instructed to ship the product to the nearest authorized Depot Repair Center. Product must be shipped at the eligible purchaser’s risk and expense to the repair center. Before the product is returned to the repair center, be sure to remove all options and accessories (which include power cord, documentation, etc.