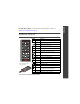
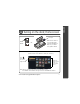
ENGLISH See your user’s guide – for more information about using your dock, visit www.kodak.com/go/hdtvdocksupport. Remote control Button ON/OFF Remove the tab to start using the remote. Press to turn on/off the HDTV dock. DISPLAY turn on/off picture/video status information bar. Home return to the home screen. BACK return to the previous screen. stop a slide show, display thumbnails. MENU display menu choices. OK accept the current selection. 4-way navigate through pictures or menus.
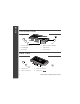
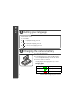
ENGLISH Front/Side View 6 1 5 2 4 3 1 Remote control sensor 4 Memory card slot - SD, MMC 2 Charging light 5 USB connector 3 Power light 6 Dock connector Back View 1 2 4 3 1 USB connector 3 Audio out connectors 2 Video out connectors 4 DC-In (5 V) 2 www.kodak.
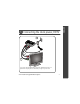
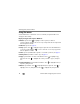
1 power 2 audio 3 video Your power cable (included with the dock) may be different from the one pictured. Use the plug that accommodates your type of power outlet. www.kodak.
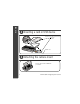
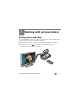
ENGLISH Inserting a card or USB device USB devices (use either USB connector): card reader flash drive SD/MMC card Attaching the camera insert Custom camera insert included with your camera. 4 www.kodak.
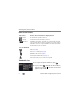
Power light Press ON/OFF. -OR- Make sure the camera is set to the appropriate regional format (NTSC or PAL). See your camera user’s guide for details. The Home screen appears. (Use the remote control buttons to make your selections.) Press then OK to choose an Input Source. Thumbnails (pictures/videos/ folders on a selected Input Source) Note: Devices connected to the dock are listed as Input Sources. Press BACK to move between the Input Source list and thumbnails window. www.kodak.
ENGLISH Setting your language On the remote control: 1 Press MENU. 2 to highlight Settings, press OK. 3 to highlight Language, press OK. 4 to select your language, press OK. Charging the camera battery 1 Connect the dock power. 2 Insert the battery in the camera (Kodak Ni-MH or Li-Ion rechargeable battery). Turn off the camera. 3 Place the camera on the dock. Charging begins. Full charging takes up to 3 hours.
1 Working with pictures/videos Viewing pictures and videos Use your high definition television to view pictures and videos from a docked camera (see page 5), memory card, or USB drive (see page 4). ■ The Home screen displays your pictures and videos as thumbnails (see page 5). ■ Use the remote control and OK buttons to navigate through your pictures/videos and to make your selections. www.kodak.
Working with pictures/videos Home screen features Input sources Pictures, videos and folders are displayed from: Camera The camera that’s placed on the dock. SD card A card inserted in the dock memory card slot. USB device A USB device (flash drive, card reader, etc.) inserted in the dock USB connectors. Each device is shown as a separate source. Each card in a card reader is shown as a separate USB device. The device inserted into the side USB connector is shown first.
Working with pictures/videos ■ To play a multimedia slide show ( ), highlight an MMS folder, then press OK. To view folder contents, highlight the folder, then press OK. NOTE: Press BACK to move between the Input Source list and thumbnails window. ■ Single view Begin working with your pictures and videos in Single view. ■ To view a single, full-screen picture, highlight the thumbnail, then press OK. ■ To magnify a picture 2X - 4X, press ZOOM+. Press ZOOM- to return to 1X.
Working with pictures/videos Using the menu Use the Menu button on the remote control to work with your pictures/videos and change your dock settings. Display in Single view and press MENU to: ■ Rotate a picture. Press to highlight a rotation option (Clockwise or Counterclockwise), then press OK. You can only rotate pictures that are unprotected and are larger than 2.0 MP. ■ Enhance a picture. See page 12. ■ Crop a picture. Press to highlight Crop, then press OK.
Working with pictures/videos Press MENU, then Settings to change: ■ Slide show duration. See page 13. ■ Language. See page 6. ■ Video Out resolution (HDTV output format). Press 1080i, then press OK. to highlight 720p or About displays your dock model number and firmware version. Selecting pictures/videos Use the multi-select feature to copy, delete, or protect two or more pictures/videos.
Working with pictures/videos Using Kodak Perfect Touch technology Kodak Perfect Touch technology helps to ensure better, brighter pictures, and can only be applied to pictures that are larger than 2.0 MP. 1 In single picture view, press MENU. 2 Press to highlight KPT, then press OK. A confirmation message then a split screen with the original and the enhanced image appear. 3 Press to highlight your preference (the Original or the Kodak Perfect Touch image), then press OK.
Working with pictures/videos Running a slide show ■ To start a slide show from any selected picture (in thumbnail or single view), press the SLIDE button. ■ To pause a slide show, press ■ To end a slide show, press . Press again to play. . Changing the slide show display interval The default interval setting displays each picture for 5 seconds. You can set the display interval at 3, 5, 10, 15, 30, or 60 seconds. 1 On the Slide Show menu, press 2 Press to highlight Interval, then press OK.
Working with pictures/videos Printing pictures You can print pictures from a docked camera, memory card, or USB device such as a flash drive (see page 4). Printing is available only for images larger than 2.0 MP. 1 Turn on the dock (see page 5). 2 Connect the USB cable from the dock to the printer. 3 Turn on the printer. 4 Select a picture in Single view (see page 9), then press MENU. 5 Press 6 Press to highlight Print, then press OK. to select the print quantity (1-39), then press OK to begin printing.
2 Solving HDTV dock problems For step-by-step product support, visit www.kodak.com/go/hdtvdocksupport and select Interactive Troubleshooting & Repairs. HDTV dock problems If... Try one or more of the following Dock does not turn on. ■ Make sure the power cable that was included with your dock is securely connected (see page 3). ■ Make sure you are pressing the ON/OFF power button on the remote control. Remote control does not function. ■ Change the remote control battery: CR2025, 3V lithium cell.
3 Appendix Important safety instructions CAUTION: Do not disassemble this product; there are no user-serviceable parts inside. Refer servicing to qualified service personnel. Kodak AC adapters and battery chargers are intended for indoor use only. The use of controls, adjustments, or procedures other than those specified herein may result in exposure to shock and/or electrical or mechanical hazards. ■ The use of an accessory that is not recommended by Kodak may cause fire, electric shock, or injury.
Appendix ■ Remote control battery may include perchlorate material. Special handling may apply in California. ■ Read and follow all warnings and instructions supplied by the battery manufacturer. Additional care and maintenance ■ Wipe the dock gently with a soft, lint-free cloth. Do not allow chemicals, such as suntan lotion, to contact painted surfaces. ■ Service agreements are available in some countries. Contact a dealer of Kodak products for more information.
Appendix Limitations This warranty does not cover circumstances beyond Kodak's control. This warranty does not apply when failure is due to shipping damage, accident, alteration, modification, unauthorized service, misuse, abuse, use with incompatible accessories or attachments, failure to follow Kodak's operation, maintenance or repacking instructions, failure to use items supplied by Kodak (such as adapters and cables), or claims made after the duration of this warranty.
Appendix interference in a residential installation. This equipment generates, uses, and can radiate radio frequency energy and, if not installed or used in accordance with the instructions, may cause harmful interference to radio communications. However, there is no guarantee that interference will not occur in a particular installation. Any changes or modifications not expressly approved by the party responsible for compliance could void the user’s authority to operate the equipment.
Appendix Waste Electrical and Electronic Equipment labeling In Europe: For human/environmental protection, it is your responsibility to dispose of this equipment at a collection facility established for this purpose (separate from municipal waste). For more information, contact your retailer, collection facility, or appropriate local authorities; or visit www.kodak.com/go/recycle. (Product weight: 170 g.