
Use and Care Guide


ASSEMBLY INSTRUCTIONS
8
2
1
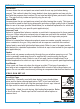
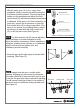
1. Mount the spray gun filter (C) with hand onto
the air inlet (I) of spray gun by connecting the
female threads of filter (C) with the male
threads if the air inlet (I). Use thread sealant
tape (not provided) turning clockwise for an
air-tight connection (See Figure 1).
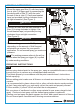
NOTE The working pressure refers to the air line
pressure when the spray gun trigger (K) is pulled
fully under working conditions.
3. Set the working pressure to 30-50 psi
depending on the amount of fluid flow and
atomization as required for your specific
application. Do not exceed spray gun maximum
pressure.
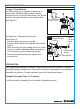
2. Connect air hose with the male threads of the
filter (C) turning clockwise to tighten. Use
clockwise for an air-tight connection
(See Figure 2).
OPERATING INSTRUCTIONS
NOTE
Before using desired paint in the spray gun, spray a compatible thinner or solvent
through the gun to remove any contaminants and residues.
Thin paints properly in accordance with the paint manufacturer's instructions
before spraying.
Before adding paint make sure all thinner or solvents are removed from the spray
canister.
that if any paint spills, you can easily collect the paint and properly discard.
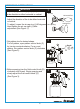
It is recommended to place a drop cloth or other collection device under canister
Fill the canister (L) about 3/4 full and start the air compressor.
Set up a piece of cardboard or other scrap material to use as as a target to test
appears too thick, add a small amount of thinner.
Do not exceed paint manufacturer 's thinning recommendations.
so
WARNING
DO NOT OVERTIGHTEN
WARNING
DO NOT OVERTIGHTEN
thread sealant tape (not provided) turning
spray. Continue to test spray until the desired spray pattern is achieved.
If during your test spray the paint