
Operating Guide


12
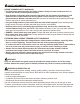
1. Connect the upper tube and the lower tube
a. Align the arrow on the end of the lower tube (K) with
the arrow on the upper tube (M). Connect both tubes
together.
b. Rotate the collar (L) toward the locked symbol to secure
the tubes together.
WARNING
Periodically check the connections to ensure that they are
tightened securely.
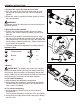
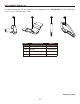
2. Attach the auxiliary handle
a. Position the front/auxiliary handle (A) onto the lower
portion of the trimmer section by sliding over the lower
tube (K).
b. Once the front handle is in the desired position, align
the hole on the handle with the hole on the bracket (BB),
then slide the bolt (CC) through the top of the handle and
secure with the fastening knob (AA). Tighten until there is
no movement in the handle.
c. The front handle can be adjusted to a suitable position.
Hardware Used
AA
Fastening knob x 1
BB
Bracket x 1
CC
Bolt x 1
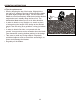
3. Battery
IMPORTANT: The battery may not be fully charged
when purchased. Before using the pole hedge trimmer for
the rst time, place the battery in the battery charger and
charge. Make sure to read all safety precautions, and follow
the instructions in the battery and charger manuals.
3a. To install the battery:
a. Align the battery with the battery compartment.
b. Insert battery into the battery compartment until battery
release button (G) locks into place. You should hear a
“click” once it is installed.
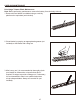
3b. To remove the battery:
a. Press the battery release button (G) on the battery
compartment.
This will cause the battery to raise out of the tool slightly.
b. Grasp the pole hedge trimmer rmly and pull the battery
out of the tool.
ASSEMBLY INSTRUCTIONS
1
G
3
L
M
K
2
A
BB
CC
AA
K