
Use and Care Guide


11
kobalttools.com
OPERATING INSTRUCTIONS
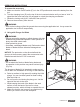
To remove the accessory
a. Make sure that the On/Off switch (E) is in the OFF position and remove the battery from the
tool.
b. Turn the clamping lever (D) on the top of the tool counterclockwise until you hear a “click” to
signal that the lever has been fully engaged to unlock the clamping mechanism.
c. Rotate the locking rod (A) 90° clockwise, then pull it off.
d. Remove the accessory from the tool.
WARNING
• Don’t let the locking rod face the ground when removing the application tool. It may cause the
application tool to fall off unexpectedly.
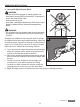
6. Using with Plunge-Cut Blade
WARNING
• Always wear safety goggles or safety glasses with side
shields during power tool operation. If the operation is
dusty, also wear a dust mask.
• Wear protective gloves.
• Use sharp, undamaged blades only. Deformed or blunt
blades or blades that are otherwise damaged can
break.
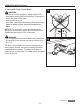
NOTICE: The protrusion on the drive shaft and the
grooves in the accessory permit the accessories to be
installed around the tool in 30° increments.
WARNING
• Do not attach the ush cut blade facing backward,
as operation in this position may cause serious injury
(Fig. 6a).
The plunge-cut blade (H) is intended to make precise
cuts to aid in the installation of ooring or wall materials.
a. Select a medium to high speed for making the initial
plunge. You can increase speed for faster cutting
after the initial cut.
b. Do not force the tool during the plunge cut. Let the
speed of the tool do the work.
c. While keeping the teeth of the blade in the work
surface, move the back of the tool in a slow,
sideways motion, which will help to expedite the cut.
d. Make sure that the tool comes to a complete stop
before you remove it from the workpiece.
6a
6b