
Use and Care Guide


10
kobalttools.com
OPERATING INSTRUCTIONS
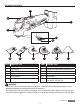
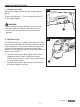
5. Installing and Removing Accessories
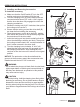
To install the accessory
a. Make sure that the On/Off switch (E) is in the OFF
position and remove the battery from the tool.
b. Turn the clamping lever (D) on the head of the tool
counterclockwise about 150° until a “click” signals
that the lever has been fully engaged to unlock the
clamping mechanism.
c. Rotate the locking rod (A) 90° clockwise, then pull on
the locking rod to remove it.
d. Ensure that the locking rod and the drive shaft (B)
are clean before installing the accessory.
e. Place the accessory on the drive shaft (B), making
sure that all the grooves on the accessory align with
the protrusions on the drive shaft.
f. Insert the locking rod into the drive shaft so that the
rib on the shaft aligns with the tool body. Then press
the locking rod and rotate it 90° counterclockwise so
that it is been secured in the drive shaft.
g. Turn the clamping lever clockwise. A “click” will
signal that the lever has been fully engaged to lock
the clamping mechanism. After hearing the click,
continue to turn the lever until it returns to its original
position.
NOTICE: The protrusion on the drive shaft and the
grooves in the accessory permit the accessories to be
installed around the tool in 30° increments.
WARNING
• Do not attach the plunge-cut blade, ush circular blade,
rigid scraper blade or carbide grout-removal blade so
that they face backward, as operation in this position
may cause serious injury.
CAUTION
• To avoid pinching, hold the clamping lever rmly when
fastening an accessory. Do not place hands or ngers
between the lever and the tool body to guard against
bruising when locking the clamping lever. Do not place
your hands or ngers between the locking rod and drive
shaft.
5a
D
Original
position
150°
5b
A
B
90°
5c