ITEM #0790024/0790023 BRUSHLESS MULTI-TOOL MODEL #KMT 124B-03 Español p. 17 KOBALT® and the K Design® are registered trademarks of LF, LLC. All Rights Reserved. ATTACH YOUR RECEIPT HERE Serial Number Purchase Date Questions, problems, missing parts? Before returning to your retailer, call our customer service department at 1-888-3KOBALT (1-888-356-2258), 8 a.m. - 8 p.m., EST, Monday - Friday. AB16408 kobalttools.
TABLE OF CONTENTS Product Specifications......................................................................................................2 Package Contents............................................................................................................3 Safety Information............................................................................................................4 Preparation.......................................................................................................
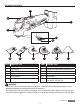
PACKAGE CONTENTS E D F C B A G PART A B C D E F H J I DESCRIPTION Locking rod Drive shaft LED work light Clamping lever On/Off switch Variable-speed dial PART G H I J K L K L DESCRIPTION Rigid scraper blade Plunge-cut blade (wood & metal) (3) Flush circular blade Carbide grout-removal blade Base plate Sanding paper (60 grit x3, 120 grit x3, 180 grit x3). WARNING • Remove the tool from the package and examine it carefully.
SAFETY INFORMATION Please read and understand this entire manual before attempting to assemble or operate this product. If you have any questions regarding the product, please call customer service at 1-888-3KOBALT, 8 a.m. - 8 p.m., EST, Monday - Friday. WARNING • The operation of any power tool can result in foreign objects being thrown into your eyes, which can result in severe eye damage.
SAFETY INFORMATION Some of the following symbols may be used on this tool. Please study them and their meaning. Proper interpretation of these symbols will allow you to operate the tool better and more safely. SYMBOL DEFINITION SYMBOL DEFINITION V Volts n0 No-load Speed A Amps /min Revolutions or Strokes per Minute Hz Hertz Direct Current W Watts Alternating Current General Power Tool Safety Warnings WARNING • Read all safety warnings and all instructions.
SAFETY INFORMATION • When operating a power tool outdoors, use an extension cord suitable for outdoor use. Use of a cord suitable for outdoor use reduces the risk of electric shock. • If operating a power tool in a damp location is unavoidable, use a ground-fault circuit interrupter (GFCI) protected supply. Use of a GFCI reduces the risk of electric shock. Personal Safety • Stay alert, watch what you are doing and use common sense when operating a power tool.
SAFETY INFORMATION Battery Tool Use and Care • Recharge only with the charger specified by the manufacturer. A charger that is suitable for one type of battery pack may create a risk of fire when used with another battery pack. • Use power tools only with specifically designated battery packs. Use of any other battery packs may create a risk of injury and fire.
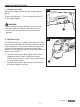
OPERATING INSTRUCTIONS 1. To Attach Battery Pack a. Place the On/Off switch (E) in the OFF position. b. Align the raised portion on the battery pack with the grooves on the bottom of the tool and then slide the battery pack onto the tool as shown. c. Make sure that the latches on the battery pack snap into place and the battery pack is secured to the tool before beginning operation.
OPERATING INSTRUCTIONS 3. Variable-speed Dial Adjust the oscillating speed with the variable-speed dial (F). 3 Turn the dial between “1” for the lowest speed and “6” for the highest speed. WARNING • Never change the speed while the tool is running. Failure to obey this caution could make you lose control of the tool and result in serious personal damage. F 4 4.
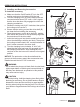
OPERATING INSTRUCTIONS 5. Installing and Removing Accessories 5a To install the accessory a. Make sure that the On/Off switch (E) is in the OFF position and remove the battery from the tool. b. Turn the clamping lever (D) on the head of the tool counterclockwise about 150° until a “click” signals that the lever has been fully engaged to unlock the clamping mechanism. c. Rotate the locking rod (A) 90° clockwise, then pull on the locking rod to remove it. d.
OPERATING INSTRUCTIONS To remove the accessory a. Make sure that the On/Off switch (E) is in the OFF position and remove the battery from the tool. b. Turn the clamping lever (D) on the top of the tool counterclockwise until you hear a “click” to signal that the lever has been fully engaged to unlock the clamping mechanism. c. Rotate the locking rod (A) 90° clockwise, then pull it off. d. Remove the accessory from the tool.
OPERATING INSTRUCTIONS 7. Using with Flush Circular Blade WARNING • Always wear safety goggles or safety glasses with side shields during power tool operation. If operation is dusty, also wear a dust mask. • Wear protective gloves. • Use sharp, undamaged blades only. Deformed or blunt blades or blades that are otherwise damaged can break. 7a NOTICE: The protrusion on the drive shaft and the grooves in the accessory permit the accessories to be installed around the tool in 30° increments.
OPERATING INSTRUCTIONS 8. Using with Carbide Grout-Removal Blade WARNING • Always wear safety goggles or safety glasses with side shields during power tool operation. If operation is dusty, also wear a dust mask. • Wear protective gloves. • Use sharp, undamaged blades only. Deformed or blunt blades or blades that are otherwise damaged can break. 8a NOTICE: The protrusion on the drive shaft and the grooves in the accessory permit the accessories to be installed around the tool in 30° increments.
OPERATING INSTRUCTIONS 9. Using with Rigid Scraper Blade 9a WARNING • Always wear safety goggles or safety glasses with side shields during power tool operation. If operation is dusty, also wear a dust mask. • Wear protective gloves. • Use sharp, undamaged blades only. Deformed or blunt blades or blades that are otherwise damaged can break. WARNING • Do not attach the rigid scraper blade facing backwards, as operation in this position may cause serious injury (Fig.9a).
OPERATING INSTRUCTIONS 10. Using with Sanding Base Plate Set 10 WARNING • Always wear safety goggles or safety glasses with side shields during power tool operation. If operation is dusty, also wear a dust mask. • Wear protective gloves. a. Align the sandpaper with the sanding plate and use your hand to press it firmly onto the sanding plate. b. It is recommended to sand a test sample of the workpiece first to select the best sanding paper. c. Select a high speed range when sanding with the multi-tool. d.
TROUBLESHOOTING WARNING • Set the On/Off switch (E) to the OFF position and detach the battery pack from the multi-tool before performing troubleshooting procedures. PROBLEM The multi-tool does not work. Strong vibration or loud noise during operation. Motor overheating. The LED worklight blinks rapidly The LED worklight blinks slowly. POSSIBLE CAUSE Battery pack is depleted. Accessory is not installed securely. CORRECTIVE ACTION Charge the battery pack.
ARTÍCULO #0790024/0790023 HERRAMIENTA DE USOS MÚLTIPLES SIN CEPILLO MODELO #KMT 124B-03 KOBALT® y K Design® son marcas registradas de LF, LLC. Todos los derechos reservados ADJUNTE SU RECIBO AQUÍ Número de serie Fecha de compra ¿Preguntas, problemas, piezas faltantes? Antes de volver a la tienda, llame a nuestro Departamento de Servicio al Cliente al 1-888-3KOBALT (1-888-356-2258), de lunes a viernes de 8 a.m. a 8 p.m., hora estándar del Este. kobalttools.
ÍNDICE Especificaciones del producto........................................................................................18 Contenido del paquete...................................................................................................19 Información de seguridad...............................................................................................20 Preparación....................................................................................................................
CONTENIDO DEL PAQUETE E D F C B A G H J I PIEZA DESCRIPCIÓN A Varilla de empalme B Eje motor C D Luz de trabajo LED Palanca de sujeción E F Interruptor de encendido y apagado Perilla de velocidad variable K L PIEZA DESCRIPCIÓN G Hoja rígida de raspado H Hoja para corte por perforación (madera y metal) (3) I Hoja circular al ras J Hoja de carburo para quitar lechada de cemento K Placa de base L Papel de lija (3 de grano 60, 3 de grano 120, 3 de grano 180).
INFORMACIÓN DE SEGURIDAD Lea y comprenda completamente este manual antes de intentar ensamblar u operar este producto. Si tiene preguntas relacionadas con el producto, llame al Departamento de Servicio al Cliente al 1-888-3KOBALT, de lunes a viernes de 8 a.m. a 8 p.m., hora estándar del Este. ADVERTENCIA • La operación de cualquier herramienta eléctrica puede arrojar objetos extraños a los ojos y causar graves daños oculares.
INFORMACIÓN DE SEGURIDAD Algunos de los siguientes símbolos pueden aplicarse al uso de esta herramienta. Obsérvelos y aprenda su significado. La interpretación correcta de estos símbolos le permitirá utilizar la herramienta de manera eficaz y segura.
INFORMACIÓN DE SEGURIDAD • No exponga las herramientas eléctricas a la lluvia o a condiciones de humedad. Si ingresa agua en una herramienta eléctrica, el riesgo de descarga eléctrica aumentará. • No maltrate el cable. Nunca use el cable para transportar, jalar o desenchufar la herramienta eléctrica. Mantenga el cable alejado del calor, el aceite, los bordes filosos o las piezas en movimiento. Los cables dañados o enredados aumentan el riesgo de descargas eléctricas.
INFORMACIÓN DE SEGURIDAD • Desconecte el enchufe de la fuente de alimentación o la batería de la herramienta eléctrica antes de realizar cualquier ajuste, cambiar accesorios o almacenar herramientas eléctricas. Este tipo de medidas de seguridad preventivas reduce el riesgo de arranques accidentales de la herramienta eléctrica.
INFORMACIÓN DE SEGURIDAD • Tome medidas de precaución cuando exista la posibilidad de que durante el trabajo se genere polvo que podría ser combustible, explosivo o perjudicial para la salud. Ejemplo: Algunos polvos se consideran cancerígenos. Use una mascarilla antipolvo y trabaje con la extracción de polvo o astillas siempre que pueda conectar este sistema. • Use la máquina solo para lijar en seco. Si ingresa agua en la máquina, aumentará el riesgo de una descarga eléctrica. • Asegure la pieza de trabajo.
INSTRUCCIONES DE FUNCIONAMIENTO 1. Para fijar el paquete de baterías a. Coloque el interruptor de encendido y apagado (E) en la posición de apagado. a. Alinee la parte elevada del paquete de baterías con las ranuras de la parte inferior de la herramienta y luego deslice el paquete de baterías hacia dentro de la herramienta, como lo muestra la imagen. c.
INSTRUCCIONES DE FUNCIONAMIENTO 3. Perilla de velocidad variable Ajuste la velocidad de oscilación con la perilla de velocidad variable (F). 3 Coloque la perilla entre “1”, para la velocidad más baja, y “6” para la más alta. ADVERTENCIA • Nunca cambie la velocidad mientras la herramienta esté en funcionamiento. No seguir esta indicación podría provocar la pérdida de control de la herramienta y heridas personales graves. 4.
INSTRUCCIONES DE FUNCIONAMIENTO e. Coloque el accesorio en el eje motor (B) de modo que todas las ranuras de este se encuentren alineadas con las protuberancias del eje motor. f. Inserte la varilla de empalme en el eje motor de modo que la varilla del eje quede alineada con el cuerpo de la herramienta. Luego, presione la varilla de empalme y gírela 90° en dirección contraria a las manecillas del reloj para que quede fija en el eje motor. g.
INSTRUCCIONES DE FUNCIONAMIENTO 6. Uso de la hoja de corte por perforación ADVERTENCIA • Al operar herramientas eléctricas, use siempre gafas protectoras o de seguridad con protecciones laterales. Si hay demasiado polvo durante la operación, use también una mascarilla antipolvo. • Use guantes de protección. • Use solo cuchillas afiladas y sin daños. Las cuchillas deformadas, sin filo o con daños de otros tipos pueden romperse.
INSTRUCCIONES DE FUNCIONAMIENTO AVISO: La protuberancia del eje motor y las ranuras del accesorio permiten la instalación de los accesorios alrededor de la herramienta con incrementos de 30°. 7b ADVERTENCIA • No fije la hoja circular al ras de forma inversa, ya que el uso de la herramienta con la hoja en esta posición podría causar lesiones graves (fig. 7a).
INSTRUCCIONES DE FUNCIONAMIENTO b. Procure mantener la hoja para quitar lechada de cemento alineada con la línea de la lechada y tenga cuidado de no aplicar demasiada presión lateral sobre la hoja para lechada de cemento durante el proceso. c. Corte la lechada de cemento alrededor de la baldosa y luego use un cincel manual para quitar la baldosa de la pared. Si la hoja se atasca durante el proceso de extracción de la lechada de cemento, puede limpiar la lija con un cepillo y terminar el trabajo.
INSTRUCCIONES DE FUNCIONAMIENTO 10. Uso del conjunto de placas base de lijado 10 ADVERTENCIA • Al operar herramientas eléctricas, use siempre gafas protectoras o de seguridad con protecciones laterales. Si hay demasiado polvo durante la operación, use también una mascarilla antipolvo. • Use guantes de protección. a. Alinee el papel de lija con la placa de lijado y presiónelo firmemente sobre la placa. b.
SOLUCIÓN DE PROBLEMAS ADVERTENCIA • Coloque el interruptor de encendido y apagado en la posición de apagado y retire el paquete de baterías de la herramienta de usos múltiples antes de realizar cualquier procedimiento de solución de problemas. PROBLEMA La herramienta de usos múltiples no funciona. La herramienta produce vibraciones o ruidos intensos durante el funcionamiento. CAUSA POSIBLE El paquete de baterías está agotado. El accesorio no se encuentra instalado firmemente. El motor se sobrecalienta.