
Use and Care Guide


13
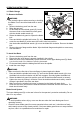
ASSEMBLY INSTRUCTIONS
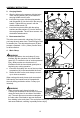
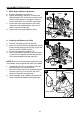
2. Carrying Handle
a. Align the holes on the saw arm with the holes
in the carrying handle (AD), then install the
carrying handle onto the arm.
b. Insert the long screw with the spring washer
and at washer (6) into the hole in the carrying
handle. Tighten the long screw it with the
double ended wrench (4).
c. Insert the two short screws with the spring
washers and at washers (7) into the holes in
the carrying handle. The two short screws with
the double ended wrench.
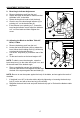
3. Dust-extraction Port
This miter saw comes with a dust bag (3) to help
you keep the work area clean. The dust bag is ideal
for smaller jobs. The dust-extraction port (E) also
accepts a standard 1-1/2 in. (38cm) vacuum hose
for dust collection.
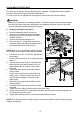
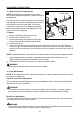
4. Work Clamp
WARNING
• In some operations, the work clamp (2) may
interfere with the operation of the lower blade
guard (Q). To reduce the risk of serious personal
injury, always make sure that there is no
interference with the lower blade guard prior to
beginning any cutting operation.
a. Insert the work clamp into one of the two clamp
receptacles (W) in the base behind the fence.
b. Rotate the knob on the work clamp to move it
up or down as needed.
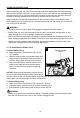
When cutting wide work pieces (such as nominal
2x8 boards), the boards must be clamped with
the work clamp provided or with a C-clamp (not
included).
WARNING
• When using the work clamp included or a
C-clamp (not included) to secure the work piece,
clamp the work piece on one side of the blade
only. The work piece must remain unclamped on
the other side of the blade to prevent the blade
from binding in the work piece. The work piece binding the blade will cause the motor to stall
and cause kickback, resulting in possibly serious injury.
2
3
E
3
4
2
W
Q
6 7
AD