ITEM #3764095 KOBALT and logo design are trademarks or registered trademarks of LF, LLC. All rights reserved. 24V JOBSITE RADIO MODEL #KJR 124B-03 Español p. 17 ATTACH YOUR RECEIPT HERE Serial Number Purchase Date Questions, problems, missing parts? Before returning to your retailer, call our customer service department at 1-888-3KOBALT (1-888-356-2258), 8 a.m. - 8 p.m., EST, Monday - Sunday. You could also contact us at partsplus@lowes.com or visit www.lowespartsplus.com.
TABLE OF CONTENT Product Specifications...................................................................................... 2 Package Content.............................................................................................. 3 Safety Information ............................................................................................ 5 Preparation....................................................................................................... 7 Operating Instructions ..................
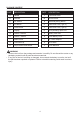
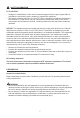
PACKAGE CONTENT B A C F E D G H Q P O N M L K J I R S T U 3 V
PACKAGE CONTENT PART DESCRIPTION PART DESCRIPTION A Handle L Tune/Seek Down B Antenna M On/Off Button C DC Socket N Bluetooth-pairing Button D EQ Button O USB Power Port (Type C) E Clock Button P USB Power Port (Type A) F Display Q AUX (auxiliary) Input Port G Volume + Button R Battery Pack Port H Volume – Button S Clock Battery Door I Mode Button T AC Power Adaptor J Tune/Seek Up U AUX Cable K Play/Pause/Preset Button V Clock Batteries WARNING • Remove the to
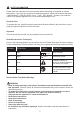
SAFETY INFORMATION Please read and understand this entire manual before attempting to assemble or operate this product. If you have any questions regarding the product, please call customer service at 1-888-3KOBALT (1-888-356-2258), 8 a.m. - 8 p.m., EST, Monday – Sunday. You could also contact us at partsplus@lowes.com or visit www.lowespartsplus.com. Know the Tool To operate this tool, carefully read this manual and all labels affixed to the tool before using it.
SAFETY INFORMATION • Do not install near any heat sources such as radiators, heat registers, stoves, or other apparatus (including amplifiers) that produce heat. • Only use attachments/accessories specified by the manufacturer. • Detach the battery pack from the apparatus during lightning storms or when unused for long periods of time. • Refer all servicing to qualified service personnel.
SAFETY INFORMATION FCC CAUTION • Changes or modifications to this unit not expressly approved by the party responsible for compliance could void the user’s authority to operate the equipment. • This device complies with Part 15 of the FCC Rules. Operation is subject to the following two conditions: (1) this device may not cause harmful interference, and (2) this device must accept any interference received, including interference that may cause undesired operation.
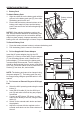
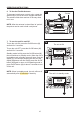
OPERATING INSTRUCTIONS 1. Battery Pack To Attach Battery Pack 1. 2. 1 R Align the raised rib on the battery pack with the grooves in the battery pack port (R), then slide the battery pack into the unit. Ensure that the battery-release buttons on the battery pack snap into place and the battery pack is secured to the unit before beginning the operation.
OPERATING INSTRUCTIONS f. After disconnecting the AUX cable (U) close the cover to protect the ports from dust, dirt, and moisture. NOTE: The AUX port is for INPUT only. Do not connect headphones or speakers. NOTE: Batteries of the connected devices cannot be charged via the AUX connection. 4.
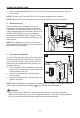
OPERATING INSTRUCTIONS 6. To Use the Flexible Antenna To decrease interference or static noise, rotate the antenna (B) or move the unit to a higher elevation. The antenna folds down and out of the way when not in use. 6 “Pocket” B NOTE: After the antenna is raised from its “pocket”, the pocket can be used to hold a cell phone. 7. To turn the unit On and Off 7a To turn the unit ON: press the On/Off button (M) and hold for 2 seconds.
OPERATING INSTRUCTIONS 8. To Set the Volume Use the Volume + button (G) and Volume – button (H) to increase or decrease the volume of the unit, respectively. Briefly press the volume to increase/decrease by one level, long press the volume to continually increase/decrease the volume. 9. To Select the Operating Mode To select the operating mode, briefly press the mode button (I) several times until the desired mode is displayed. The following operating modes are available: – FM Radio reception.
OPERATING INSTRUCTIONS 12. Equalizer (EQ) Adjustment Your unit’s bass or treble can be adjusted in the equalizer menu by briefly pressing EQ button (D). The menu order after pressing the EQ button (D) is: Bass Treble Exit. a. b. c. d. e. In any mode, press the clock button (E) for 2 seconds to enter the time menu. The time menu HOUR MINUTE EXIT. order is: 12H/24H b. c. d. Adjusting the treble Adjusting the bass Press the EQ button (D) to first adjust the bass.
OPERATING INSTRUCTIONS 14. Tuning AM and FM a. Press the mode button (M) several times until the AM or FM is shown on the display (F). A radio station can be tuned to manually or automatically (scan-tuning). b. Manual tuning: Briefly press the ‘<<’ button (L) or ‘>>’ button (J) to reach the desired frequency. Each press will increase or decrease the frequency by 0.1MHz for FM and 10kHz for AM range. The frequency is shown on the display. c.
CARE AND MAINTENANCE All maintenance should only be carried out by a qualified service technician. WARNING • To reduce the risk of personal injury and damage, never immerse your machine, battery pack or charger in liquid or allow a liquid to flow inside them. Cleaning Before cleaning or performing any maintenance, remove the battery. For safe and proper operation, always keep the unit clean. Always use only a soft, dry cloth to clean the unit. Never use detergent or alcohol.
WARRANTY For 5 years from the date of purchase, the product is warranted for the original purchaser to be free from defects in material and workmanship. This guarantee does not cover damage due to abuse, normal wear, improper maintenance, neglect, unauthorized repair/alteration, or expendable parts and accessories expected to become unusable after a reasonable period of use.
ARTÍCULO #3764095 KOBALT y el diseño del logotipo son marcas comerciales o marcas registradas de LF, LLC. Todos los derechos reservados. RADIO PARA EL LUGAR DE TRABAJO DE 24V MODELO #KJR 124B-03 ADJUNTE SU RECIBO AQUÍ Número de serie Fecha de compra ¿Preguntas, problemas, piezas faltantes? Antes de volver a la tienda, llame a nuestro Departamento de Servicio al Cliente al 1888-3KOBALT (1-888-356-2258), de lunes a domingo de 8 a.m. a 8 p.m., hora estándar del Este.
ÍNDICE Especificaciones del producto........................................................................ 18 Contenido del paquete ................................................................................... 19 Información de seguridad............................................................................... 21 Preparación .................................................................................................... 23 Instrucciones de funcionamiento.....................................
CONTENIDO DEL PAQUETE B A C F E D G H Q P O N M L K J I R S T U 19 V
CONTENIDO DEL PAQUETE PIEZA DESCRIPCIÓN PIEZA DESCRIPCIÓN A Manija L Sintonizar/buscar hacia abajo B Antena M Botón de encendido/apagado C Toma de CC N Botón para vincular dispositivos con Bluetooth D Botón EQ O Puerto de alimentación USB (tipo C) E Botón de reloj P Puerto de alimentación USB (tipo A) F Exhibición Q Puerto de entrada AUX (auxiliar) G Botón de Volumen + R Puerto del paquete de baterías H Botón de Volumen – S Cubierta de la batería del reloj I Botón de mod
INFORMACIÓN DE SEGURIDAD Lea y comprenda completamente este manual antes de intentar ensamblar u operar este producto. Si tiene preguntas relacionadas con el producto, llame al Departamento de Servicio al Cliente al 1-888-3KOBALT (1-888-356-2258), de lunes a domingo de 8 a. m. a 8:00 p. m., hora estándar del Este. También puede ponerse en contacto con nosotros a través de partsplus@lowes.com o visitar www.lowespartsplus.com.
INFORMACIÓN DE SEGURIDAD • No instale cerca de ninguna fuente de calor tal como radiadores, salidas de calefacción, estufas u otros aparatos (incluidos amplificadores) que produzcan calor. • Use solo fijaciones/accesorios especificados por el fabricante. • Desenchufe el paquete de baterías del aparato durante tormentas eléctricas o cuando no lo use por períodos prolongados. • Solicite todos los trabajos de reparación a personal de servicio calificado.
INFORMACIÓN DE SEGURIDAD PRECAUCIÓN DE FCC • Los cambios o modificaciones a esta unidad que no estén expresamente aprobados por la parte responsable del cumplimiento podrían anular la autorización del usuario para utilizar el equipo. • Este dispositivo cumple con la sección 15 de las reglas de la FCC.
INSTRUCCIONES DE FUNCIONAMIENTO 1. Paquete de baterías 1 Para fijar el paquete de baterías 1. 2. R Botones de liberación de la batería Alinee la varilla elevada del paquete de baterías con las ranuras del paquete de baterías (R) y, luego, deslice el paquete de baterías en la unidad. Asegúrese de que los botones de liberación de la batería del paquete de baterías encajen en su lugar y que este quede fijo a la unidad antes de comenzar la operación.
INSTRUCCIONES DE FUNCIONAMIENTO 3. Para conectar un reproductor externo al puerto de entrada AUX a. b. c. d. e. f. 3 Seleccione el modo de funcionamiento AUX con el botón de modo (I). Q Inserte el cable AUX (U) en el puerto de entrada AUX (Q) y asegúrese de que estén conectados correctamente. Conecte un reproductor MP3, un reproductor de CD u otro dispositivo de audio directamente a la unidad usando el cable AUX (U). Encienda el dispositivo de audio externo e inicie la reproducción.
INSTRUCCIONES DE FUNCIONAMIENTO 5. Para instalar las baterías del reloj Su unidad está equipada con una función de memoria para almacenar la hora y sus estaciones de radio preestablecidas. Cuando la unidad está en la posición OFF (apagada), esta función de memoria se alimenta con dos baterías de reloj que deben instalarse en la unidad. a. b. c.
INSTRUCCIONES DE FUNCIONAMIENTO 7. Para encender y apagar la unidad Para encender la unidad: mantenga presionado el botón de encendido/apagado (M) durante 2 segundos. 7a La unidad está encendida Para apagar la unidad: mantenga presionado el botón de encendido/apagado (M) durante 2 segundos. 87.50 MHz Modo de espera: presione brevemente el botón de encendido/apagado (M) para que la unidad cambie al modo de espera. Cuando la unidad está en modo de espera, todas las salidas de audio dejarán de funcionar.
INSTRUCCIONES DE FUNCIONAMIENTO 10. Modo de funcionamiento de Bluetooth Presione el botón de modo (I) varias veces hasta que se active el modo BT (Bluetooth) o presione brevemente el botón de emparejamiento de Bluetooth (N) para ir directamente al modo Bluetooth. 8 12hr AM El icono de Bluetooth parpadea cuando el modo BT está activo, pero no hay ningún dispositivo Bluetooth conectado. El icono de Bluetooth permanece encendido cuando un dispositivo se conecta correctamente.
INSTRUCCIONES DE FUNCIONAMIENTO 12. Ajuste del ecualizador (EQ) 9a Los graves o agudos de su unidad se pueden ajustar desde el menú del ecualizador presionando brevemente el botón EQ (D). El orden del menú después de presionar el botón EQ (D) es: Bass (Graves) Treble (Agudos) Salida. a. b. c. d. e. Treble Bass Presione el botón de EQ (D) para ajustar primero los graves. Presione el botón “<<” (L) o el botón “>>” (J) para disminuir o aumentar los graves en el rango de -5 a +5.
INSTRUCCIONES DE FUNCIONAMIENTO 14. Sintonización de AM y FM a. Presione el botón de modo (M) varias veces hasta que aparezca AM o FM en la pantalla (F). Se puede sintonizar una emisora de radio de forma manual o automática (exploración de emisoras). b. Sintonización manual: presione brevemente el botón “<<” (L) o el botón “>>” (J) para alcanzar la frecuencia deseada. Cada vez que presione aumentará o disminuirá la frecuencia en 0.1 MHz para FM y en 10 kHz para AM. La frecuencia se muestra en la pantalla.
CUIDADO Y MANTENIMIENTO El mantenimiento debe estar a cargo únicamente de un técnico de servicio calificado. ADVERTENCIA • Para reducir el riesgo de provocar lesiones personales y daños, nunca sumerja la máquina, el paquete de baterías ni el cargador en líquidos, ni permita que ingresen líquidos en ellos. Limpieza Antes de limpiar o realizar cualquier mantenimiento, retire la batería. Para un uso seguro y adecuado, siempre mantenga la unidad limpia.
GARANTÍA Este producto tiene cobertura de garantía contra defectos en materiales y mano de obra por 5 años a partir de la fecha de compra para el comprador original. Esta garantía no cubre daños debidos al maltrato, desgaste normal, mantenimiento inadecuado, negligencia, reparaciones o alteraciones no autorizadas, o piezas y accesorios prescindibles que se espera que resulten inutilizables después de un período de uso razonable.