
User's Manual


18
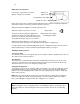
Using the keypad buttons
Most buttons are described in detail in other sections, but here is an overview of their
functions:
Power–turns the projector on and off (page 12).
Auto
Image
–resynchronize
the projector to the source.
Presets–cycles through the available preset settings.
Menu–opens the onscreen menus.
Select–confirms choices made in the menus.
Up/Down/Left/Right
arrows–navigates to and adjusts settings in the menus
.
Source–changes the active source.
Help–button to access the projector‟s help feature
Optimizing
computer images
After the projector is running and the image is on the screen, you can optimize the image using
the onscreen menus.
• Adjust the Keystone, Contrast, or Brightness in the Basic Picture menu
• Change the Aspect Ratio. Choose the option that best fits your input source.
• Adjust the Color Temperature in the Advanced Picture menu
.
• Adjust the Phase, Tracking, or Horizontal or Vertical position in the
Advanced Picture menu.
• Once you have optimized the image for a particular source, you can save the settings using
Presets. This allows you to quickly recall these settings later.
Presentation features
Several features are provided to make giving presentations easier. Here is an overview, details
are found in the menu section.
• The Custom key allows you to assign various features to the button.
The default effect is Source Info, which displays information about the
projector and current source.
• The Search Screen option lets you change the appearance of the blank screen and start up
screen.
• Two options, Auto Off and Screen Save Time, are provided to automatically shut down
the projector after several minutes of inactivity or display a black screen. This helps
preserve lamp life.