
Manual


9
Loading and Firing
recommended loads (see load chart on page 13),
and only load your Knight Rifle with a recom-
mended black powder or black powder substi-
tute. Never use smokeless powder!
4� If using pelletized powder, place the recommended
number of pellets into the muzzle�
WARNING
!
To reduce the risk of an explosion, do not exceed
recommended loads (see load chart on page 13).
5� If using sabots, place the bullet firmly in the proper
sabot so that the bullet’s base is squarely seated�
6� Insert the projectile and start it down the bore
using a Knight Bullet Starter�
7� Using a hand over hand motion, drive the bullet
down onto the powder charge using the concave
end of the ramrod or cleaning jag� Do not pound
or bounce the ramrod on the bullet� This will
deform or displace the projectile, causing loss of
accuracy and bullet performance� If using pellet-
ized powder, this can also crack or crush the pel-
lets, resulting in loss of accuracy or performance�
WARNING
!
If the bullet is not seated firmly on
the powder charge, the rifle may explode when
fired.
8� Remove your ramrod from the bore�
9� Double check your trigger and secondary safeties
and be sure that both are on safe� Be sure the rifle
is pointed in a safe direction� Depending on your
model, pull the hammer assembly rearward until
the hammer locks into firing position, open the
bolt on a DISC Rifle, or release the drop or break-
open action�
10� Insert a priming device or 209 primed DISC Full
Plastic Jacket� Close the bolt and drop or break-
open action�
WARNING
!
Your rifle is now armed. Do not point your rifle at anything that you
do not want to shoot.
Loading Instructions for the TK2000 Muzzleloading Shotgun
1� Make sure that all safety systems are engaged before loading and that there is no
primer, live or spent, installed�
2� Place the butt of the shotgun on the ground so that the muzzle is facing up and away
from the body�
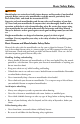
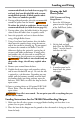
Priming the Full
Plastic Jacket
DISC Extreme and Long
Range Hunter
1� Insert the 209 shotgun
primer into the large end
of the Full Plastic Jacket�
2� Lift the bolt and pull
back� Place the Full Plastic
Jacket™ into the breech
and close the bolt�
3� A weather-proof seal is
formed over the primer
and nipple�