
Manual

25
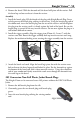
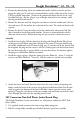
2� Remove the breech plug� Insert the combo tool (socket end first) into the receiver,
engage the plug (part I) and turn it counterclockwise until it slides out of the receiver�
This may require more force� (A hole in the combo tool allows for the use of a rod,
for added leverage�) Put the plug in a jar of Knight solvent for a few minutes, while
cleaning the barrel and receiver�
3� Remove the forearm stock� By using the screwdriver end of the combo tool, take out
the stock screw (S9) located on the underside of the stock� The stock and barrel easily
separate�
4� Remove the barrel� Using the socket end of the combo tool, take out the bolt (S6)
that is located in the forearm stock chamber� Unscrew it counterclockwise until it
slides out of the receiver� Pull the barrel up and out to release it from the receiver�
Assembly
1� Install the breech plug� Fill the threads of the plug with Knight Breech Plug Grease
to help prevent the breach plug from sticking in the receiver� Using the breech plug
end of the combo tool, insert the breech plug (part I) into the rear of the receiver and
hand tighten the plug into the receiver, until it is firmly against the back of the barrel�
Be sure the breech plug is screwed all the way into the receiver� Do not over tighten
the plug or it will become difficult to remove�
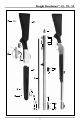
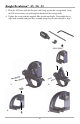
2� Install the trigger carriage� Align the action pivot slot (Photo #3 - Letter C) with the
receiver cross bolt (Photo #3 - Letter D), slide the action in, and close the assembly�
3.
D
C
3� Attach the barrel and stock� Push the barrel into the receiver fore end opening and
firmly attach the barrel to the receiver using the hex headed barrel bolt� Put the fore-
stock up against the bottom of the barrel and slide it down into the receiver stock
opening� Using the screwdriver end of your combo tool and firmly reattach the stock
screw through the stock into the stock lug on the barrel�
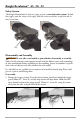
209 Conversion Non-Full Plastic Jacket Breech Plug
The Knight Revolution can be converted to use 209 primers without the DISC Full
Plastic Jacket�
1� Use supplied punch to remove the two carriage body spring pins�
2� Pull the carriage body assembly up and off of the lower pivot base assembly�
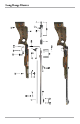
Knight Revolution™ .45, .50, .52