
Manual

21
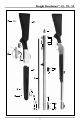
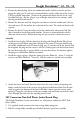
4� Remove the barrel� With the forestock off, the barrel will pivot off the receiver� Pull
the barrel up and out to release it from the receiver�
Assembly
1� Install the breech plug� Fill the threads of the plug with Knight Breech Plug Grease
to help prevent the breach plug sticking in the receiver� Using the breech plug end of
the combo tool, insert the breech plug into the rear of the receiver and hand tighten
the plug into the receiver, until it is firmly against the back of the barrel� Be sure the
breech plug is screwed all the way into the receiver� Do not over tighten the plug or it
will become difficult to remove�
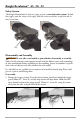
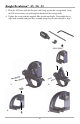
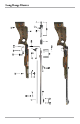
2� Install the trigger assembly� Align the trigger pivot (Photo #2 - Letter C) with the
receiver cross bolt� Rotate the trigger assembly back up into the receiver until snug�
Replace the mechanism locking screw securing the trigger assembly into the receiver�
C
2.
A
B
1.
3� Attach the barrel and stock� Align the barrel lug’s pivot slot with the receiver cross
bolt and rotate the barrel upward until locked in place� Put the forestock up against
the bottom of the barrel and slide it down onto the receiver� Using the screwdriver
end of your combo tool, firmly reattach the stock screw through the forestock into
the stock lug on the barrel�
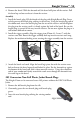
209 Conversion Non-Full Plastic Jacket Breech Plugs
The Knight Vision can be converted to use 209 primers without the DISC Full Plastic
Jacket�
1� Remove the old breech plug from the rifle�
2� Generously grease the new breech plug with breech plug
grease�
3� Insert the new breech plug utilizing the existing combo
tool�
Knight Vision™ .50
Mfg# 900046