Contents Introduction ��������������������������������������������2 Safety Definition Unpacking Your New Knight Muzzleloader Getting to Know Your New Knight Muzzleloader DISC Extreme™ .45/.50/.
Introduction D ear Knight Rifle® owner, congratulations! As a member of the Knight family, you now own the tradition of the past with the technology of the future. Knight Rifles has helped muzzleloading mature from a nostalgic interest into a true hunting sport. Every year, numerous world records are taken across the globe. With your Knight muzzleloader, you can expect unmatched accuracy on the range and in the field.
Introduction Unpacking Your New Knight Muzzleloader Knight muzzleloaders are delivered factory-packaged, preserved with a coating of protective oil, and placed in a corrosion resistant bag for shipping. Before loading and firing, make certain that all protective oil has been cleaned from the bore, breech plug, nipple, and exposed firing mechanisms. Your muzzleloader has been tested, inspected, and properly packaged at the factory. Knight Rifles cannot control product handling after shipment.
Basic Safety Rules ! WARNING Muzzleloaders can seriously or fatally injure shooters and bystanders if not handled properly. Before you use your muzzleloader, read this manual, particularly these Basic Safety Rules, and watch the instructional DVD. Supervise and teach muzzleloading and firearm safety to all members of your family. Never lend your muzzleloader to anyone who is not thoroughly familiar with its operation and the basic rules of muzzleloading safety.
Basic Safety Rules ! WARNING Even if you are proficient with other firearms, rifles, or other similar muzzleloaders, be sure to read the special muzzleloader safety rules below, as there may be features or functions of this product that you are not familiar with.
Care and Cleaning Always clean and lubricate your muzzleloader after each day’s shooting. A muzzleloader must be free of rust, dirt, grease, and powder residue to function safely and reliably. Careful maintenance, which includes inspection of all components to determine if they are in proper working order, is absolutely essential.
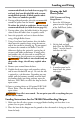
Loading and Firing ! WARNING To reduce the risk of accidental discharge, explosion, serious injury or death, always follow this complete procedure for loading and firing. Always wear proper eye and ear protection and be sure to keep muzzle pointed in a safe direction away from the body when preparing to load, loading, and firing. Preparing to Load ! WARNING To reduce the risk of accidental discharge, perform the following checks: 1.
Loading and Firing recommended loads (see load chart on page 13), and only load your Knight Rifle with a recommended black powder or black powder substitute. Never use smokeless powder! 4. If using pelletized powder, place the recommended number of pellets into the muzzle. ! WARNING To reduce the risk of an explosion, do not exceed recommended loads (see load chart on page 13). Priming the Full Plastic Jacket DISC Extreme and Long Range Hunter 1.
Loading and Firing 3. Measure out either FFg black powder, or industry approved black powder substitute and pour into the barrel (120 grains maximum). Suggested 100 grain max when using T7. ! WARNING To reduce the risk of an explosion, do not pour directly from the propellant container, do not exceed recommended loads (see load chart on page 12), and only load your Knight Rifle with a recommended black powder or black powder substitute. Never use smokeless powder! Do not use pelletized powder.
Reloading 1. Return all safeties to the safe position. 2. Remove live or spent percussion caps and primers from your firearm. 3. Leave the action open during swabbing and loading (except break open actions which should remain closed.) 4. Place the butt of the rifle on the ground. 5. Screw the cleaning jag onto the ramrod. 6. Moisten the cleaning patch with Knight Easy Clean and wring any excess out with your fingers. 7.
This page left blank intentionally.
Recommended Loads Knight Rifles are designed to perform best between 90 and 150 grains of Black Powder FFg, or industry approved black powder substitute. See maximum recommended load for specific models. ! WARNING Never use smokeless powder. It can cause your muzzleloader to explode. When determining the best load for your Knight Rifle, follow these steps: 1. Determine which game you intend to hunt and what bullet weight you intend to use.
Recommended Loads Recommended Loads for Rifles The following chart is intended to be used as a reference to assist you in determining what Knight bullet to use for what game. .50 cal = 310 Lead .50 cal = 260 Jacketed Hollow Point .50 cal = 250, 290 Polymer Tip .52 cal = 275, 350, 375 Red Hots .50 cal = 250, 300 Red Hots .50 cal = 245, 285 Spitzer Boat Tails Antelope, Whitetail, Mule Deer .
Ballistics Chart 15
Adjustments Trigger Adjustment ! WARNING All trigger and sear adjustments must be made by the factory or a certified gunsmith only. Incorrect adjustments can increase the risk of accidental discharge. Do not reduce trigger pull to less than three pounds, as this increases the risk of an accidental discharge. Creation of a lower trigger pull is an unauthorized alteration and is a misuse of the product.
Breech Plugs All Knight Rifles are equipped with a removable breech plug for easier cleaning. The breech plug should be removed at the end of each shooting session for a thorough cleaning of the bore and breech area. Knight Rifles manufactures several styles of breech plugs, and you should familiarize yourself with the one in your rifle. ! WARNING Using the wrong breech plug may cause the breech plug to blow out the back of the muzzleloader.
Knight Vision™ .50 Left hand conversion instructions, please call Knight. Action: Right Handed Quick Detachable Trigger Carriage Assembly, Removable Stainless Steel Breech Plug. Ballistics/Recommended Loads: (See page 13) Barrel: 26” Green Mountain Rifle Barrel, Rifle Grade MS - Camouflaged, 1:28 Twist, .
Knight Vision™ .
Knight Vision™ .50 Safety System The Knight Vision has only one safety system, a cross-bolt safety system. To lock the trigger, push the safety to the right. Push the safety to the left, to put the rifle in the fire position. Fire Safe Disassembly and Assembly ! WARNING Be sure rifle is not loaded or primed before disassembly or assembly. Study the rifle schematic and acquaint yourself with the different parts and terminology of your muzzleloader before assembling or disassembling.
Knight Vision™ .50 4. R emove the barrel. With the forestock off, the barrel will pivot off the receiver. Pull the barrel up and out to release it from the receiver. Assembly 1. Install the breech plug. Fill the threads of the plug with Knight Breech Plug Grease to help prevent the breach plug sticking in the receiver.
Knight Revolution™ .45, .50, .52 Action: Right Handed Quick Detachable Trigger Carriage Assembly, Removable Stainless Steel Breech Plug. Left Hand conversion instructions, please call Knight. (See page 16 for breech plug identification) Ballistics/Recommended Loads: (See page 13) Barrel: 27", Green Mountain Rifle Barrel, Rifle Grade Blue or Stainless Steel, 1:28 Twist, .50 caliber 27”, Green Mountain Rifle Barrel, Rifle Grade Blue or Stainless Steel, 1:26 Twist, .
Knight Revolution™ .45, .50, .
Knight Revolution™ .45, .50, .52 Safety System The Knight Revolution has only one safety system, a cross-bolt safety system. To lock the trigger, push the safety to the right. Push the safety to the left, to put the rifle in the fire position. Fire Safe Disassembly and Assembly ! WARNING Be sure rifle is not loaded or primed before disassembly or assembly. Study the rifle schematic and acquaint yourself with the different parts and terminology of your muzzleloader before assembling or disassembling.
Knight Revolution™ .45, .50, .52 2. R emove the breech plug. Insert the combo tool (socket end first) into the receiver, engage the plug (part I) and turn it counterclockwise until it slides out of the receiver. This may require more force. (A hole in the combo tool allows for the use of a rod, for added leverage.) Put the plug in a jar of Knight solvent for a few minutes, while cleaning the barrel and receiver. 3. R emove the forearm stock.
Knight Revolution™ .45, .50, .52 3. Place the 209 insert with the flat open side facing up into the carriage body. Insert the 209 insert retainer screw through the bottom of the carriage body. 4. Tighten the screw with the supplied Allen wrench until tight. Reassemble the carriage body assembly and pivot base assembly using the pins you removed in Step 1. Mfg# 900047 2. 1. 3. 4.
DISC Extreme™ .45/.50/.52 Action: Patented Double Safety System, New C-Toolless, Quick Release, Removable Bolt Assembly, Removable Stainless Steel Breech Plug (see page 16 for breech plug identification for .45/.50 and .52 caliber). Ballistics/Recommended Loads: (See page 13) Barrel: 26", 1:30" Twist, .45 Fluted Blue/Stainless, 26", 1:28" Twist, .50 Blued/Stainless, 26", 1:26" Twist, .
DISC Extreme™ .45/.50/.52 *Note: .52 caliber will have Xcoil Recoil pad and the Power Stem Breech Plug.
Long Range Hunter Action: Patented Double Safety System, New C-Toolless, Quick Release, Removable Bolt Assembly, Removable Stainless Steel Breech Plug (see page 16 for breech plug identification for .50 and .52 caliber). Ballistics/Recommended Loads: (See page 13) Barrel: 26", 1:28" Twist, .50 Blued/Stainless, 26", 1:26" Twist, .
Long Range Hunter 30
DISC Extreme™ .45/.50/.52 and Long Range Hunter Action and Safety Systems Bolt Action The bolt has been designed for easy removal and breakdown for easy cleaning of internal and external surfaces. The rifle also features a removable breech plug, making it easier to clean the bore thoroughly from one end to the other. The design also allows you to unload the rifle without firing by pushing unfired powder and/or bullet out the back of the barrel with the ramrod.
DISC Extreme™ .45/.50/.52 and Long Range Hunter Trigger Safety Secondary Safety Cocking piece Disassembly and Assembly ! WARNING Be sure rifle is not loaded or primed before disassembly or assembly. Study the rifle schematic and acquaint yourself with the different parts and terminology of your muzzleloader before assembling or disassembling. Letters and numbers in parentheses refer to labels on each rifle schematic for each model.
DISC Extreme™ .45/.50/.52 and Long Range Hunter Assembly 1. Install the breech plug. Fill the threads of the plug with Knight Breech Plug Grease to help prevent the breach plug sticking in the receiver. Using the breech plug end of the combo tool, insert the breech plug (I) into the rear of the receiver and hand tighten the plug into the receiver until it is firmly against the back of the barrel. Be sure the breech plug is screwed all the way into the receiver.
DISC Extreme™ .45/.50/.52 and Long Range Hunter 5. T o assemble, thread the striker assembly clockwise into the bolt body. Do not apply any pressure after the threading reaches the end. Do not tighten the striker against the bolt housing. 6. When the striker assembly reaches the end of the threads, turn it counterclockwise, until reference points (Photo #3 - Letters D and E) are aligned with each other.
Bighorn™ .50/.52 Wolverine™ .50 Action: Patented Double Safety System, Removable Bolt Assembly, Removable Stainless Steel Breech Plug (see page 16 for breech plug identification) Ballistics/Recommended Loads: (See page 13) Barrel: Wolverine 209: 22” Blued Steel Green Mountain Rifle Barrel, 1:28 Twist, .50 Caliber Bighorn: 26” Blued and Stainless Steel Green Mountain Rifle Barrel, 1:28 twist, .50 Caliber Bighorn 26” Stainless Steel Green Mountain Rifle Barrel, 1:26 Twist, .
Bighorn™ .50/.52 Wolverine™ .
TK2000™ Shotgun Action: Patented Double Safety System, one-piece removable Extreme 209 Hammer assembly. Removable Stainless Steel Breech Plug (see page 16 for breech plug identification) Loads: (See page 10) Barrel: 26” Realtree Hardwoods Green HD Ignition: Full Plastic Jacket™, 209 Primer Included In Package: Hex Head Combo Tool, DVD, Five Plug Screws, 5/32 Allen Wrench, Full Plastic Jackets, Non Red Plastic Jacket conversion, Capper/Decapper, Overshot Wads, Shot Cups Length And Weight: 45 Inches, 7.
TK2000™ Shotgun 38
Bighorn™ .50/.52 Wolverine™ .50 and TK2000™ Shotgun Action and Safety Systems Straight Pull Action The pull-type system functions by pulling the hammer assembly back from the receiver until it cocks. With both safeties off, the hammer under spring tension is released with a pull of the trigger. The hammer slides through the receiver and strikes the primer. With the rifle primed, using a 209 primer in the red Full Plastic Jackets, a spark moves forward through the breech plug and ignites the powder charge.
Bighorn™ .50/.52 Wolverine™ .50 and TK2000™ Shotgun Disassembly and Assembly ! WARNING Be sure the muzzleloader is not loaded or primed before disassembly or assembly. Study the rifle schematic and acquaint yourself with the different parts and terminology of your muzzleloader before assembling or disassembling. Letters and numbers in parentheses refer to labels on each rifle schematic for each model. It is advisable to use a padded vise to remove and reinstall the breech plug.
Bighorn™ .50/.52 Wolverine™ .50 and TK2000™ Shotgun 209 Conversion Non-Full Plastic Jacket Breech Plugs The DISC Extreme and Long Range Hunter can be converted to use 209 primers without the DISC Full Plastic Jacket. 1. Remove the old breech plug from the rifle. 2. Generously grease the new breech plug with breech plug grease. 3. Insert the new breech plug utilizing the existing combo tool.
Knight Rolling Block (KRB7) Action: Quick detachable trigger, hammer, rolling block assembly. Removable stainless steel breech plug. Ballistics/Recommended Loads: (See page 13 ) Barrel: 27", Green Mountain Rifle Barrel, Rifle Grade Blue or Stainless Steel, 1:28 Twist, .50 caliber Ignition: 209 Primer Included in Package: Hex Head Combo Tool, Jag & Extension, 5ea High Pressure Sabot, 2ea Hammer Spurs, DVD.
Knight Rolling Block (KRB7) RR RF 43
Knight Rolling Block (KRB7) Action and Safety Systems Rolling Block Action and Hammer Spur Safety The rolling block action can be opened to install and remove primers. The hammer spur safety provides protection from accidental discharge by changing the shape of the hammer nose so as to allow or not allow contact with the firing pin. This is achieved by pivoting the hammer spur downward to the safe position any time the hammer is cocked or de-cocked.
Knight Rolling Block (KRB7) Trigger Blocking Cross Bolt Safety This safety mechanism blocks the movement of the trigger to the rear (fire) position. This safety bolt consists of a red plastic ring embedded in the bolt to indicate the position of the safety. When the red ring is visible, the safety is off and when the trigger is pulled the hammer will fall and a loaded gun will fire. ! WARNING The trigger blocking cross bolt safety prevents firing of the rifle from the cocked position only.
Knight Rolling Block (KRB7) 3. R emove the forearm stock. By using the screwdriver end of the combo tool, take out the stock screw (S9) located on the underside of the stock. The stock and barrel easily separate. 4. Remove the barrel. Using the socket end of the combo tool, take out the bolt (S6) that is located in the forearm stock chamber. Unscrew it counter clockwise, until it slides out of the receiver. Pull the barrel up and out to release it from the receiver. Assembly 1. Install the breech plug.
Knight Parts™ Part Ref. Model No. Description A 090215 HAMMER ASSEMBLY, 5/8 .
Knight Parts™ Part Ref. Model No.
Knight Parts™ Part Ref. Model No.
Knight Parts™ Part Ref. Model No.
Knight Parts™ Part Ref. Model No. Description 090233 DISC EXTREME BOLT SUB-ASSY, C-Toolless, MS, DISC EXTREME 090224 DISC EXTREME BOLT SUB-ASSY, C-Toolless.
Knight Warranty™ Service Policy Every Knight muzzleloader™ is carefully inspected and tested in order to ensure that it conforms to Knight's strict specifications and standards. Any alteration, modification, misuse, repair, or refinishing will result in voiding the warranty. If there is any question regarding the performance of your muzzleloader, please write our Service Department, fully describing all circumstances and conditions involved.
Knight Warranty™ 53
Knight Warranty™ Warranty Limitations Knight products™ are sold by us with the specific understanding that we are not responsible in any manner whatsoever for their safe handling or resale under local, state, and federal laws and regulations. Knight Rifles shall not be responsible in any manner whatsoever for malfunctioning of the muzzleloader, for physical injury, or for property damage resulting in whole or in part from: 1. Accidental or negligent discharge 2. Improper or careless handling 3.
Knight Warranty™ Limited Lifetime Warranty (Bighorn™, TK2000™, Wolverine™) Limited Lifetime Warranty Extended Service Policy (DISC™ Extreme, Long Range Hunter, Knight Revolution™, Knight Vision™, KRB7) Year 1: Knight® Rifles will repair or replace any defective part caused by defective materials/ craftsmanship.
Knight Warranty™ limited warranty gives you specific legal rights. You may have others thich vary from state/jurisdiction to state/jurisdiction. No Liability For Consequential Damages.
57