
Manual

9
Action and Safety Devices
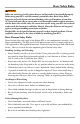
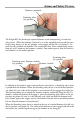
Hammer (uncocked)
Decocking safety
(safe position)
Photo #1
The Knight KP1 has break-open exposed-hammer action incorporating a transfer-bar
safety device. When the hammer is forward, it is in the uncocked position and the trans-
fer-bar safety device is in the safe position, so the trigger will not fire (see photo #1). To
cock the rifle, pull back the hammer. The transfer-bar safety device automatically moves
from safe to fire whenever the hammer is cocked. You cannot open or close the breech if
the hammer is in the cocked position.
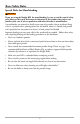
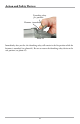
Decocking safety
(safe position)
Hammer (cocked)
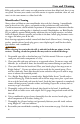
Decocking safety
(fire position)
Hammer (cocked)
Photo #2 Photo #3
In addition to the hammer action and transfer-bar safety device, a decocking safety device
is provided for the hammer. When the decocking safety device is in the forward position
(see photo #2), the striker of the hammer is recessed and will not engage the transfer bar.
This position allows you to uncock the hammer without accidentally firing the rifle. To
decock a cocked rifle without discharging it, place the decocking safety device in the safe
position (see photo #2), aim in a safe direction, and, while you hold the hammer with
your thumb, squeeze the trigger and ease the hammer forward into its uncocked position.
Do not allow the hammer to snap forward.
When the decocking safety device is moved to the rear of a cocked hammer, the rifle is in
the fire position (see photo #3). The striker of the hammer is now engaged and will strike
the transfer bar, transferring the energy of the hammer to the firing pin.