
Manual

28
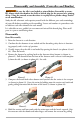
Disassembly and Assembly (Centerfire and Rimfire)
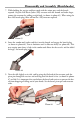
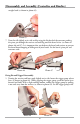
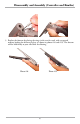
2. Turning the receiver and butt stock slightly on its side with one hand, insert the trig-
ger group into the trigger group slot located in the receiver (as shown in photo #12).
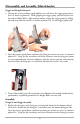
Pushing the trigger group release lever forward (as shown in photo #13), rock the
trigger group slightly until it locks into position. The trigger group should fit flush
and should not be able to be pulled free.
Photo #12 Photo #13
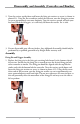
Barrel Assembly
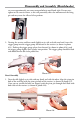
1. Turn the rifle slightly to its side with one hand and with the other align the pivot pin
hole of the weld lug with the pivot pin hole of the receiver (as shown in photo #14).
Once the holes are aligned, push the pivot pin through until flush with both sides of
the receiver (as shown in photo #15).
Photo #14 Photo #15
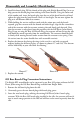
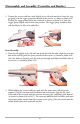
2. While holding the receiver and butt stock with the action open and the breach
exposed. Grip the extractor with the thumb and index finger, align the flat screw-
driver end of the extractor with the extractor retaining slot, and firmly push forward
(as shown in photos #16 and #17). The extractor should be held in firmly while mov-
ing forward under tension from the extractor assist spring. Close the action (note the
action should close with reasonable tension).