
Manual

27
Disassembly and Assembly (Centerfire and Rimfire)
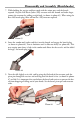
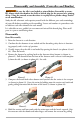
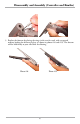
2. Turn the receiver upside down and locate the firing pin retainer set screw (as shown in
photo #10). Using the flat screwdriver end of the extractor, turn the firing pin retainer
set screw approximately two turns clockwise. Turn the receiver upward and with your
free hand catch the firing pin, as it will freely fall from the receiver. Set it aside.
Photo #10
3. Do not disassemble your rifle any further. Any additional disassembly should only be
performed by a qualified gunsmith or by Knight Rifles warranty staff.
Assembly
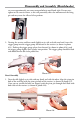
Firing Pin and Trigger Assembly
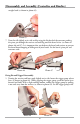
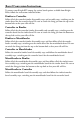
1. Replace the firing pin in the firing pin retaining hole located in the hammer slot of
the receiver. Ensure that the firing pin is rotated to enter the desired firing pin hole
either centerfire or rimfire. The firing pin should be aligned with the top hole for
rimfire and with the bottom hole for centerfire. Turn the receiver upside down and
locate the firing pin retainer set screw (as shown in photo #11). Using the flat screw-
driver end of the extractor, turn the firing pin retainer set screw approximately two
turns counterclockwise until hand tight. Do not over tighten or use excessive force, as
this will potentially effect the movement of the firing pin and may cause the rifle to
fail to perform.
Photo #11