
Manual

24
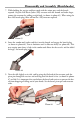
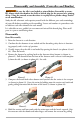
Disassembly and Assembly (Muzzleloader)
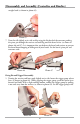
2. Install the breech plug. Fill the threads of the plug with Knight Breech Plug Grease to
help prevent the breach plug from sticking in the barrel breech. Using the socket end
of the combo tool, insert the breech plug into the rear of the barrel breech and hand
tighten the plug into the barrel breech, until it is hand tight. Do not over tighten the
plug or it will become difficult to remove.
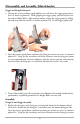
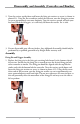
3. While holding the receiver and butt stock with the action open and the breach
exposed, grip the extractor with the thumb and index finger, align the flat screwdriver
end of the extractor with the extractor retaining slot and firmly push forward. Note
that the extractor is only placed into this position with the Full Plastic Jacket Breech
Plug. If you are using the Bare 209 Breech Plug, the extractor will not fit into the rifle
and should be stored separately from the muzzleloader. The extractor should be held
in firmly while moving forward under tension from the extractor assist spring. Close
the action (note the action should close with reasonable tension).
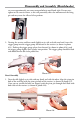
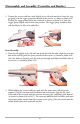
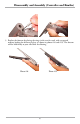
4. Replace the forearm by placing the wings in the rear first, and with an upward
motion, locking the forearm in place (as shown in photos #17 and #18). The forearm
will be held firmly to your rifle while free floating.
Photo #17 Photo #18
5. Replace the ramrod.
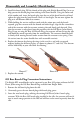
209 Bare Breech Plug Conversion Instructions
The Knight KP1 muzzleloader can be converted to use Bare 209 primer without the Full
Plastic Jacket using the 209 Bare Breech Plug available from Knight Rifles.
1. Remove the old breech plug from the rifle.
2. Generously grease the new breech plug with breech plug grease.
3. Insert the new breech plug, utilizing the existing Full Plastic Jacket’s breech plug
extractor. With the Bare 209 breech plug installed in the rifle, the extractor will not fit
into its usual storage position in the rifle and will have to be stored separately from the
rifle.