
Manual

23
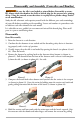
Disassembly and Assembly (Muzzleloader)
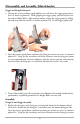
set screw approximately two turns counterclockwise until hand tight. Do not over-
tighten or use excessive force, as this will potentially effect the movement of the firing
pin and may cause the rifle to fail to perform.
Photo #12
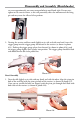
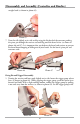
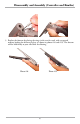
2. Turning the receiver and butt stock slightly on its side and with one hand, insert the
trigger group into the trigger group slot located in the receiver (as shown in photo
#13). Pushing the trigger group release lever forward (as shown in photo #14), rock
the trigger group slightly until it locks into position. The trigger group should fit flush
and should not be able to be pulled free.
Photo #13 Photo #14
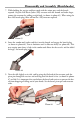
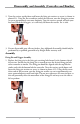
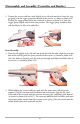
Barrel Assembly
1. Turn the rifle slightly to its side with one hand, and with the other, align the pivot pin
hole of the weld lug with the pivot pin hole of the receiver (as shown in photo #15).
Once you are certain the holes are aligned, push the pivot pin through until flush with
both sides of the receiver (as shown in photo #16).
Photo #15 Photo #16