
Manual

12
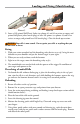
Loading and Firing (Muzzleloading)
jag, swab the entire bore several passes with the wet patch until it contacts the breech
plug. Place a dry patch on the jag and swab the entire barrel again, making sure to
contact the breech plug.
This process will help prevent misfires and hangfires. It will also improve First Shot
Accuracy by removing grease and oils left in the bore during cleaning.
Loading
Make sure that all safety systems are engaged before loading and that there is no primer,
live or spent, installed.
1. Place the butt of the rifle on the ground so that the muzzle is facing up and away
from the body.
2. If using loose propellant, set your powder measurer to the desired amount and fill the
powder measure. Pour powder into the muzzle.
WARNING
!
To reduce the risk of
an explosion, do not pour directly from the propellant container, do not exceed
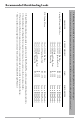
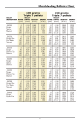
recommended loads (see load chart on page 15), and only load your Knight Rifle
with a recommended black powder or black powder substitute. Never use smoke-
less powder!
3. If using pelletized powder, place the recommended number of pellets into the muzzle.
WARNING
!
To reduce the risk of an explosion, do not exceed recommended
loads (see load chart on page 15).
4. If using sabots, place the bullet firmly in the proper sabot so that the bullet’s base is
squarely seated.
5. Insert the projectile and start it down the bore using a Knight Bullet Starter.
6. Using a hand-over-hand motion, drive the bullet down onto the powder charge using
the concave end of the ramrod or cleaning jag. Do not pound or bounce the ramrod
on the bullet. This will deform or displace the projectile, causing loss of accuracy and
bullet performance. If using pelletized powder, this can also crack or crush the pellets,
resulting in loss of accuracy or performance.
WARNING
!
If the bullet is not seated
firmly on the powder charge, the rifle may explode when fired.
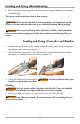
7. Remove your ramrod from the bore.
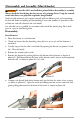
8. Double check that the hammer is not cocked and the decocking safety device is set to
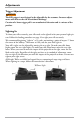
safe. Be sure the rifle is pointed in a safe direction. Press the breach lock release but-
ton (see photo #5) and open the break action (see photo #6).