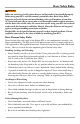
Contents Introduction ��������������������������������������������2 Safety Definition Unpacking Your New Knight KP1 Getting to Know Your New Knight KP1 2 3 3 Disassembly and Assembly (Centerfire and Rimfire) ������������������������������������������24 Disassembly Assembly 24 26 Basic Safety Rules ������������������������������������4 Barrel Conversion Instructions ��������������29 Basic Firearm Safety Rules Special Rules for Muzzleloading Rimfire to Centerfire Centerfire to Rimfire Rimfire
Introduction D ear Knight Rifle® owner, congratulations! As a member of the Knight family, you now own the tradition of the past with the technology of the future. Knight Rifles has helped muzzleloading mature from a nostalgic interest into a true hunting sport. Every year, numerous world records are taken across the globe. With your Knight KP1, you can expect unmatched accuracy on the range and in the field with the new rimfire and centerfire abilities, offered for the first time ever in a Knight Rifle®.
Introduction Unpacking Your New Knight KP1 Your Knight KP1 is delivered factory-packaged, preserved with a coating of protective oil, and placed in a corrosion resistant bag for shipping. Before loading and firing, make certain that all protective oil has been cleaned from the bore, breech plug (muzzleloaders only), nipple, and exposed firing mechanisms. Your KP1 has been tested, inspected, and properly packaged at the factory. Knight Rifles cannot control product handling after shipment.
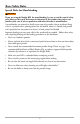
Basic Safety Rules ! WARNING Rifles can seriously or fatally injure shooters and bystanders if not handled properly. Before using your KP1, read this manual, particularly these Basic Safety Rules. Supervise and teach firearm and muzzleloading safety to all members of your family. Never lend your rifle to anyone who is not thoroughly familiar with its operation and the basic rules of rifle safety. Be certain that anyone using your KP1 has read and understands this Instruction and Safety Manual.
Basic Safety Rules Special Rules for Muzzleloading ! WARNING If you are using the Knight KP1 for muzzleloading, be sure to read the special safety rules below, as there may be features or functions of this product that you are not familiar with, even if you are proficient with other firearms or muzzleloaders.
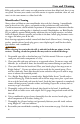
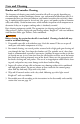
Care and Cleaning Rifle grade stainless steel is more rust and corrosion resistant than blued steel, but it is not rust proof. To insure your stainless steel rifle remains in superior condition, clean, oil, and store it in the same manner as a blued steel rifle. Muzzleloader Cleaning Always clean and lubricate your muzzleloader after each day’s shooting. A muzzleloader must be free of rust, dirt, grease, and powder residue to function safely and reliably.
Care and Cleaning Rimfire and Centerfire Cleaning The frequency of cleaning your rimfire/centerfire rifle will vary greatly depending on the ammunition, weather conditions, climate, type and amount of lubrication used. It is recommended that you clean and lubricate your rimfire/centerfire after each day’s shooting. A rimfire/centerfire must be free of rust, dirt, grease, and powder residue to function safely and reliably.
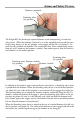
Action and Safety Devices Hammer (uncocked) Decocking safety (safe position) Photo #1 The Knight KP1 has break-open exposed-hammer action incorporating a transfer-bar safety device. When the hammer is forward, it is in the uncocked position and the transfer-bar safety device is in the safe position, so the trigger will not fire (see photo #1). To cock the rifle, pull back the hammer. The transfer-bar safety device automatically moves from safe to fire whenever the hammer is cocked.
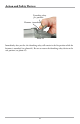
Action and Safety Devices Decocking safety (fire position) Hammer (uncocked) Photo #4 Immediately after you fire, the decocking safety will remain in the fire position while the hammer is uncocked (see photo #4). Be sure to return the decocking safety device to the safe position (see photo #1).
Loading and Firing (Muzzleloading) Preparing to Load ! WARNING To reduce the risk of accidental discharge, perform the following checks: 1. Confirm that all safeties are functioning properly and are in the safe position. 2. Check that there is no primer, either live or spent, installed. 3. Place the rifle butt on the ground, remove the ramrod, and place it in the bore. If the ramrod tip is near flush with the muzzle, the rifle is unloaded and the bore free from obstruction.
Loading and Firing (Muzzleloading) jag, swab the entire bore several passes with the wet patch until it contacts the breech plug. Place a dry patch on the jag and swab the entire barrel again, making sure to contact the breech plug. This process will help prevent misfires and hangfires. It will also improve First Shot Accuracy by removing grease and oils left in the bore during cleaning.
Loading and Firing (Muzzleloading) Photo #5 Photo #6 9. Insert a 209 primed Full Plastic Jacket (see photos #1 and #2 to review an empty and primed full plastic jacket breech plug) or bare 209 primer (see photos #3 and #4 to review an empty and primed bare 209 breech plug). Close the break-open action. ! WARNING Your rifle is now armed. Do not point your rifle at anything that you do not want to shoot. Firing 1.
Loading and Firing (Muzzleloading) 8. Place a dry patch on the jag and swab the entire barrel again, making sure to contact the breech plug. This process will ensure better shot to shot accuracy. ! WARNING Failure to swab the bore as instructed before reloading may leave hot residue in the bore which could result in an accidental discharge during loading. ! WARNING There are many black powder substitutes available.
Loading and Firing (Centerfire and Rimfire) Firing 1. With your action uncocked and the decocking safety device set to safe, bring the muzzleloader to your shoulder and put the desired target in your sights. 2. When you are ready to shoot, cock the hammer. 3. Sight in on the target, move the decocking safety device to fire. 4. The rifle can now be fired with the squeeze of the trigger. Be confident of your target and squeeze to fire. Decocking a Loaded Rifle 1.
Recommended Muzzleloading Loads The following chart is intended to be used as a reference to assist you in determining what Knight bullet to use for what game. It is for reference only. You should ultimately decide what works best for you. All bullets are assumed to be in Knight's High Pressure Sabots™. .50 cal = 250, 300 Red Hots .
Muzzleloading Ballistics Chart 17
Adjustments Trigger Adjustment ! WARNING The KP1 trigger is not designed to be adjustable by the customer. Incorrect adjustments will increase the risk of accidental discharge. Creation of a lower trigger pull is an unauthorized alteration and is a misuse of the product. Sighting In To shoot your rifle accurately, your rifle needs to be sighted in for your personal sight picture. Follow the loading procedures on page 10 to sight your rifle accurately.
Breech Plugs (Muzzleloader) The Knight Rifle KP1 muzzleloader comes equipped with a removable breech plug for easier cleaning. The included breech plug is a Full Plastic Jacket breech plug suitable for Full Plastic Jacket loading. The breech plug should be removed at the end of each shooting session for a thorough cleaning of the bore and breech area. When in storage or in use, the breech plug must always have high temperature synthetic grease, such as Knight’s Breech Plug Grease, applied to the threads.
Disassembly and Assembly (Muzzleloader) ! WARNING Be sure the rifle is not loaded or primed before disassembly or assembly. Always check the breech plug for the presence of a priming device. Using the ramrod, ensure that there is no projectile or powder charge loaded. Study the rifle schematic and acquaint yourself with the different parts and terminology of your rifle before assembling or disassembling. Letters and numbers in parentheses refer to labels on each rifle schematic for each model.
Disassembly and Assembly (Muzzleloader) 7. While holding the receiver and butt stock with the action open and the breech exposed. Grip the Full Plastic Jacket (FPJ) extractor with the thumb and index finger, remove the extractor by pulling straight back (as shown in photo #5). When using the Bare 209 breech plug, there will not be a FPJ extractor required. Photo #5 8. Insert the combo tool (socket end first) into the breech and engage the breech plug (as shown in photo #6).
Disassembly and Assembly (Muzzleloader) Trigger and Firing Pin Removal 1. Turning the receiver and butt stock slightly on its side locate the trigger group release lever (as shown in photo #9). While gripping the trigger group, push the release lever forward and hold. With a slight rocking motion, remove the trigger group by pulling out and away from the receiver (as shown in photo #10). Set the trigger group aside. Photo #9 Photo #10 2.
Disassembly and Assembly (Muzzleloader) set screw approximately two turns counterclockwise until hand tight. Do not overtighten or use excessive force, as this will potentially effect the movement of the firing pin and may cause the rifle to fail to perform. Photo #12 2. Turning the receiver and butt stock slightly on its side and with one hand, insert the trigger group into the trigger group slot located in the receiver (as shown in photo #13).
Disassembly and Assembly (Muzzleloader) 2. Install the breech plug. Fill the threads of the plug with Knight Breech Plug Grease to help prevent the breach plug from sticking in the barrel breech. Using the socket end of the combo tool, insert the breech plug into the rear of the barrel breech and hand tighten the plug into the barrel breech, until it is hand tight. Do not over tighten the plug or it will become difficult to remove. 3.
Disassembly and Assembly (Centerfire and Rimfire) ! WARNING Be sure the rifle is not loaded or primed before disassembly or assembly. Always check the chamber for shells or breach plug for the presence of a priming devise. Using the ramrod, ensure that there is no projectile or powder charge loaded on all muzzleloaders. Study the rifle schematic and acquaint yourself with the different parts and terminology of your rifle before assembling or disassembling.
Disassembly and Assembly (Centerfire and Rimfire) straight back (as shown in photo #5). Photo #5 7. Turn the rifle slightly to its side and by using the flat head of the extractor pushing the pivot pin through the receiver and weld lug until the barrel is free (as shown in photos #6 and #7). It is important that you balance the barrel and receiver to prevent the barrel from dropping or falling out of your hands. Set the barrel, pivot pin and extractor aside.
Disassembly and Assembly (Centerfire and Rimfire) 2. Turn the receiver upside down and locate the firing pin retainer set screw (as shown in photo #10). Using the flat screwdriver end of the extractor, turn the firing pin retainer set screw approximately two turns clockwise. Turn the receiver upward and with your free hand catch the firing pin, as it will freely fall from the receiver. Set it aside. Photo #10 3. Do not disassemble your rifle any further.
Disassembly and Assembly (Centerfire and Rimfire) 2. Turning the receiver and butt stock slightly on its side with one hand, insert the trigger group into the trigger group slot located in the receiver (as shown in photo #12). Pushing the trigger group release lever forward (as shown in photo #13), rock the trigger group slightly until it locks into position. The trigger group should fit flush and should not be able to be pulled free. Photo #12 Photo #13 Barrel Assembly 1.
Disassembly and Assembly (Centerfire and Rimfire) Photo #16 Photo #17 3. Replace the forearm by placing the wings in the rear first and, with an upward motion, locking the forearm in place (as shown in photos #18 and #19). The forearm will be held firmly to your rifle while free floating.
Barrel Conversion Instructions To convert your Knight KP1 among the various barrel options available from Knight Rifles, follow the instructions indicated below. Rimfire to Centerfire Follow all of the centerfire/rimfire disassembly steps and assembly steps, switching out the rimfire barrel for the centerfire barrel. Be sure to switch the firing pin from the top to the bottom hole so that your rifle will fire.
Knight KP1 Muzzleloader Schematic Ramrod Retainer Ramrod Sights Barrel Assembly Forearm Assembly Pivot Pin Firing Pin Retaining Screw Receiver Buttstock Group Firing Pin Extractor Breech Plug Fire Control Group Breech Plug 31
Knight KP1 Muzzleloader Specifications Caliber: .50 caliber Barrel: 26” Green Mountain Rifle Barrel, Rifle Grade MS - Camouflaged, 1:28 Twist, .50 caliber Ignition: 209 Full Plastic Jacket and 209 Bare Primer Length And Weight: 43½”, 8 Pounds Length of Pull: 14 1/8” Powder: Black Powder FFg, or industry approved black powder substitute. (Maximum Powder Charge) 150 Grains by Volume, in loose FFg or the pelleted powder FFg.
Knight KP1 Rimfire and Centerfire Schematic Barrel Assembly Pivot Pin Forearm Assembly Firing Pin Retaining Screw Extractor Fire Control Group Firing Pin Receiver Buttstock Group 33
Knight KP1 Centerfire and Rimfire Specifications Barrel: Blued, Stainless Steel Ignition: Centerfire & Rimfire Caliber: Rimfire: .17 HMR, .22 LR Centerfire: .223 Rem., .243 Win., .270 Win., .300 Win., .30-06 Twist Rate: .17 HMR 1:9” .22 LR 1:16” .223 Rem. 1:9” .243 Win. 1:9” .270 Win. 1:10” .30-06 1:10” .300 Win. 1:10” Warranty: Limited Lifetime with extended service policy. See page 40. (center to center) .500 2.000 2.
Knight KP1 Parts™ Model No.
Knight KP1 Parts™ Model No.
Knight KP1 Parts™ Model No.
Knight KP1 Parts™ Model No. Description 010112 Ramrod Insert B 010114 Ramrod Shaft 23.
Knight Warranty™ Service Policy Every Knight Rifle™ is carefully inspected and tested in order to ensure that it conforms to Knight's strict specifications and standards. Any alteration, modification, misuse, repair, or refinishing will result in voiding the warranty. If there is any question regarding the performance of your rifle, please write our Service Department, fully describing all circumstances and conditions involved.
Knight Warranty™ Warranty Limitations Knight products™ are sold by us with the specific understanding that we are not responsible in any manner whatsoever for their safe handling or resale under local, state, and federal laws and regulations. Knight Rifles shall not be responsible in any manner whatsoever for malfunctioning of the muzzleloader, for physical injury, or for property damage resulting in whole or in part from: 1. Accidental or negligent discharge 2. Improper or careless handling 3.
Knight Warranty™ Limited Lifetime Warranty Extended Service Policy Year 1: Knight® Rifles will repair or replace any defective part caused by defective materials/ craftsmanship. Year 2-5 (extended service policy): Knight® Rifles will repair or replace any defective threaded parts caused by defective materials/craftsmanship. Lifetime: Knight® Rifles will replace or repair a defective barrel or receiver caused by defective materials/craftsmanship.
Knight Warranty™ damages for personal injury or any other pecuniary loss) arising out of the use of or inability to use this product, even if Knight® Rifles has been advised of the possibility of such damages. In any case, Knight® Rifles’ and its suppliers’ entire liability under any provision of this agreement shall be limited to the amount actually paid by you for the product.
43