
Installation Guide


3
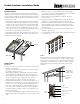
Stapling Flange
CATHEDRAL CEILINGS
Determine the maximum thickness of insulation that can be installed by
subtracting 1" from the depth of the ceiling cavity. Select either EcoBatt R-30
(8¼") or R-38 (10¼") High Density Cathedral Ceiling Insulation. Determine
the width of insulation needed by measuring the typical distance between
ceiling joists (15" or 23").
• Butt insulation firmly against both the top plate of the wall at the bottom
and the ridge joist at the top of the cathedral ceiling. Do not push batts
completely into the joist cavity. The front face of the batt should be flush
with the face of the ceiling joist, leaving a 1" airspace between the batt
and the underside of the roof deck. Stapling flanges to the face of the
ceiling joists is the best way of maintaining proper batt position for faced
products. Do not compress batts or block ventilation.
• Install kraft-faced batts with the facing toward the inside of the home. For
unfaced batts, consult local codes and practices for appropriate vapor
retarded selection and positioning.
EXTERIOR WALLS
Wood Frame
• Attention to detail is very important. Seal all penetrations in exterior walls
with caulk or foam sealant.
• Determine the width of insulation needed (15" or 23") by measuring the
typical distance between wall studs.
• When installing EcoBatt kraft or foil-faced batts, place between framing
members with the facing toward the warm-in-winter side of the home.
• When installing EcoBatt unfaced batts, place between framing members.
The selection and positioning of an appropriate vapor retarder, if
required, should be in accordance with local codes and practices.
• EcoBatt Staple-Free Batt Insulation is a friction fit batt designed for use in
standard 2" x 4" wood framed construction where the stud spacing is no
more than 15" on center. For batt products with stapling flanges use
5
⁄16"
or
3
⁄8" staples to fasten stapling flanges or tabs. Maximum spacing for
fasteners is 12. Fasten each tab to its adjacent stud either to the face or
inset stapled. If the face is stapled, overlap successive batt flanges on the
previously installed flange.
• Be sure batts fit snugly against top and bottom wall plates. If desired, the
flanges of faced products may be stapled to the face or inside of the wall
studs.
• Without over-compressing, split insulation around wiring, plumbing or
ductwork whenever possible. Batts can be partially cut or separated when
fitting insulation behind wiring or plumbing fixtures.
• Place small pieces of insulation behind all outlet boxes. Do not over-
compress insulation.
• For smaller stud cavities, cut staple-free batts ¾" wider than the inside
width dimensions of the wall cavity and follow the instructions above.
• The Installer should make certain that there are no obstructions that could
prevent a tight fit and create a gap or void. Repair all tears with Foil-
Scrim-Kraft, (FSK) facing tape available in most lumber yards and home
improvement stores.
• Do not leave kraft-faced batts exposed. Cover with an approved finish
material (i.e. gypsum board).
• Cover all insulation and vapor retarders with an approved finish material,
(i.e. gypsum board).
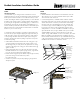
Headers
Exterior wall headers over doors and windows shall be insulated as long
as the header is recessed to allow space for insulation. Headers shall be
treated as exterior walls with proper air sealing and insulation filling the
void. If headers are solid and there is no space for insulation, air sealing
shall be applied to the entire perimeter of the header prior to drywall
installation.
EcoBatt Insulation Installation Guide
Rafter
Wall Studs
Air seal perimeter
of header before
installing insulation
Fill entire recess
with EcoBatt
Insulation
Single or double header
as required
EcoBatt insulation
Sealant
Sealant
Interior
Drywall
Exterior sheating