
Installation Guide

3
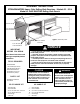
Lower Drawer Installation
(six lower positions)
1. Take one heavy duty slide and in-
sert rear clip into desired rear notch,
and lower front clip into front notch
(See Figure 3.).
2. To install a drawer, simply insert the
drawer slide into the cabinet slide and
close the drawer completely. The
mechanism will automatically latch.
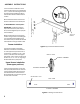
DRAWER REMOVAL
To remove a drawer, pull the drawer
out until it stops. Notice the locking le-
vers located inside the track that is at-
tached to the drawer. Lift the left lever
(A) while pressing down on the right
lever (B) (See Figure 4.). Pull the
drawer clear on the slides.
Figure 4. Drawer Removal
CAUTION
Pull out only one drawer at a
time to avoid sudden tipping
of product which could cause
serious personal injury or
property damage. For optimal
weight distribution of unit,
install larger drawers in lower
positions of unit.
DRAWER SLIDE REMOVAL
(CABINET MEMBER)
Upper Drawer Slides - remove the
screw from the slide that holds it to the
inner panel. Lift the slide up, then pull
forwards.
Lower Drawer Slides (HD) - twist the
top of the slide inward while lifting and
pulling forward.
DRAWER ARRANGEMENTS
Figure your drawer arrangement from
the table below:
1" deep drawer requires 1 notch
2-1/2" deep drawer requires 2 notches
2-1/2" deep (HD) drawer req. 1 notch
6" deep (HD) drawer req. 2 notches
9-1/2" deep (HD) drawer req. 3 notches
You can assemble any combination of
(HD) drawers as long as you do not
use any more than six notches.
WEIGHT CAPACITIES
The following weights are the load
ratings for the drawers:
1" 97 lbs.
2-1/2" 94 lbs.
2-1/2" (H.D.) 180 lbs.
6" (H.D.) 172 lbs.
9-1/2" (H.D.) 166 lbs.