JOBSITE STORAGE SOLUTIONS ALWAYS ON THE JOB™ INSTALLATION MANUAL 118-M MOBILE PLAN STATION Werner Co. 724-588-2000 93 Werner Rd.
NOTICE ATTENTION: PLEASE READ AND UNDERSTAND ALL INSTRUCTIONS AND WARNINGS BEFORE ASSEMBLING, INSTALLING OR USING THIS PRODUCT. Tools Required • 1/2” SOCKET • 5/16” SOCKET • SCREWDRIVER, PHILLIPS HEAD Parts List • MODEL 500 POWER CREW QTY. 1 • POWER SUPPLY QTY. 1 BOLT KIT #32-1181 • PLASTIC HANDLES QTY. 2 • SCREW, #10-14X1/2” PLASTITE QTY. 4 • CABLE TIE 6” QTY. 5 • BOLT M4X12MM PHILLIPS HD QTY. 4 • LOCKWASHER 1/4” QTY. 4 • WASHER #10 QTY.
Data Vault USER INSTRUCTIONS Contents I. Installing TV.................................................................................................. 4 II. Wire harness routing.............................................................................. 6 ENGLISH III. Installing strap........................................................................................
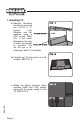
I. Installing TV a. Remove Mounting bracket by removing two #10-24 x ¾” screws, Lock Washers and flat washers using a 5/16” socket, (See Fig. 1) set aside. Remember the way in which the bracket is mounted, this will aid you in reattaching it after TV is installed. b. Carefully set TV face down on a flat surface. (SEE FIG. 2) ENGLISH c. Attach the Wiring Harness which includes HDMI and VGA cables, along with the power supply for the TV. (SEE FIG.
Data Vault USER INSTRUCTIONS d. Place the Mounting Bracket, and align with the mounting holes on back of TV (SEE FIG. 4) The “hook” on the mounting bracket should be positioned at the top of the TV e. NOTE the direction that the Mounting Bracket is positioned on the back of the TV. Fasten the bracket to the TV using four M4 bolts, four ¼” Lock Washers and four #10 Washers. (SEE FIG. 5) The “hook” on the mounting bracket should face away from the TV as shown ENGLISH f.
II.Wire Harness Routing a. The TV Power cord should be routed through the grommet, and over to the Power Crew in the middle section of the box. Cable ties have been included in the Bolt kit to help keep the cables and cords organized and out of the way. Couple the wiring harness to the TV cord as shown. This will help keep the wiring harness from getting in the way. (SEE FIG. 7) Cable Ties Wiring Harness Power Cord Grommet III. Installing Strap a.
Data Vault USER INSTRUCTIONS ENGLISH NOTES Page 7
KnaackLLC ATTN:Warranty Claims 420 E. Terra Cotta Avenue Crystal Lake, IL 60014 www.knaack.com If you have any questions, please call toll free at 1-800-456-7856. ©2013 Knaack LLC PN 14-0062 2015 Werner Co. Rev.