36 inch 2.
TABLE OF CONTENTS 1. WHAT’S IN THE BOX 6 2. OVERVIEW OF THE SOUNDBAR MAIN UNIT 7 3. OVERVIEW OF THE REMOTE CONTROL 4. PLACE YOUR SOUNDBAR 8 10 Wall installation precautions. 11 Wall mount the Soundbar 11 5. INSTALL/REPLACE THE REMOTE BATTERY 6. CONNECT YOUR SOUNDBAR 13 14 Connect with the supplied Power Cord. 14 Connect with the supplied HDMI Cable. 15 Connect with the supplied Optical Cable. 16 Connect with the supplied 3.5mm AUX Cable. 17 Connect with your Bluetooth Device. 17 7.
CAUTION RISK OF ELECTRIC SHOCK DO NOT OPEN CAUTION: TO REDUCE THE RISK OF ELECTRIC SHOCK, DO NOT REMOVE COVER (OR BACK). NO USER-SERVICEABLE PARTS INSIDE. REFER SERVICING TO QUALIFIED SERVICE PERSONNEL. The lightning flash with arrowhead symbol, within an equilateral triangle, is intended to alert the user to the presence of uninsulated “dangerous voltage” within the product’s enclosure that may be of sufficient magnitude to constitute a risk of electric shock to persons.
IMPORTANT SAFETY INSTRUCTIONS 1.Read these instructions. 2. Keep these instructions. 3. Heed all warnings. 4. Follow all instructions. 5. Do not use this apparatus near water. 6. Clean only with a dry cloth. 7.Do not block any ventilation openings. Install in accordance with the manufacturer’s instructions. 8.Do not install near any heat sources such as radiators, heat registers, stoves, or other apparatus (including amplifiers) that produce heat. 9.
WARNINGS This symbol on the product means there is uninsulated, dangerous voltage within the product enclosure that may present a risk of electrical shock. This symbol on the product means there are important operating and maintenance instructions in this guide. Do not ingest battery, chemical burn hazard. The remote control supplied with this product contains 2 AAA battery. Do not swallow the battery, it may cause severe risks or lead to death. Keep new and used batteries away from children.
•Keep the product away from fire and heat sources. Do NOT place naked flame sources, such as lighted candles, fireplaces, radiators, heat registers or other apparatus (including amplifiers) that produce heat. • Do NOT make unauthorized alterations to this product. • Do NOT use a power inverter with this product. •The speaker wires and interconnect cables included with this system are not approved for in-wall installation.
•Do not dispose of batteries in fire or water. • Recycle or dispose of batteries as per state and local guidelines. •Danger of explosion if battery is incorrectly replaced. Replace only with the same or equivalent type. •When the remote control is not to be used for a long time (more than a month), remove the battery from the remote control to prevent it from leaking. •If the batteries leak, wipe away the leakage inside the battery compartment and replace the batteries with new ones.
1. What’s in the box 36 inch2.1 Channel Soundbar 40 10 18 19 12 AAA battery X 2 Power Cable OPTICAL Cable 3.5mm AUX Cable AUX to RCA Cable Wall Anchor X 2 Wall Screw X 2 16 51 13 50 1A 2A 3A 4C 4A 11 1С Remote Control HDMI Cable User Guide Quick Guide User Guide Quick Guide Wall Mount Template NOTE: If any part of the product is damaged, don't use it. Contact KMOUK customer service or mail us at support@kmouk.com.
2. Overview of the Soundbar Main Unit Front side LED Display Remote Control Back side HDMI(ARC) AUX IN OPTICAL HDMI(ARC) HDMI(ARC) Input AUX IN OPTICAL AUX IN OPTICAL Input Power Input Installation hole Right Panel (Control Panel) VOL + VOL - SOURCE POWER Volume +/-: Press to adjust the volume up or down Source: Press to switch the audio source among AUX IN/BT IN/HDMI(ARC) /OPTICAL modes.
3.
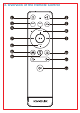
Button Operation 1 Power on/ Power off 2 Switch to Bluetooth mode or connect to the last paired device, if no paired record, the “ ” light on the LED screen flashes. Long press the button for 2s, it will disconnect and enter pairing mode. 3 HDMI 4 AUX 5 Switch to HDMI mode. Switch to AUX mode. Switch to OPTICAL mode 6 BASS Press to adjust the bass up or down (Press BASS to adjust from 0 to 10, with memory function, return to default “5” after restoring factory settings.
4. Place your Soundbar You can choose to place your Soundbar main unit below the center of your TV or mount it on the wall. TV TV Wall Installation Precautions 1.Make sure you read all the safety information before you mount the Soundbar main unit on the wall. 2.Make sure you use screws provided or specified by the authorized manufacturer. 3.KMOUK bears no responsibility for accidents or damage caused by improper wall mounting and screws installation or insufficient wall strength, etc. 4.
Wall mount the Soundbar 1.Place the supplied wall mount template on the wall. Make sure the wall mount template is at least 2 inches (5cm) below the center of the TV. 2.Use a level to make sure the Soundbar is positioned accurately. 3.Use the tape to stick the wall mount template firmly on the wall. Fig1 TV 2inches or more Fig2 Fig3 4mm 4.Mark on the wall using each marking on the template through the mounting holes (Fig.1). 5. Take away the wall mount template. 6.
5. Install/Replace the Remote Battery When the Soundbar does not respond by operating with the remote control, replace two batteries with new batteries. And use R03 (size AAA) manganese batteries for replacement. Warning •Danger of explosion if battery is incorrectly replaced. Replace only with the same or equivalent type. Caution • The battery contains perchlorate material, handle it with care. Steps 1.Open the battery compartment, remove the old batteries if necessary. 2.
6. Connect your soundbar After you have fixed the position of the Soundbar main unit, you can start connecting it to your TV or other devices and listen to the audio through your Soundbar. Make sure your TV or device supports the HDMI ARC feature. For information, check the user manual of your TV or device. NOTE: Please do not connect the Soundbar to any power amplifier products, in case of causing Soundbar damage. Connect with the supplied power cord 1.
4.Press the "HDMI" button on the remote or press the "SOURCE" button on the soundbar to enter HDMI(ARC) mode. 5.Set up your TV as the following steps: Setting-Sound-Output-HDMI ARC-Digital output-PCM. 6. The screen will display “Hd”when turning on TV or other devices. HDMI(ARC) AUX IN OPTICAL HDMI(ARC) HDMI IN HDMI (Supplied) HDMI IN HDMI OUT Support HDMI ARC devices only TV PCM HDMI OUT NOTES: 1.
2.Plug the one terminal of OPTICAL cable into the soundbar OPTICAL port and another into TV OPTICAL port . 3. Turn on the soundbar. 4.Press the "OPT" button on the remote or press the "SOURCE" button on the soundbar to enter OPTICAL mode. 5.Set up your TV as the following steps: Setting-Sound-Output-OPTICAL-Digital output-PCM 6.Using the native controls on your connected device, make sure the audio settings are set to OPTICAL Audio and are turned on. 7.
HDMI(ARC) AUX IN OPTICAL AUX (LINE IN) AUX (LINE IN) AUX (Supplied) TV AUX (LINE OUT) Connect with your Bluetooth device 1.Make sure your device supports the Bluetooth function. 2.The operational range between the Soundbar main unit and your Bluetooth device is approximately 32.8ft (10 meters) (without any obstacle between the Bluetooth device and Soundbar main unit). 3.Only one Bluetooth device can be paired at a time. 4.There is NO password required.
2.Switch on the Bluetooth audio device (e.g., smartphone) and start the Bluetooth connection. 3.The Bluetooth device will now receive the device identification as “KMOUK KM-HSB004”. 4.When connected, the white LED light will keep on. Second/ third times connection 1.Power on, the soundbar will connect back to the last paired device automatically and restore the previous settings. 2.After the successful pairing, the “ ” will keep on instead of flashing.
•Electronic devices may cause radio interference. Devices that generate electromagnetic waves must be kept away from the Soundbar main unit - e.g., microwaves, wireless LAN devices, etc. 7. USE YOUR SYSTEM You can use your Soundbar with the control panel or remote control and adjust the sound effect or select the audio source. Operations of the control panel Button Power Operation Single press (Power on) LED Indicator Voice Prompt Indicates channels and sound modes Long press 1.
Operations of the remote control Button Operation LED indicator Voice Promp Power Short press Power on/off. When firstly power on, the LED indicator will display “ ” channel.
Adjust the sound effect Tone quality Remote control buttons Display Music Movie Game Select the audio source NOTES: 1.The audio source switching order is: (Bluetooth)(HDMI)------(AUX IN)(OPTICAL), and the default setting is Bluetooth mode. 2.When powered on, the volume of each mode has a memory function and it does not interfere with each other. 3.
8. Restore factory setting When power on, press the “Power” and “Source” button for 5 seconds simultaneously to restore factory setting and return to the Bluetooth pairing mode. 9. Troubleshooting Refer to the table below if this product does not function properly. If the problem you are experiencing is not listed below or if the instructions below do not help, turn off the product, disconnect the power cord, and contact KMOUK customer service or mail us at support@kmouk.com. 1.
Is the distance between the remote control and soundbar main unit too far? • Move the remote control closer to the soundbar main unit. I cannot find the Bluetooth name of this Soundbar on my Bluetooth device. Make sure the Bluetooth function is activated on your Bluetooth device. Make sure the Soundbar has paired with your Bluetooth device. 10. Specification Model Name KMOUK KM-HSB004 Net weight 3.828KG Dimensions Soundbar: 36 x4.17x2.94 inch Peak Power 160W Standby power ≤0.
11. ADDITIONAL INFORMATION Care & Maintenance •Switch the unit off at the mains and unplug it if you are leaving it unattended for a long period (holidays etc.). •Avoid leaving the battery fitted the remote control if you leave the unit unattended for long periods. It may leak and damage the remote control. •Occasionally wipe the cabinet with a lint free duster. Never clean the unit with liquids or solvents.All care and cleaning operations should be carried out with the unit unplugged from the mains power.
Class B FCC Statement This equipment has been tested and found to comply with the limits for a Class B digital device, pursuant to Part 15 of the FCC Rules. These limits are designed to provide reasonable protection against harmful interference in a residential installation. This equipment generates, uses and can radiate radio frequency energy and, if not installed and used in accordance with the instructions, may cause harmful interference to radio communications.
FCC ID:2A2VUKM-HSB004