
Manual

THE-1102 1 Installation Guide
cover. Do not use excessive force and deform or
break the tab.
2. Carefullypullthecoverfromthebase.
Handy Box Installation (Recommended)
1. MountanHMO-6036
wallplatetothehandy
boxusingthetwoscrews
provided.
2. RemovetheTHE-1102’s
coverfromtheblackbase
(seetheLocationand
CoverRemovalsection).
3. Withtheplastictabbuonontheboom,aach
thebasetothebackplateusingthetwoscrews
provided.
4. Connectthewiring(seetheWiringsection).
5. Reinstallthecover.
Hollow Wall Installation
1. RemovetheTHE-1102’scoverfromtheblackbase
(seetheLocationandCoverRemovalsection).
2. Usingthebaseasa
template,drilltwoholes
formountingscrews
(7/64inchesor3mmin
diameterand1.4inches,
1-13/32inches,or35.6mm
apart)andcutacenter
holefortheterminalblock.
3. Withtheplastictabbuonontheboom,aach
thebasetothewallusingtwo#6self-threading
screws.(Plasticanchorsarerecommended,and
thesizeoftheholeswillthenneedadjusting.)
4. Connectthewiring(seetheWiringsection).
5. Reinstallthecover.
Installation Guide
Humidity Transmitter w/ Temperature Sensor
THE-1102
Mounting
Mounting 1
Location and Cover Removal 1
Handy Box Installation (Recommended) 1
Hollow Wall Installation 1
Wiring 2
More Information 2
Maintenance 2
Important Notices 2
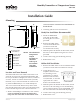
Location and Cover Removal
InstalltheTHE-1102onaninsidewallwhereitcan
sensetheaverageroomtemperature/humidityand
beawayfromdirectsunlight,heatsources,windows,
airvents,andaircirculationobstructions(curtains,
furniture,etc.).Itcanbemountedonahollowwall
or(withanHMO-6036)toa2x4inchhandybox.
Thecoverisheldtotheblackbasebythreesmall
pegsthattintheholesofthecover.Theboompeg
isonatabandsnapsintothecenterboomhole.
1. WithasmallPhillipsscrewdriverorhexwrench,
press in and hold the plastic tab buon that
snaps into the center hole on the boom of the
2-1/4" (57 mm)
2-7/16"
(62 mm)
5/8"
(16 mm)
Up (Toward Ceiling
at Installation)
Tab Button
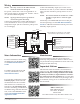
Temperature Output
(10K Thermistor)
Humidity Output
(0 to 5 VDC)
Signal Ground
– Power Ground
(A)
(B)
(C)
(F)
(D)
+ 10 to 15 VDC Power
NOTE: The Thermistor
Temperature
Output
Terminal “A”
should be
at the top of
the terminal
strip aer
installation.