
User Guide

Installation Guide
Selector Relays
RCC-1111
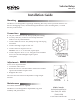
Mounting
The RCC-1111 is designed for right angle mounting. The relays are not position sensitive. Use
the two self-tapping screws, inserted through the bracket’s 7/32" mounting holes, to attach
the relay to the surface.
Connections
♦ All port connections use 1/4" O.D. polyethylene tubing.
♦ Use only clean, dry control air. No attempt should be
made to use any other medium.
1. Connect Main air to Port “M” (Main), 20 Psig with 30 psig
maximum.
2. Connect the High output to Port “H”.
3. Connect the Low output to Port “L”.
NOTE: If “H” or “L” is not used, cap the input.
4. Connect inputs to Ports “1 to 6” using the lower numbers
first. Leave the unused higher inputs open to
atmosphere.
Adjustments
To use a low output function:
1. Loosen the center screw.
2. Rotate the selector valve dial until it matches the number
equal to the number of inputs used.
3. Retighten the screw.
The valve does not need to be adjusted for a high output
function.
Maintenance
No routine maintenance is required.
The RCC-1111 are designed for dependable, long term
reliability and performance.
KMC Controls
19476 Industrial Drive
New Paris, IN 46553
574.831.5250
www. kmccontrols.com
109-019-01E