
Install Instructions
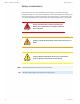
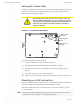
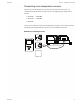
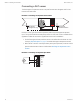
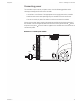

Table Of Contents
- Contents
- Section 1: About the controllers
- Section 2: Installing the controllers
- Section 3: Changing the room setpoint
- Section 4: Configuring the controllers
- Section 5: Balancing airflow
- Section 6: Application drawings
- Section 7: Sequences of operation
- Section 8: System integration and networking
- Appendix A: K-factors
- Index

Setting the rotation limits
SimplyVAV controllers are manufactured for a damper that rotates 90 degrees from open to
close. If the VAV damper is not a 90 degree damper, set the rotation limits to 45 or 60
degrees before mounting the controller.
Caution
Before setting the rotation limits on the controller, refer to the
damper position specifications in the VAV control box to which
the controller will be attached. Setting rotation limits that do not
match the VAV damper may result in improper operation or
equipment damage.
Illustration 2–1 Controller rotation limit selections
45
60
Position notch
as shown
Stop position
holes
Stop screw in
storage
Rotate CW
To set the rotational limits, do the following
1 Turn the controller over so you have access to the back.
2 Manually rotate the actuator fully clockwise as viewed from the back.
3 Remove the stop screw from its storage location and clean any debris from the
threads.
4 Insert the screw into the correct stop position hole.
5 Tighten the screw only until the head touches the plastic in the bottom of the recess.
Mounting on a VAV terminal box
Mount the controller inside of a metal enclosure. To maintain RF emissions specifications,
use either shielded connecting cables or enclose all cables in conduit.
Mount the controller directly over the damper shaft. A minimum shaft length of 2.0 inch
(51mm) is required.
Note: SimplyVAV controllers are designed to directly mount to 3/8 to 5/8inch (9.5to16mm)
round or 3/8 to 7/16 inch (9.5to11 mm) square damper shafts.
Section 2: Installing the controllers KMC Controls, Inc.
14 Revision G