
Product Manual
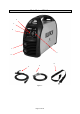

Page 16 of 25
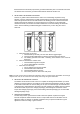
a. Holding the electrode
The best way to grip the electrode holder is the way that feels most comfortable to
you. Position the electrode to the work piece when striking the initial arc. It may be
necessary to hold the electrode perpendicular to the work piece. Once the arc is
started, the angle of the electrode in relation to the work piece should be between 10
and 30 degrees. This will allow for good penetration, with minimal spatter.
⚠WARNING
EXPOSURE TO A WELDING ARC IS EXTREMELY HARMFUL TO THE EYES AND SKIN!
Prolonged exposure to the welding arc can cause blindness and burns. Never strike an arc or
begin welding until you are adequately protected. Wear flame-proof welding gloves, a heavy
long sleeved shirt, trousers without cuffs, high topped shoes, and an ANSI approved welding
helmet.
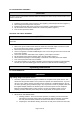
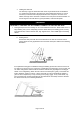
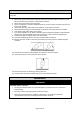
b. Striking the arc
Scratch the work piece with the end of electrode to the start arc and then raise it
quickly about 1/8 inch gap between the rod and the work piece. Refer to the following
illustration:
It’s important that the gap be maintained during the welding process and so that’s not it’s not
too wide or too narrow. If it’s too narrow, the rod will stick to the work piece. If it’s too wide, the
arc will be extinguished. Practice will be needed to maintain the gap. Beginners usually get
sticker or arc extinguishing. When the rod is stuck to the work piece, gently rock it back and
forth to separate. If this is not done, a short circuit will occur and it will break the welder. A
good arc is accompanied by a crisp, cracking sound (frying eggs). To lay a weld bead, only
two movements are required: downward (as the electrode is consumed) and in the direction
the weld is to be laid, as in following illustration: