
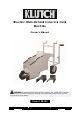
Product Manual

1. Ma
k
2. Ma
k
-
-
b
c. C
d. fi
-
3. Plu
g
115
4. Tur
n
k
e sure the
P
k
e sure the f
o
The Rear
W
The desired
a. loosen th
e
b
. Unload th
e
hange the
m
t the bolts a
n
The Compa
c
g
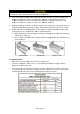
the Power
C
volt, ground
n
the Power
P
ower Switc
h
o
llowing par
t
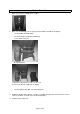
W
heel Bracke
t
Slip Form (
P
e
se two nuts
e
bolts
m
old that you
n
d nuts agai
n
c
tion Ram (
6
C
ord into a
p
ed, electric
a
Switch ON.
Bef
o
h
(#14)is
O
s are prope
r
t
s (#28).
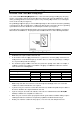
P
art# 1
A
,#1
B
.
need (1A, 1
n
. (#2, #3, #
4
6
4). (See Pa
r
p
roper exten
s
l outlet. (Se
e
Page 9 of 2
1
o
re Eac
h
O
FF.
r
ty attached
t
B
, #1C)
B or 1C)
4
, #5)
r
ts Diagram.
sion cord. T
h
e
Parts Diag
r
1
h
Use
t
o the machi
n
)
h
en, plug th
e
r
am.)
n
e and adju
s
e
extension
c
s
ted:
c
ord into the nearest