
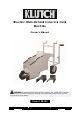
Product Manual

A
lways
m
electric
a
5. Ins
p
bin
d
con
d
pro
b
6. Fill
t
usi
n
7. Inst
a
(1A
)
a.
b.
Ground
• Ma
k
• If y
o
Ma
c
• The
(not
acc
o
m
ake sure t
h
a
l outlet befo
p
ect the gen
e
d
ing of movi
n
d
ition that m
a
b
lem correct
e
t
he Pneuma
t
n
g the Curbi
n
a
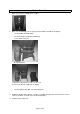
ll a Slip Fo
r
)
, Curb Style
Align the m
o
of the Body
Then secur
e
and Lock N
u
d
Preparatio
n
k
e sure the g
o
u have strai
g
c
hine from w
a
trench for t
h
included).
T
o
mmodate t
h
h
at the Pow
e
re making a
d
e
ral conditio
n
n
g parts, cra
c
a
y affect its
s
e
d before fu
r
t
ic Tires with
n
g Machine.
r
m. The Cur
b
(1C), and S
o
unting hole
s
Assembly (1
e
the Slip Fo
r
u
ts (2).
n
round and t
h
g
ht lines, m
a
a
ndering off
h
e curb shou
T
he ground s
h
e turns and
P
e
r Switch (1
4
d
justments t
o
n
of the Cur
b
c
ked or brok
e
s
afe operati
o
r
ther use. D
o
air. The thr
e
Each tire re
q
b
ing Machin
e
lant Style (1
B
s
in the Slip
F
3).
r
m in place
u
h
e trench ar
e
a
ke sure to s
line.
ld be cut wit
hould be rel
a
curves the
C
P
age 10 of
2
4
) is OFF an
d
o
the Curbin
g
b
ing Machin
e
e
n parts, da
m
o
n. If abnor
m
o
not use da
m
e
e Pneumati
q
uires 30 P
S
e
comes wit
h
B
). To instal
l
F
orm with th
u
sing the Bo
l
e
firm and c
o
s
et a string-li
n
h a good, s
h
a
tively dry.
T
C
urbing Mac
2
1
d
the Curbin
g
g
Machine.
e
. Check for
l
m
aged elect
r
m
al noise or
v
m
aged equi
p
c Tires mus
t
I (207 kPa)
o
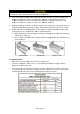
h
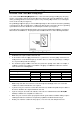
three style
s
l
a Slip For
m
e
mounting
h
l
ts (5), Sprin
g
o
mpacted.
n
e (not inclu
d
h
arp edging
s
T
he trench al
hine will ha
v
g
Machine is
l
oose screw
s
r
ical wiring,
a
v
ibration occ
p
ment.
t
be properly
o
f air pressu
r
s
of Slip For
m
:
h
oles locate
d
g
Washers (
4
d
ed) to kee
p
s
hovel or sq
u
s
o needs to
v
e to make.
s
unplugged
f
s
, misalignm
a
nd any oth
e
c
urs, have th
e
filled with ai
re. Do not o
v
m
s: Mower's
d
in the front
/
4
), Flat Was
p
the Curbin
g
u
are mouth
s
be wide en
o
f
rom its
ent or
e
r
e
r before
v
erfill.
Edge
/
bottom
hers (3),
g
s
hovel
o
ugh to