
Product Manual

Page 6 of 14
another tool. Never use an accessory that has a lower operating speed or operating pressure than
the tool itself.
Keep guards in place and in working order. Never operate the product without the guards in place.
Specific Operation Warnings
⚠WARNING
Wear ANSI Z87.1 compliant safety goggles or safety glasses with side shields when assembling
and using the hose reel.
Do not exceed the max working pressure of 300 PSI.
Keep children away from the work area. If not in use, store out of the reach of children.
Ensure that the reel is properly installed before connecting input and output hoses.
Before connecting a pressure source, ensure that the supply pressure does not exceed maximum
working pressure rating of reel.
Never attach any tool or accessory to the hose unless it is capable of safely operating at a
pressure greater than the supply pressure.
If a leak occurs in the hose or reel, remove system pressure immediately.
If reel ceases to unwind or rewind, remove system pressure immediately.
Do not kink the hose. Do not step on the hose or drive or drag objects over the hose. Do not place
any objects on the hose or hose reel.
Pull the hose from the reel by grasping the hose itself, not the valve.
Bleed fluid/gas pressure from reel before servicing it.
Use soap and water when checking for air leaks. Exposure of skin directly to pressurized air or
fluids could result in severe bodily injury. Remember, even low pressure is very dangerous and
can cause personal injury or death.
Assembly Instructions
⚠WARNING
To avoid a dangerous sudden release of pressure that can cause severe injury, ensure that the
pressure source for the reel is turned off and the supply hose is not pressurized.
1. Prior to mounting the hose reel, ensure that the supply hose pressure does not exceed the
maximum working pressure of the hose reel. Also check that the pressure source is turned off and
the supply hose for the reel is not pressurized.
2. Unpack the reel and inspect for damages. Check that the reel has a smooth rotation.
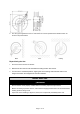
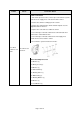
3. Fasten the mounting base (#4 in parts list) in the desired location. The reel dimensions and the
pattern of the mounting holes in the base are shown below. Tighten all hardware securely.