3/8in. x 50ft. Cold Flex Air Hose Reel Owner’s Manual WARNING: Read carefully and understand all ASSEMBLY AND OPERATION INSTRUCTIONS before operating. Failure to follow the safety rules and other basic safety precautions may result in serious personal injury.
® Thank you very much for choosing a Klutch product! For future reference, please complete the owner’s record below: Serial Number/Lot Date Code: ________________________________ Purchase Date: ____________________________________________ Save the receipt, warranty, and this manual. It is important that you read the entire manual to become familiar with this product before you begin using it. This air hose reel is designed for certain applications only.
Table of Contents Intended Use .......................................................................................................................................... 4 Technical Specifications ...................................................................................................................... 4 Important Safety Information ............................................................................................................... 4 Specific Operation Warnings .......................
Intended Use The Klutch 3/8in. x 50ft. Cold Flex Air Hose Reel incorporates metal forms to ensure strength and function equally well in both mobile and permanent mount situations. The hose reel is suitable for a variety of heavy-duty applications in the mining, construction, service, and marine industries. The industrial-grade reel includes a hose with a maximum 300 PSI working pressure as well as automatic rewind. The hose reel is easy to mount to a wall, floor, or ceiling.
Do not use the product where there is a risk of causing a fire or an explosion; e.g., in the presence of flammable liquids, gases, or dust. The product can create sparks, which may ignite the flammable liquids, gases, or dust. Do not allow the product to come into contact with an electrical source. The tool is not insulated and contact will cause electrical shock. Keep children and bystanders away from the work area while operating the tool. Do not allow children to handle the product.
another tool. Never use an accessory that has a lower operating speed or operating pressure than the tool itself. Keep guards in place and in working order. Never operate the product without the guards in place. Specific Operation Warnings ⚠WARNING Wear ANSI Z87.1 compliant safety goggles or safety glasses with side shields when assembling and using the hose reel. Do not exceed the max working pressure of 300 PSI. Keep children away from the work area.
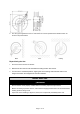
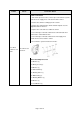
4. The arm (5) that guides the hose on and off the reel can be repositioned for better function as shown in the picture below. Wall Floor Ceiling Repositioning the Arm 1. Pull out the hose until the reel latches. 2. Remove the four sets of nuts and washers holding the arm to the base. 3. Turn the arm to a desired position, aligning the arm mounting holes with the holes in the flange of the base, and retighten the nuts and washers.
Operating Instructions ⚠WARNING Wear ANSI Z87.1 compliant safety goggles or safety glasses with side shields when assembling and using the hose reel. Do not exceed the max working pressure of 300 PSI. Never attach any tool or accessory to the hose unless it is capable of safely operating at a pressure greater than the supply pressure. If a leak occurs in the hose or reel, remove system pressure immediately. If reel ceases to unwind or rewind, remove system pressure immediately.
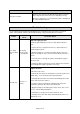
Maintenance Interval Maintenance Point Every three months Clean the hose with a cloth dipped in warm water to remove dirt or deposits and ensure the reel is rewinding correctly. Do not use detergents or solvents which could be damaging to the cable-winding materials. Troubleshooting Use the table below to troubleshoot problems before contacting service personnel or your local dealer. If the problem continues after troubleshooting, call your local dealer for assistance.
Failure Possible Cause Corrective Action Install a new swivel: 1. Turn off the pressure source, release pressure from the system, and remove the supply hose connection from the swivel. 2. Remove the swivel assembly (6) from reel axle. 3. Remove the circlip from the swivel and take it apart. See the diagram below for reference. 4. Replace the seals and reassemble the swivel. 5. Use Teflon tape or thread sealant on the swivel threads and reconnect the swivel with the axle. 6.
Parts Diagram Parts List Part Number 1 2 3 4 5 6 7 8 9 11 12 13 17 18 19 20 21 22 23 24 25 26 27 28 29 30 31 32 Part Description Spring Assembly Drum-1 Drum-2 Base Arm Swivel Assembly Hose Assembly Guard Spring Hub Bearing Assembly Ratchet Spring, Dog Axle Nut-1 Clamp-1 Clamp-2 Bolt-1 Washer-1 and Bolt-2 Set Nut-2 Washer-2 Bolt-3 Nut-3 Nut-4 and Lock-1 Set Roller Bracket Assembly Ball Stop Assembly Locking Ring Washer Spacer-1 Retaining Ring Bolt-4 Page 11 of 14 Quantity 1 1 1 1 1 1 1 1 1 2 1 1 8 1 1 2
Part Number 34 37 39 40 42 43 44 45 46 47 Part Description Setscrew-1 Washer Spacer-2 Cover-1 Cover-2 Setscrew-2 Bolt-5 Bolt-6 Washer Spacer-3 Nut-5 and Lock-2 Set Washer Spacer-4 Quantity 1 1 1 1 4 3 1 1 3 3 Replacement Parts For replacement parts and technical questions, please call Customer Service at 1-800-222-5381. Not all product components are available for replacement. The illustrations provided are a convenient reference to the location and position of parts in the assembly sequence.
Limited Warranty Northern Tool and Equipment Company, Inc. ("We'' or "Us'') warrants to the original purchaser only ("You'' or "Your") that the Klutch product purchased will be free from material defects in both materials and workmanship, normal wear and tear excepted, for a period of two years from date of purchase. The foregoing warranty is valid only if the installation and use of the product is strictly in accordance with product instructions.
Distributed by: Northern Tool & Equipment Company, Inc. Burnsville, Minnesota 55306 www.northerntool.