XXXXXXXXXXXX/ Assembly instructions and safety rules •、* • Please read and follow all instructions carefully when installing and using this zipline. • All riders must read and understand the instructions and Safety Rules before riding. G Keep this manual for future reference.
WARNING: ALWAYS FOLLOW THESE SAFETY RULES • This unit should be installed only by Adult. • Adult supervision is required at all times. • This unit contains small parts. Do not allow children under 3 years of age near the parts or the assembly area. • Not recommended for children under 8 years of age. • Only one rider may use the unit at a time. • Do not exceed maximum weight 250lbs(113 kg) • Make sure everything is installed correctly and inspect and double test the line before each use.
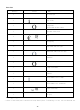
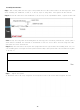
Parts List: Quantity Picture Name 1 1 1 seat with rope i Steel trolly Q spring brake (preinstalled on main cable) 1 1 1 adjustable safety belt € 財 carrying bag 2 sling cable with soft pipe O 1 1 SUS304 main cable with soft pipe turnbuckle Q 1 7 turnbuckle safety backup cable U-clamp with washer 3 1 1 1 1 strap carabiner I wrench 10mm(use for U-clamp) wrench 13mm(use for turnbuckle) ■ M r® 製 ratchet with strap wire grip Choosing the Zipline Course: • Choose a clear
and healthy, with at least a 36" circumference or 12" diameter. If you're unsure about the area you would like to install your zipline, we recommend contacting a professional to evaluate your property and/or help with installation. • Beneath the cable, the course should be grassy, flat, and clear of all obstacles (bushes rocks, debris, hard surfaces, etc.) How High Should I Install My Zipline? • That is depends on the preference and height of the kids using the zipline.
Assembly instructions: Step 1: Take a sling cable with soft pipe to wrap around the tree that will be used as the Starting Point. After fully extending the turnbuckle, attach it to the eye loops of sling cable, then tighten the bolt and nut. Step 2: Attach the other end of the turnbuckle to the eye loop of the zipline(main cable), tighten the bolt and nut.
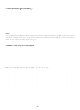
② Take another sling cable with soft pipe to wrap around the finishing point tree, keep a distance under the zipline, tread the hook of the ratchet through the two eye loops of the sling cable. ③ Attach the hook of the strap to the wire grip, then clamp the zipline with the wire grip. FINISH POINT ④ Pull the ratchet handle up and down until the line is tight enough,then relock the zipline with five U-Clamps.
U-clamp installation(wrench 10mm): 1. Wrap the zipline around the finishing tree, then use 2 U-clamps (①②)to lock the cable. Note: a. Al I clamps must be added with washers when used, then lock clamps as shown above: b.When you wrap your zipline K H around the finishing point tree, it should be formed a tear drop shaped wrap around the tree-see illustration below. Do not tighten up tight against the tree! CORRECT cable wrap Tear-drop Shaped 2.Wrap the cut-end back and use three U-clamps (③,④,⑤)to lock.
⑤ Take off the tighten tools(ratchet with strap,wire grip, sling cable on the Finishing Point Step 5: Tune the zipline by tightening the turnbuckle, which will tighten up the line. Tighten line until it K appears,, to be nearly straight. DO NOT OVERTIGHTEN. Install turnbuckle safety backup cable; Note: The safety backup should be installed after all turnbuckle adjustments are finished. It must be removed if future adjustments are required.
Step 6: Install the trolley, using the carabiners connect safety belt with the strap, then connect the swing seat, as shown below. Step 7: Installation completed. Step 8: Launching Platform-Must be stable and not prone to rocking. It should be tall enough to allow your shortest riders to easily reach the trolley.