
Owners manual

Making the air connections
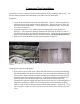
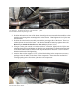
1. Temporarily slip the emergency brake cables out of their support to allow room for
installing the air tank. Position the air tank on top of the mounting bracket with the
fittings facing the driver’s side of the vehicle and the compressor. Do not attach the tank
to the bracket yet (see photo 7).
2. Remove the red rubber plug from the end of the steel braided leader hose on the
compressor and apply Teflon thread tape to the threads on the check valve at the end of
the leader hose.
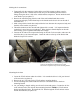
3. Make a loop with the leader hose and position the hose between the compressor body and
the back of the bracket (see photo 8).
4. Thread the leader hose into the tank and tighten with a wrench. It is important that the
connection is snug, but not over tightened. When the brass female adapter on the tank
starts turning, you’ve tightened the leader hose enough.
5. Connect the air tube to the compression fitting on the tank. For best results, make sure the
end of the tube is cut clean and square. Route the tube over the top of the bracket that
holds the Jeep EVAP canister.
Photo 7 – Emergency brake cable support Photo 8 – Air tank positioned on mounting bracket.
Note how the braided steel leader hose is looped
between the compressor body and the mounting bracket.
Mounting the air horn
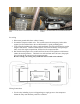
1. Locate the EVAP canister under the vehicle. It is towards the driver’s side, just forward
of the rear axle (see photo 9).
2. Remove the two 5/8” bolts for the EVAP canister mounting bracket.
3. Use the mounting bolts found inside the horn box to attach the horns to the horn
mounting bracket
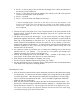
4. Cut your tubing to length, making sure the end is clean and square. Connect the air line
to the solenoid valve, then slip the horn mounting bracket UNDER the EVAP canister
bracket and align the holes. Re-install the 5/8” bolts through the EVAP canister mount
and the horn bracket (see photo 10)