
Owners manual

Compressor/Tank Installation
Included in your kit is a vehicle-specific mounting bracket for the compressor and air tank. The
bracket clamps around the horizontal beam located above the rear differential.
Preparation
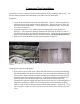
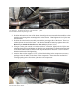
1. Locate the horizontal beam above the rear differential. There is a small wiring harness,
attached to the top of the support with two plastic clips. Remove the clips to allow free
movement of the wiring harness. It is not necessary to salvage the clips – they will not
be re-used (see photo 1).
2. Attach the compressor to the vehicle-specific mounting bracket using the bolts in
Package 2. The compressor should be mounted with the piston on the driver’s side of
the vehicle, facing away from the tank mounting location. Bring the bolts up through the
bottom of the mounting plate and have the nuts on the top. Do not mount the tank yet.
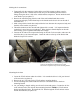
3. Insert two 5” mounting bolts into each rear mount plate (see photo 2).
Photo 1 – Horizontal beam with wiring harness clips
removed
Photo 2 – Rear Mount Plates with bolts inserted
Mounting the compressor/tank bracket
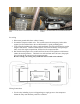
1. Work from the driver’s side of the vehicle and slide all three rear mount plate/mounting
bolt sub-assemblies onto the horizontal beam. The rear mount plates should be towards
the rear of the vehicle, the bolts should be extending over and below the beam, pointing
toward the front of the vehicle (see photo 3). As each sub-assembly is positioned over
the beam, slide it towards the passenger side of the vehicle so that the three sub-
assemblies are spaced at roughly the same intervals as the three sets of mounting holes on
the bracket (see photo 4). Make sure the wiring harness you detached from the beam
earlier is lying on TOP of the bolts and not running under the bolts! Helpful Tip: Using
electrical tape to temporarily hold the bolts on the rear mount plates will make this task
easier.