Model JEEPKIT-1 Bolt-on Air Horn & Compressor Kit for Jeep Wrangler JK IMPORTANT: It is essential that you y and any other operator of this product read and understand the contents of this manual before installing and using this product.
Model JEEPKIT-1 Components: 1 1 1 1 1 1 1 1 1 2.
Package #2 – Jeep Kit bracket and tank hardware Qty 6 5” bolts Qty 6 Nyloc nuts Qty 3 Rear mount plates Qty 4 Nuts, bolts, and washers – (Air tank mounting hardware) Compressor/Tank – General Information Your Jeep Kit comes complete with a model 6250RC, 9% duty cycle compressor and a 2.5 liter air tank. Please follow the installation instructions that follow in order to enjoy the best use of your air horn kit.
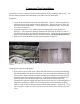
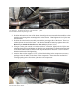
Compressor/Tank Installation Included in your kit is a vehicle-specific mounting bracket for the compressor and air tank. The bracket clamps around the horizontal beam located above the rear differential. Preparation 1. Locate the horizontal beam above the rear differential. There is a small wiring harness, attached to the top of the support with two plastic clips. Remove the clips to allow free movement of the wiring harness.
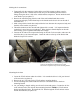
Photo 3 – Slide the rear mount plate/bolt assemblies over the beam. Work from the driver’s side and slide the assemblies towards the passenger’s side Photo 4 – All three rear mount plate/bolt assemblies in place. 2. Position the bracket in front of the beam, then align the rear mount/bolt assemblies so that the bolts pass through the mounting holes in the bracket. Hand tighten the six Nyloc nuts onto the bolts. 3. Position the entire bracket assembly towards the passenger side of the beam.
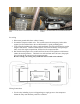
Making the air connections 1. Temporarily slip the emergency brake cables out of their support to allow room for installing the air tank. Position the air tank on top of the mounting bracket with the fittings facing the driver’s side of the vehicle and the compressor. Do not attach the tank to the bracket yet (see photo 7). 2.
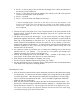
Photo 9 – EVAP canister. Note the two 5/8” mounting bolts Photo 10 – Air horn bracket mounted under EVAP unit bracket Pre-wiring 1. Disconnect ground cable from vehicle’s battery. 2. Ground the compressor black wire. The nut that secures the emergency brake cable support just forward and above the rear differential is a good grounding point. 3. Your wiring kit includes red, yellow, purple and black wires that will need to be run the length of the vehicle.
• • • • Pin 30 – to the 10 gauge red wire that runs the length of the vehicle and attaches to the red wire on the compressor Pin 85 – to the yellow wire runs the length of the vehicle to one side of the pressure switch (it does not matter which terminal)* Pin 86 – to ground Pin 87 – to one end of the fuse holder (cut the loop) * before attaching spade connectors to the ends of the wires that connect to the pressure switch, pass the wires through the opening in the black rubber pressure switch cover.
COMPRESSOR OPERATING INSTRUCTIONS IMPORTANT: The compressor has a maximum working pressure of 120 PSI and is capable of 9% duty cycle. It is designed for use with air horns, air bags and other accessories that utilize the compressed air stored in the tank. Always operate the compressor at or below the MAXIMUM PRESSURE RATING of the compressor. Operation exceeding maximum pressure ratings and or duty cycle will result in damage to air compressor. 1.
Kleinn Model JEEPKIT-1 LIMITED WARRANTY Kleinn Automotive Air Horns warrants this product, when properly installed and under normal conditions of use, to be free from defects in workmanship and materials for a period of one year from provided date of purchase. To receive a replacement or for repairs, return the complete unit to retailer from whom it was purchased along with proof of purchase. Returns should be made within the time period and conditions of the retailer’s policy for exchanges.