
Installation Instructions
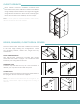


Align the cam locks (included in the cam lock pack
from the shelf kit) into the shelves, making sure the
open ends match up. Firmly press the cam locks into
the holes.
2
Note: Cam locks cannot be removed once installed, ensure
proper installation.
Lower the shelf with installed cam locks onto the
installed cam dowels on the uprights. Once seated,
secure the shelves with a Phillips head screwdriver
by turning the cam lock a half turn in the clockwise
direction.
3
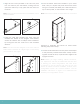
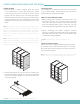
Once all shelves have been installed in your closet
base, verify it is square and plumb. Secure the closet
using an L-bracket (478-5050) into a wall stud and on
top of the top shelf, so the bracket is out of sight.
4
Note: The cam locks are designed to be turned with the
Phillips head screwdriver at a slight angle, to avoid hitting
your knuckles on the upright.
Note: Install one L-bracket per closet base into a wall stud.
Continue to assemble and secure all closet bases
following the previous steps.
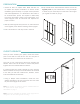
The next closet base will be set into place and clamped
to the previously installed closet base. Clamp the two
together so that the front, top and bottom edges of the
uprights are flush.
5
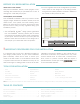
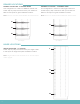
Note: Before you begin installing cabinet connectors,
it is important to note the pre-drilled holes that are used
in building your closet configurations. We have found
it common to use the second hole from the top and
bottom for cabinet connector installation, however, some
configurations require use of these locations. Use the
installation instructions on pages 7-8 to determine hole
locations your configurations will use.
4