
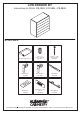
Installation Instructions


1
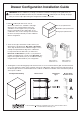
Drawer Configuration Installation Guide
To find all Klëarvue Cabinetry
®
installation instructions and installation videos,
visit www.klearvuecabinetry.com.
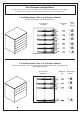
1. Klëarvue Cabinetry® offers three sizes of
drawer kits called “Low”, “Medium” and “High”
drawer kits. The matching drawer fronts are
available in 5 inch heights so they may be put
into the configured into the cabinet box, in any
combination. You can also change them around in
the future, should you decide you want a different
drawer configuration.
A: Low (5”H) Drawer Kit
B: Medium (10”H) Drawer Kit
C: High (15”H) Drawer Kit
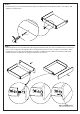
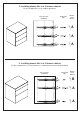
2. There are two types of brackets used to mount your
drawer front to the drawer kit, Bracket A or Bracket B.
These align the drawer fronts at different heights so they
overlap the top and bottom edge of the cabinet box.
If you purchased a low drawer kit, you will receive
Bracket A and Bracket B in your kit. If you purchase a
medium or high drawer kit, you will receive Bracket A. The
pages in this guide will tell you if you should be installing
using Bracket A or Bracket B for your configuration.
A B
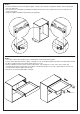
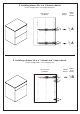
3. The diagrams on the following pages will tell which holes to use to install the drawer glide, and which bracket
to use. Pay attention to which holes are being used on the cabinet box, and also which hole is being used on
the drawer glide. Drawers toward the bottom of a cabinet use different installation holes than drawers placed
at the top of a cabinet.
Configuration Drawing Holes to Use
Drawer Kit
Type
®
A
B
A
Drawer Front
Bracket to Use
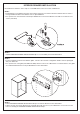
IMPORTANT: Please read before you begin your drawer installation. The pages in this guide show you
how to assemble the different drawer layouts available for Klëarvue Cabinetry®. Look through the pages
until you see the steps representing the configuration needed to assemble.