
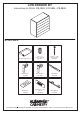
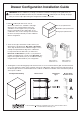
Installation Instructions


5
INTERIOR DRAWER INSTALLATION
Interior drawers follow the same steps as a standard drawer, with some minor modifications.
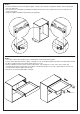
STEP 1:
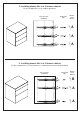
• Install bracket A (478-9804) to the back of the drawer front. Be sure that the tab of the bracket with two holes is
facing toward the bottom of the drawer front, as pictured below.
• Line up the holes on the brackets with the pre-drilled holes on the interior drawer front and secure with the euro
screws (478-9835).
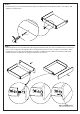
STEP 2:
• Follow STANDARD DRAWER INSTALLATION Steps 2-3 to assemble your interior drawer box.
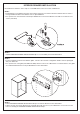
STEP 3:
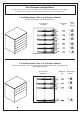
• For the installation location of the drawer glides, reference the “Drawer Configuration Guide” that was packaged
with your drawer kit.
• Line up the holes of the glide (478-9806/478-9807) with the holes in the cabinet box. For interior drawers, the glides
are set back behind the first set of pre-drilled holes in the cabinet box.
STEP 4:
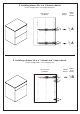
• Follow STANDARD DRAWER INSTALLATION Step 5 to install the drawer into the cabinet box.
• If done correctly, the interior drawer front should be flush with the face of your cabinet box. If not, make sure the
holes are lined up per INTERIOR DRAWER INSTALLATION Step 3.