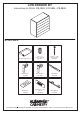
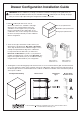
LOW DRAWER KIT Instructions for SKUs: 478-3800, 478-3804, 478-3808 KIT INCLUDES: Shallow drawer box x 1 1/4" x 1/2" Euro screw x10 478-9835 3/16" x 1-3/16" Long screw x1 478-9832 Bracket A x2 478-9804 Bracket B x2 478-9805 Left glide x1 478-9806 Bumper x1 478-9833 Drawer box cover cap x2 478-9830 Right glide x1 478-9807 To find all Klëarvue Cabinetry® installation instructions and installation videos, visit www.klearvuecabinetry.com.
Important: Please read before you begin your drawer installation. Take note of your cabinet configuration. • If your configuration features a low drawer kit in one of the locations shaded below, the drawer front will be attached using bracket B. • If your configuration features a low drawer kit in the location shaded below, the drawer front will be attached using bracket A. • All interior drawers will be attached using bracket A regardless of drawer location. See page 5 for interior drawer installation.
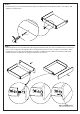
STEP 2: • Install the long screw (478-9832) through the back of the drawer box into the drawer bottom. This helps to add stability to your drawer kit. 478-9832 STEP 3: • Attach the drawer front to the drawer box by lining up the brackets with the slots in the drawer box. Push until you hear a “click” on both the left and right side.
STEP 4: • For the installation location of the drawer glides, reference the “Drawer Configuration Guide” that was packaged with your drawer kit. • Line up the holes of the glides (478-9806/478-9807) with the holes in the cabinet box and secure with the euro screws (478-9835). • The drawer glides should be marked left (L) and right (R). STEP 5: • To install the drawer box, begin by fully extending both left and right drawer glides.
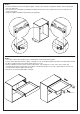
INTERIOR DRAWER INSTALLATION Interior drawers follow the same steps as a standard drawer, with some minor modifications. STEP 1: • Install bracket A (478-9804) to the back of the drawer front. Be sure that the tab of the bracket with two holes is facing toward the bottom of the drawer front, as pictured below. • Line up the holes on the brackets with the pre-drilled holes on the interior drawer front and secure with the euro screws (478-9835).
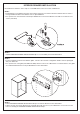
DRAWER ADJUSTMENT AND REMOVAL ADJUSTMENT: A1) Turn the metal adjustment screw to adjust the drawer front up and down. A2) If the drawer is not adjusting in position, turn the right screw to unlock the hinge and retry step A1. B) Adjusting your drawer fronts to the left and right can be a little tricky. To make adjustments, you will adjust the white adjustment screw inward and outward of your drawer kit by using a Phillips screwdriver.
Drawer Configuration Installation Guide IMPORTANT: Please read before you begin your drawer installation. The pages in this guide show you how to assemble the different drawer layouts available for Klëarvue Cabinetry®. Look through the pages until you see the steps representing the configuration needed to assemble. 1. Klëarvue Cabinetry® offers three sizes of drawer kits called “Low”, “Medium” and “High” drawer kits.
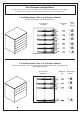
For all drawer configurations: Line up the punch holes in the drawer glides with the specified pre-drilled holes in the cabinet, as shown in the illustrations. Fasten the glides to the box with the provided screws. 1. Installing drawer kits in a 6-drawer cabinet. For this configuration, use all low drawer kits. Holes Used for Installation Drawer Front Bracket Drawer Kit Type B B B B B A 2. Installing drawer kits in a 4-drawer cabinet.
3. Installing drawer kits in a 3-drawer cabinet. For this configuration, use all medium drawer kits. Holes Used for Installation Drawer Kit Type Drawer Front Bracket A A A 4. Installing drawer kits in a 3-drawer cabinet. For this configuration, use 1 low drawer kit, 1 medium drawer kit and 1 high drawer kit.
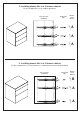
5. Installing drawer kits in a 2-drawer cabinet. For this configuration, use all high drawer kits. Holes Used for Installation Drawer Kit Type Drawer Front Bracket A A 6. Installing a drawer kit in a 1-drawer and 1-door cabinet. For this configuration, use 1 low drawer kit.
7. Installing a drawer kit in a 3-drawer and 1-door cabinet. For this configuration, use 3 low drawer kits.
8. Installing a drawer kit in a 2-drawer and 1-door cabinet. For this configuration, use 2 low drawer kits.
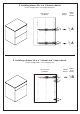
For all drawer configurations with inner drawers: Line up the punch holes in the drawer glides with the specified pre-drilled holes in the cabinet. The glides for the inner drawers are set back behind the first set of punch holes as shown in the illustration. Fasten the glides to the box with the provided screws. 9. Installing drawer kits in a 2-drawer unit with 2 inner drawers. For this configuration, use 2 high drawer kits and 2 low drawer kits (for the inner drawers).
11. Installing drawer kits in a 3-drawer unit with 1 inner drawer. For this configuration, use 2 medium drawer kits and 2 low drawer kits (1 for the top exterior drawer and 1 for the inner drawer). 1 inner drawer front will be required to complete the inner drawer.
12. Installing drawer kits in a tall cabinet For this configuration, use 5 low drawer kits. 5 inner drawer fronts will be required to complete the inner drawers.
13. Installing drawer kits in a tall cabinet. For this configuration, use 4 low drawer kits. 4 inner drawer fronts will be required to complete the inner drawers.