
Assembly Instructions


9
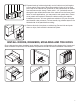
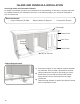
Attachsecond3"llerusingLargeL-Brackets.Thisisinstalledatthe
endoftherst3"ller,perpendiculartothecabinetbox.Remove
clampsoncesiliconehasdried.
3)
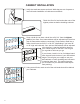
AdditionalItemforInstallation
Determineorientationofcabinet(leftorrightopening)andusea
rubbermallettoattachedincludedfeetintothepre-drilledholes.
Adjustcabinetlegssothetopofthecabinetboxislevelwiththe
34-3/4"chalkline.Topositionblindcornerproperly,have3"ofspace
betweenwallandthelengthofcabinet(bringing39"cabinetto42").
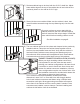
Installcabinettowall,makingsurecabinetislevel.Install2cabinet
screwsthroughthefasteningstrip.
Oncethecornercabinetisinstalled,attachrst3"ller.Applysilicone
tothebackofthellerandclampintoplace,3/4"backfromthe
openingofthecabinet.Wipedownanyexcesssilicone.
1)
2)
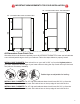
BLIND CORNER INSTALLATION
Materials Needed:
• Silicone
• (2)3”x30”FrontMatchFillers
• Clamps
• RubberMallet
• LargeL-Brackets